Lower Seat Frame Assembly Overview
Lower Seat Frame Assembly Overview
• On the front seat, the upper and lower seat pan frames can be separated and replaced individually.
• When removing the seat pan, make sure the bushings in the bearing points (upper and lower frame threaded connection) are not damaged. These bushing cannot be replaced with workshop materials.
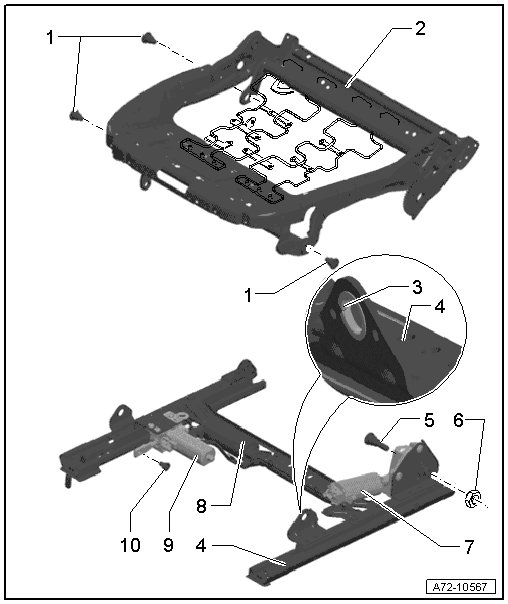
1 Screw
Self-locking
• 28 Nm
• Quantity: 3
• Replace
• Threaded holes for screws must always be cleaned (for example, with thread cutter)
2 Seat Pan Upper Frame
• Removing and installing, refer to => [ Lower Seat Frame ] Power Front Memory Seats
3 Bushing
• Inserted in all bracket locations
• Cannot be replaced with workshop materials
• If the bushings are damaged, assembly part must be replaced.
4 Seat Pan Lower Frame
• Removing and installing, refer to => [ Lower Seat Frame ] Power Front Memory Seats
5 Bolt
• 28 Nm
• Replace
• Threaded holes for screws must always be cleaned (for example, with thread cutter)
6 Nut
7 Driver Seat Height Adjustment Motor (V245) or Front Passenger's Seat Height Adjustment Motor (V246)
• Removing and installing, refer to => [ Driver and Front Passenger Height Adjustment Motors ] Power Front Memory Seats
8 Seat Forward/Back Adjustment Motor (V288)
• Cannot be removed and installed with workshop materials
• Stays on seat pan lower frame => [ (Item 4) Seat Pan Lower Frame ]
9 Driver Seat Angle Adjustment Motor (V243) or Front Passenger Seat Angle Adjustment Motor (V244)
• Removing and installing, refer to => [ Front Seat Angle Adjustment Motors ] Power Front Memory Seats
10 Screw
Self-locking
• 20 Nm
• Replace
• Threaded holes for screws must always be cleaned (for example, with thread cutter)