Windshield Assembly Overview
Windshield Assembly Overview
• Calibrate the camera if the windshield was replaced on a vehicle with lane assist.
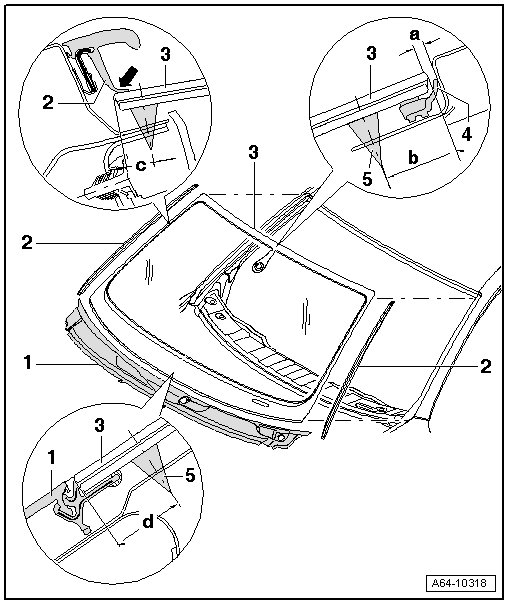
1 - Plenum chamber cover
• For new replacement windows, a protective piping is located in the retaining strip, which must be pulled off before installing plenum chamber cover.
• Press into fastening strip only after window adhesive curing time has elapsed.
2 - Drip rail
• Press into clips to stop only after the minimum curing time for the adhesive.
• When pressing in drip rail, make sure sealing lip lies flat against windshield - arrow -and does not slip behind edge of windshield.
3 - Windshield
• Removing and installing, refer to => [ Windshield, Removing and Installing ] Windshield, Removing and Installing.
• Distance to roof dimension - a - = 2 mm" +.5mm
• Align distance at sides.
4 - Cover profile
• Replace, refer to => [ Cover Profile, Replacing ] Cover Profile, Replacing.
5 - Adhesive sealing material
• Observe curing times.
• Note varying spacing dimensions to window edge:
• Dimension - b - = 19 mm±2mm
• Dimension - c - = 8 mm±2mm
• Dimension - d - = 19mm±2mm
Removing Protective Piping for Grip Channel
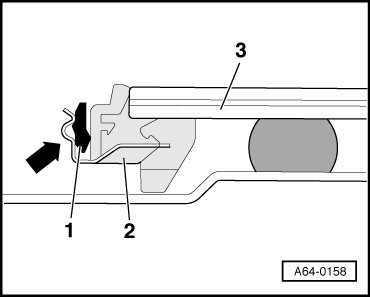
- Pull off protective piping from grip channel only after installing window.
- Before installing plenum chamber cover, protective piping - 1 - must be pulled out of grip channel - 2 - of windshield - 3 -.