Generator
Generator
Observe notes on contact corrosion. Refer to => [ Contact Corrosion ] Contact Corrosion.
Special tools, testers and auxiliary items required
• Hose Clamps Up to 25 mm Dia. (3094)
• Hose Clip Pliers (VAS 6340)
• Hose Clip Pliers (VAS 6362)
Removing
- With ignition switched off, disconnect battery Ground (GND) wire. Refer to => [ Battery, Disconnecting and Connecting ] Battery, Disconnecting and Connecting.
- Remove quick-release fasteners - 1 - and - 2 -.
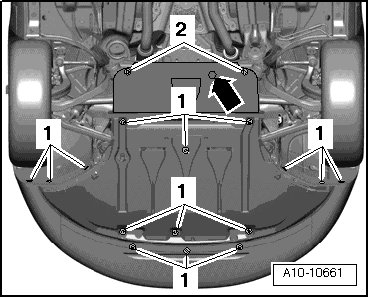
- Remove pin of expanding clip - arrow - and remove noise insulation.
- With air suspension: remove the bracket and air supply assembly.
- Remove electrical harness connector - 2 - from bracket and disconnect it.
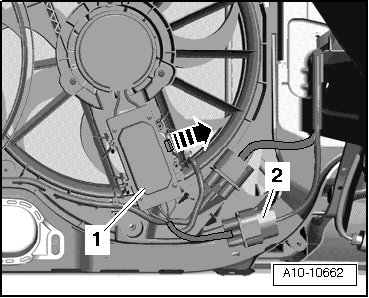
- Release clip - arrow - and lay coolant fan control module (J293) - 1 - aside.
CAUTION!
Risk of destroying if the running direction of a used ribbed belt is reversed.
• Before removing ribbed belt, marking running direction with chalk or a felt-tip pen for reinstallation.
- Pivot tensioner in direction of - arrow - to release tension on ribbed belt.
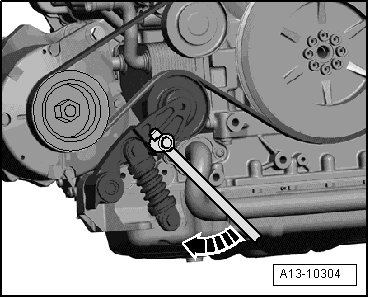
- Remove ribbed belt and release tensioner.
- Remove bolts - arrows -.
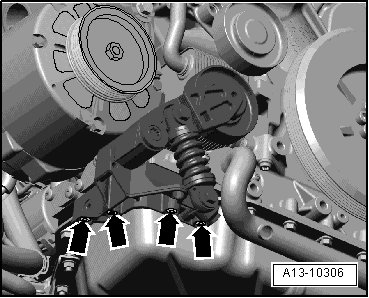
- Remove tensioner for ribbed belt from upper section of oil pan.
- Clamp coolant hoses - 2 - and - 3 - using (3094).
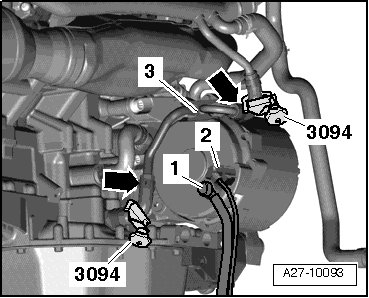
• Place a rag under separating point to catch escaping coolant.
- Disconnect coolant hoses - arrows - from coolant pipes.
- Disconnect electrical harness connector - 3 - at generator.
- Remove terminal 30/B+ - 1 -.
- Remove the bolts - arrows - and remove generator.
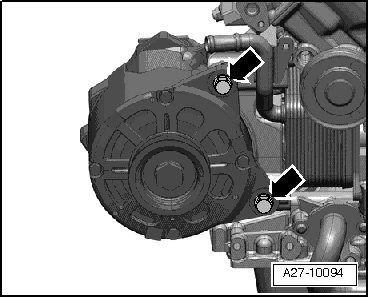
• If generator is stuck in its bracket, screw in mounting bolts again except for 2 rotations.
• Carefully strike on bolt heads using flat side of hammer - doing this loosens sleeves of generator mount.
Installing
Install in reverse order of removal, observing the following:
• Secure all hose connections using standard hose clamps.
- Slightly drive back sleeves for retaining bolts in order for easier installation of generator.
• Tight sleeves for generator mount must be made smooth-running, otherwise clamping force of sleeve is too little despite correct torque.
- Place ribbed belt - 2 - over belt pulleys in the specified sequence.
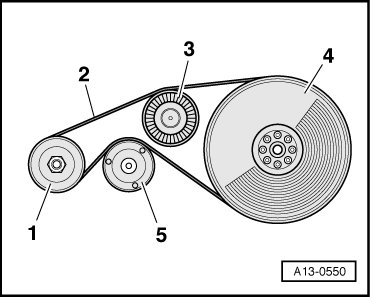
1 Generator
3 Idler pulley
4 Vibration damper
5 Tension roller
• When installing ribbed belt, be sure that it is seated correctly on belt pulleys.
- Install ribbed belt.
- With air suspension: install the bracket and air supply assembly.
- Connect battery. Required actions => [ Vehicles with : ] Battery, Disconnecting and Connecting.
- Fill coolant.
- Start engine and check belt routing.
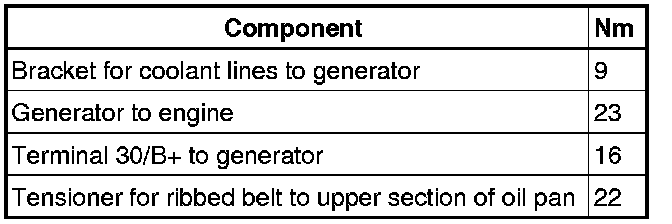
Tightening Specifications