EGR With EGR Cooling System Assembly Overview
EGR with EGR Cooling System Assembly Overview
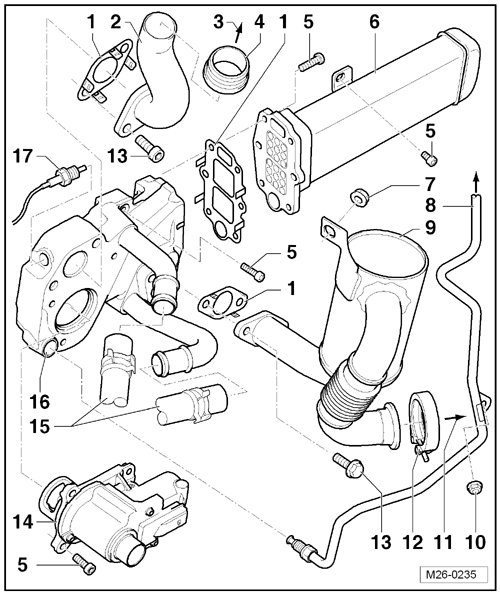
1 Gasket
• Replace
• Note installation position
2 Connecting Pipe
• To remove and installing, also loosen the connections - 33 - => [ Connecting Piece ] Turbocharger Assembly Overview on the turbocharger
3 To the Connection on the Turbocharger
• - 33 - => [ Connecting Piece ] Turbocharger Assembly Overview
4 Seal
• Replace if damaged
5 Bolt
• 8 Nm
6 Radiator
• For exhaust gas recirculation system
• Removing and installing, refer to => [ Housing with EGR Cooler ] Housing With EGR Cooler
7 Nut
• 23 Nm
• Installed on the stud bolt - 17 - => [ Hex Stud ] Turbocharger Assembly Overview on the turbocharger
8 Control Pipe
• 23 Nm
• Do not change the angles of the control line
• To exhaust pressure sensor 1 (G450)
• Install without tension
9 Filter
• For exhaust gas recirculation system
• Removing and installing, refer to => [ Filter ] Filter
10 Nut
• 23 Nm
11 To the Particulate Filter
12 Clamp
• 3.5 Nm
• Replace
• Note installation position, refer to => [ Clamps, Installed Position on Exhaust System ] Clamps, Installed Position on Exhaust System
13 Bolt
• 23 Nm
14 Exhaust Gas Recirculation Motor 2 (V339)
• Removing and installing, refer to => [ EGR Motor 2 ] EGR Motor 2
• Mark the installation position before removing
• Always clean the fitting area on the valve and housing and lubricate lightly if necessary.
15 Coolant Hose
• Check for secure seat
• Coolant hose connection diagram, refer to => [ Connection Diagram, Coolant Hoses ] [1][2]Cooling System
16 Housing
• For exhaust gas recirculation system
• Removing and installing, refer to => [ Housing with EGR Cooler ] Housing With EGR Cooler
17 EGR Temperature Sensor (G98)
• 20 Nm
• Removing and installing, refer to => [ EGR Temperature Sensor ] Service and Repair
• Cut out the gasket and replace if it is damaged or leaks
• Follow the tightening specification