A/C Compressor Drive Unit Overview
A/C Compressor Drive Unit Overview
• Due to the installation position of the A/C compressor, the drive unit can only be checked after the subframe and the left engine mount have been removed. Refer to => [ A/C Compressor ] A/C Compressor.
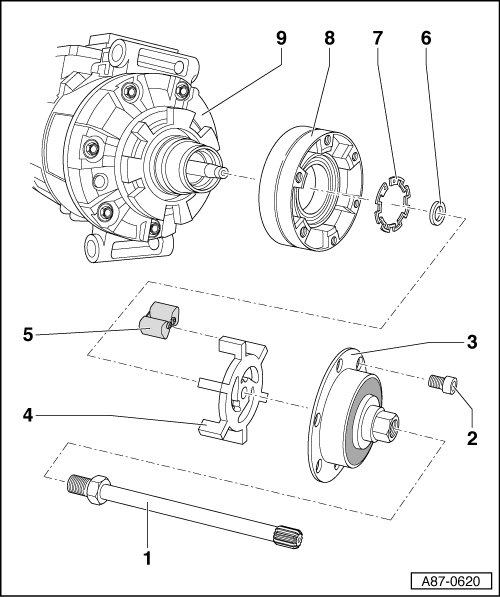
1 A/C Compressor Input Shaft
• 60 Nm
• There must be no play in the threaded connection seated in the engine drive wheel splines.
• Grease the splines to the engine drive wheel with grease (G 000 100). Refer to Electronic Parts Catalog (ETKA).
• Loosening and tightening, refer to => [ A/C Compressor Input Shaft, Loosening and Tightening ] A/C Compressor Input Shaft, Loosening and Tightening.
• Removing and installing, refer to => [ A/C Compressor Input Shaft ] A/C Compressor Input Shaft.
2 Hex Socket Head Bolt
• 10 Nm
3 Drive Plate
• The overload protection takes over when the torque is excessive (for example, if the A/C compressor runs with resistance) and the drive shaft runs freely without driving the A/C compressor.
• Check the run-out. Refer to => [ A/C Compressor Drive Plate with Overload Protection, Checking Run-Out and Adjusting ] A/C Compressor Drive Plate With Overload Protection, Checking Run-Out and Adjusting.
• Removing and installing, refer to => [ Drive Plate with Overload Protection ] Drive Plate With Overload Protection.
4 Drive Plate
• 30 Nm
• Attached to the A/C compressor input shaft.
• The overload protection takes over when the torque is excessive (for example, if the A/C compressor runs with resistance) and the drive shaft runs freely without driving the A/C compressor.
• Removing and installing, refer to => [ A/C Compressor Drive Plate ] A/C Compressor Drive Plate.
5 Rubber Element
• Decouples the drive unit and dampens vibrations and noises.
• Install on correct side. Refer to => [ A/C Compressor Drive Plate ] A/C Compressor Drive Plate.
6 Spacer
• The original spacer must be installed.
• Dimension: 17.5 x 10 x 3 mm
7 Circlip
• Replace
• Install on the proper side - the Flat side faces A/C compressor.
8 Drive Plate
• With roller bearing
• Removing and installing, refer to => [ Drive Plate with Anti-Friction Bearing ] Drive Plate With Anti-Friction Bearing.
• Clean the A/C compressor flange before installing the drive plate.
9 A/C Compressor