Fuel Pressure
1. Reduce the internal pressure of the fuel pipes and hoses.2. Remove the fuel pressure regulator at the fuel rail side.
CAUTION: Cover the fuel pressure regulator with a shop towel to prevent splash of fuel that could be caused by some residual pressure in the fuel pipe line.
3. Install the tool for measuring the fuel pressure.
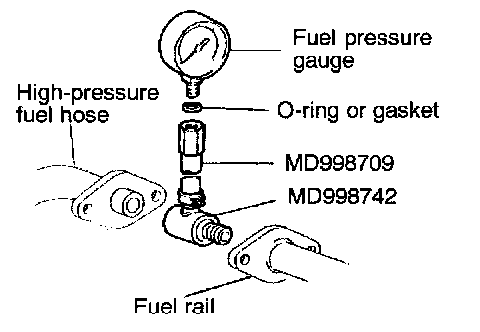
1. Remove the union joint and bolt from the special tool MD998709 (adapter hose) and instead attach the special tool MD998742 (hose adapter) to the hose adapter.
2. Place a suitable O-ring or gasket on the assembled special tools MD998709 and MD998742 and install the fuel pressure gauge.
3. Install the assembled tool for measuring the fuel pressure between the fuel rail and the high-pressure fuel hose.
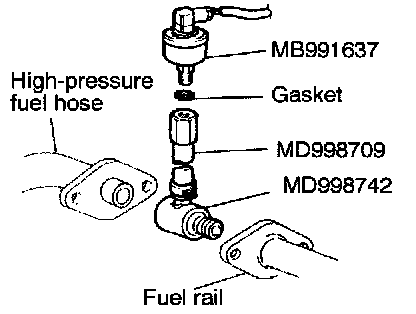
1. Remove the union joint and boll from the special tool MD998709 (adapter hose) and instead attach the special tool MD998742 (hose adapter) to the hose adapter.
2. Place a gasket over special tool MB991637 (fuel pressure gauge) and install this tool in the assembled special tools MD998709 and MD998742.
3. Install the assembled tool for measuring the fuel pressure between the fuel rail and the high-pressure fuel hose.
4. Connect the scan tool to the data link connector.
5. Turn the ignition switch to ON. (But do not start the engine.)
6. Use the scan tool to operate the fuel pump. Check that there are no fuel leaks from any parts.
7. Finish the actuator test or turn the ignition switch to OFF.
8. Start the engine and let it idle.
9. Measure the fuel pressure during idling.
Standard value: Approx. 270 kPa (38 psi) at curb idle.
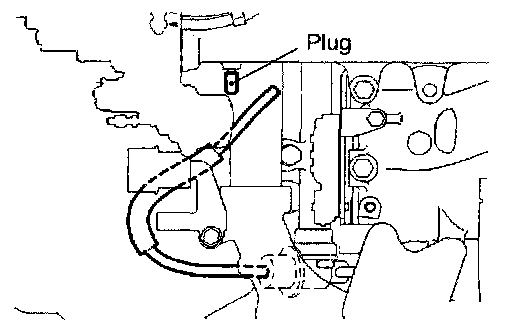
10. Disconnect the vacuum hose (blue stripe) from the air intake fitting manifold and then plug the nipple. Measure the fuel pressure in this condition.
Standard value: 330 - 350 kPa (47 - 50 psi) at curb idle speed
11. Check that the fuel pressure during idling does not decrease even after the engine is raced a few times.
12. Use a finger to gently press the fuel return hose while repeatedly racing the engine, and check that there is fuel pressure in the return hose also.
NOTE: There will be no fuel pressure in the return hose if there is insufficient fuel flow.
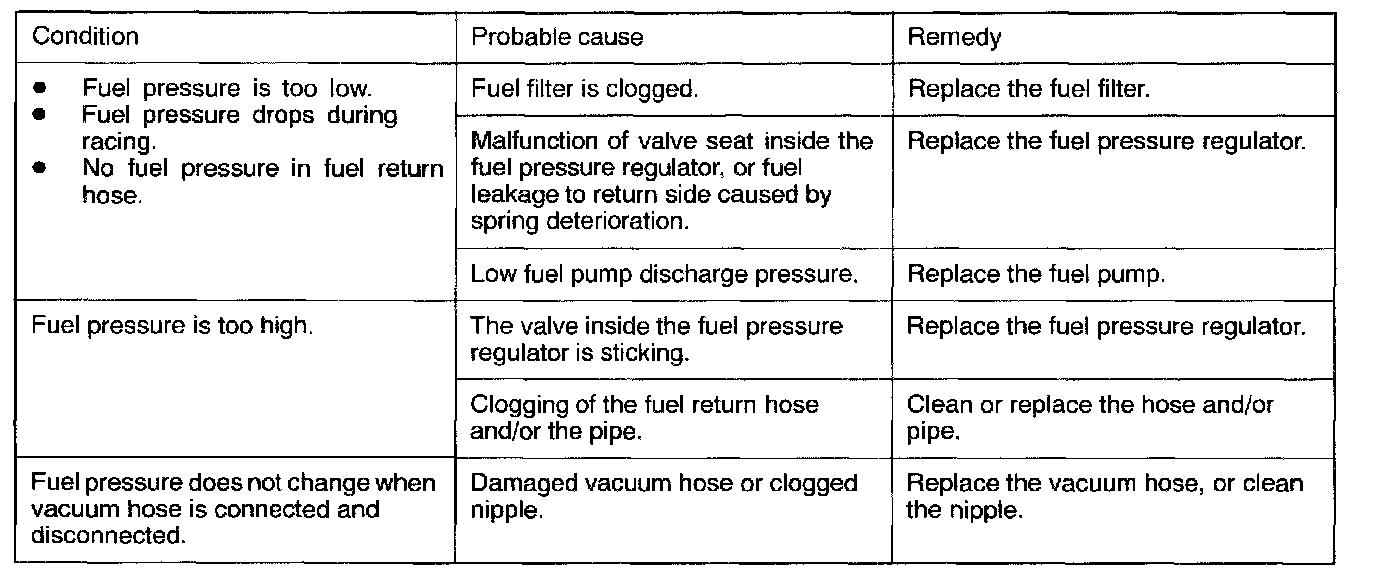
13. If the fuel pressure measured in steps (6) to (9) is outside the standard value range, check for the probable cause by referring to the following table, and then make the appropriate repair.
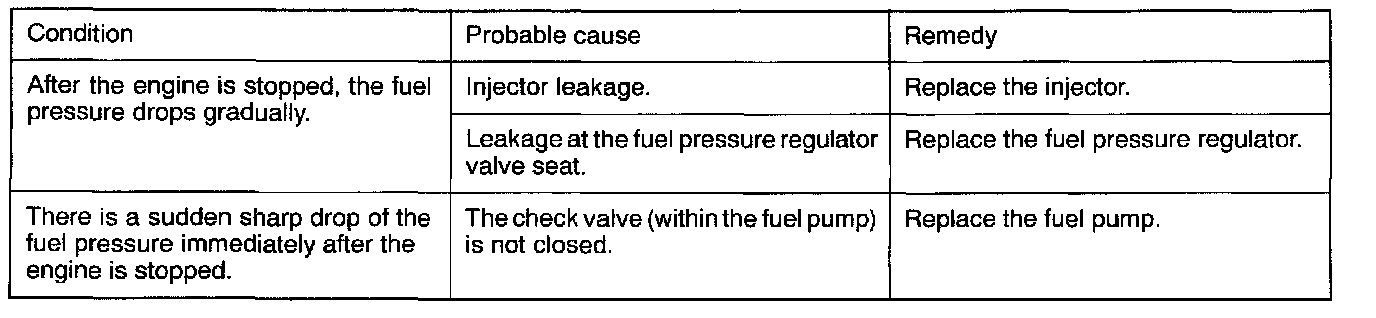
14. Stop the engine and check for a change of the value indicated by the fuel pressure gage. The condition is normal if there is no decrease in the indicated value within two minutes. If there is a decrease in the indicated value, monitor the speed of the decrease, and, referring to the following table, determine the cause of the problem and make the appropriate repair.
15. Reduce the internal pressure of the fuel pipes and hose. (Refer to On-vehicle Service.)
16. Disconnect the fuel pressure gage and the special tool from the fuel rail.
CAUTION: Because there will be some residual pressure in the fuel pipe line, use a shop towel to cover so that fuel doesn't splatter.
17. Replace the O-ring at the end of the high-pressure fuel hose with a new one.
18. After connecting the high-pressure fuel hose to the fuel rail, tighten the installation bolt to the specified torque.
Tightening torque: 5 N.m (3.6 ft.lbs)
19. Check that there is no fuel leakage.
1. Drive the fuel pump using scan tool (MUT-II).
2. Check the fuel line for leaks, repair as needed.
3. Stop the fuel pump.
4. Remove the scan tool (MUT-II).