Inspection Procedure L-2
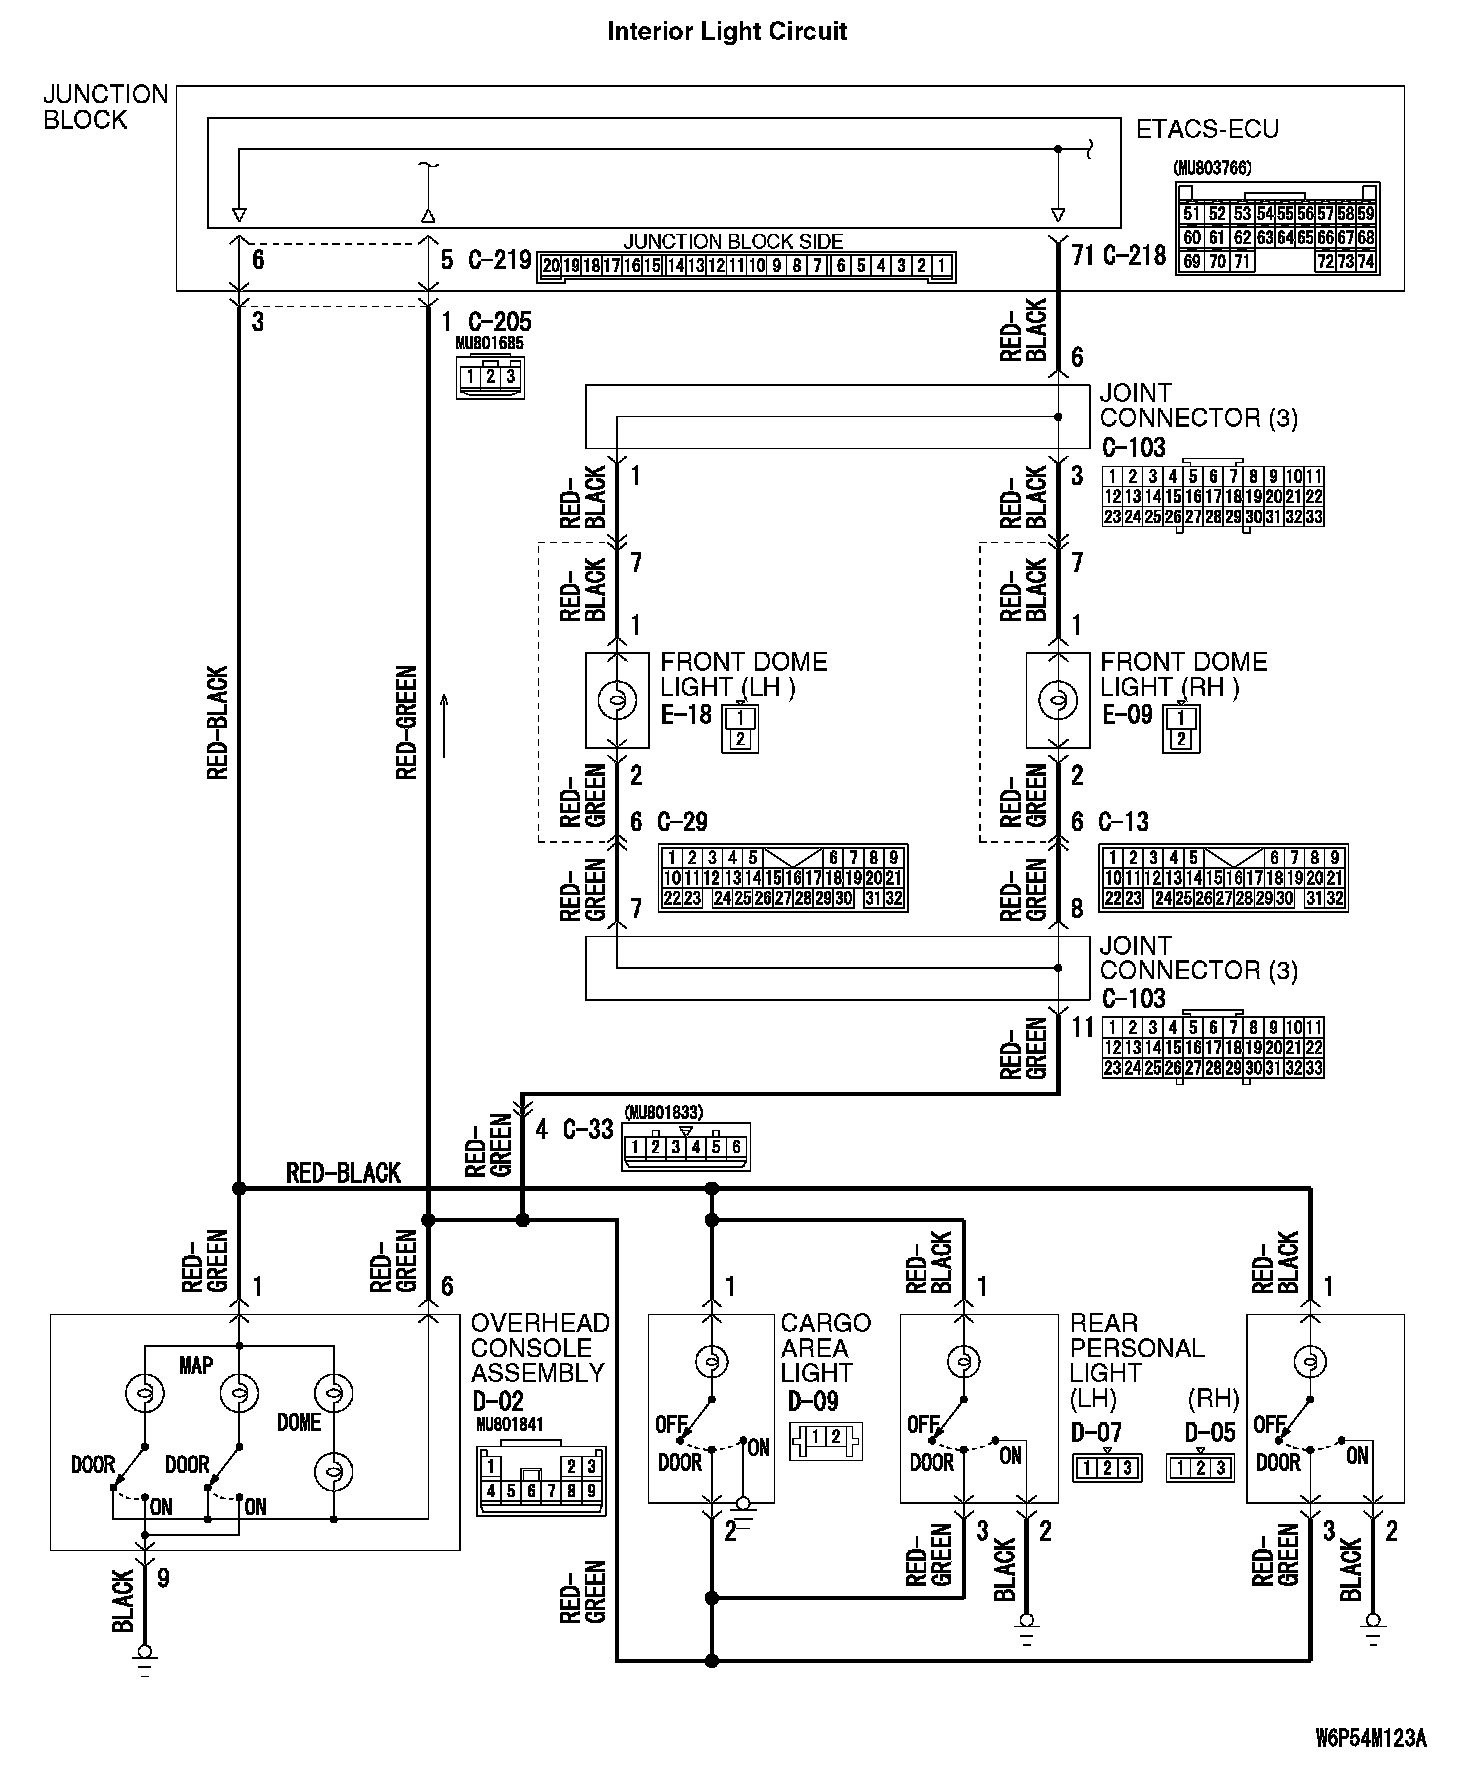
INSPECTION PROCEDURE L-2: Interior Light: The dome lights, map lights, rear personal lights, cargo area light or front door lights do not illuminate or go out normally.Interior Light Circuit Part 1:
Interior Light Circuit Part 2:
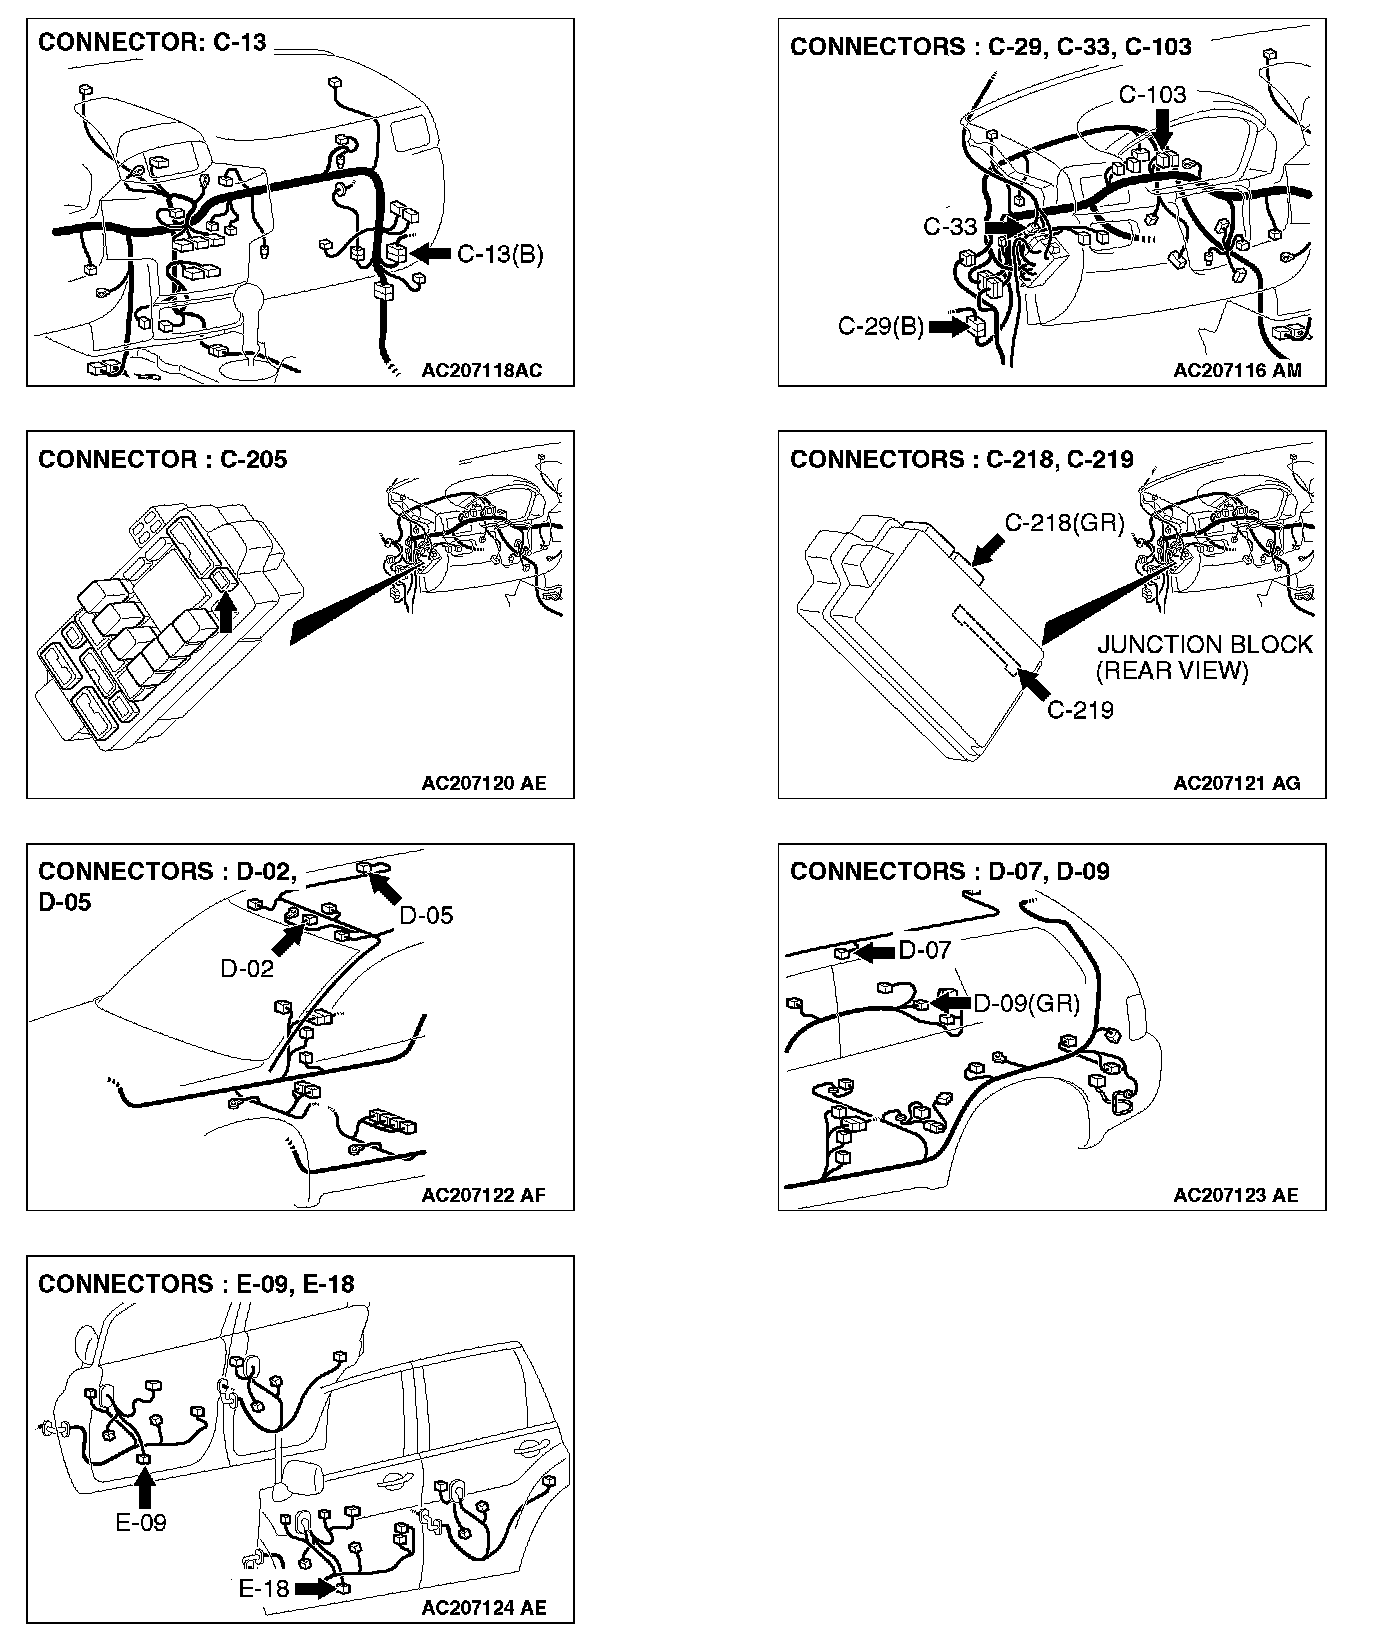
CIRCUIT OPERATION
The ETACS-ECU operates the dome light according to the following signals:
- Ignition switch (IG1): ON or OFF
- Key reminder switch: ON or OFF
- Front door switch: ON or OFF
- All door switches: ON or OFF
- Driver's door lock actuator switch: LOCK or UNLOCK
TECHNICAL DESCRIPTION (COMMENT)
Is the dome light does not flash normally, a burned-out dome light bulb, the input circuits from the switches described in "CIRCUIT OPERATION", the power supply line to the switches or the ETACS-ECU may be defective.
TROUBLESHOOTING HINTS
- The map light bulb may be defective
- The dome light bulb may be defective
- The cargo area light bulb may be defective
- The rear personal light bulb may be defective
- The wiring harness or connectors may have loose, corroded, or damaged terminals, or terminals pushed back in the connector
- The ETACS-ECU may be defective
DIAGNOSIS
Required Special Tools:
- MB991223: Harness Set
- MB992006: Extra Fine Probe
- MB991958: Scan Tool (M.U.T.-III Sub Assembly)
- MB991824: V.C.I.
- MB991827: M.U.T.-III USB Cable
- MB991910: M.U.T.-III Main Harness A
STEP 1. Check which of the dome lights, map lights, rear personal lights, cargo area light or front door lights do not illuminate normally.
Q: Which of the dome lights, map lights, rear personal lights, cargo area light or front door lights fail to illuminate normally?
Dome lights, map lights, rear personal lights and cargo area light: Go to Step 2.
Dome lights and map lights: Go to Step 4.
Rear personal lights and cargo area light: Go to Step 6.
Dome lights: Go to Step 7.
Map lights: Go to Step 8.
Rear personal light (LH) and cargo area light: Go to Step 14.
Rear personal light (LH): Go to Step 15.
Rear personal light (RH): Go to Step 22.
Cargo area light: Go to Step 29.
Front door lights: Go to Step 34.
Front door light (LH): Go to Step 37.
Front door light (RH): Go to Step 40.
Rear personal lights, cargo area light and front door lights: Go to Step 43.
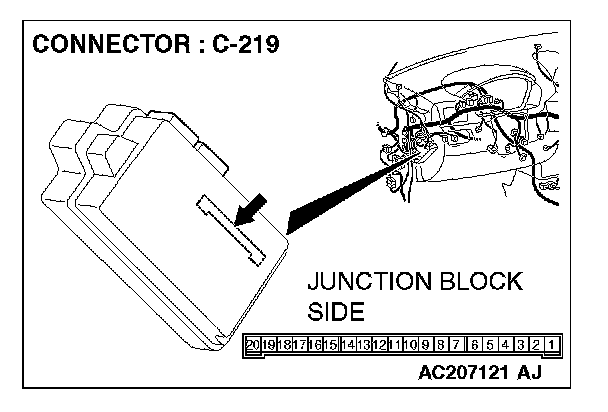
STEP 2. Check ETACS-ECU connector C-219 for loose, corroded or damaged terminals, or terminals pushed back in the connector.
Q: Is ETACS-ECU connector C-219 in good condition?
YES: Go to Step 3.
NO: Repair or replace the damaged component(s). Refer to Harness Connector Inspection. Verify that the dome lights, map lights, rear personal lights and cargo area light illuminates normally.
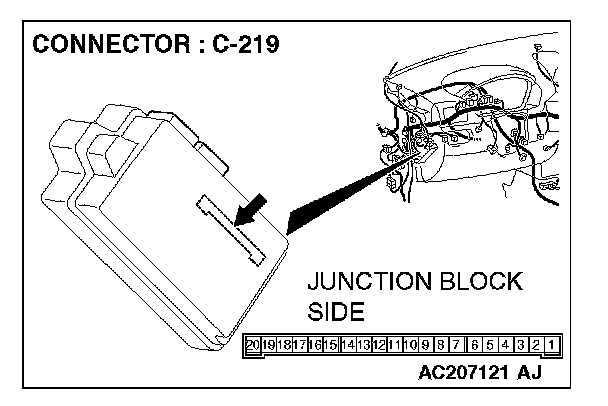
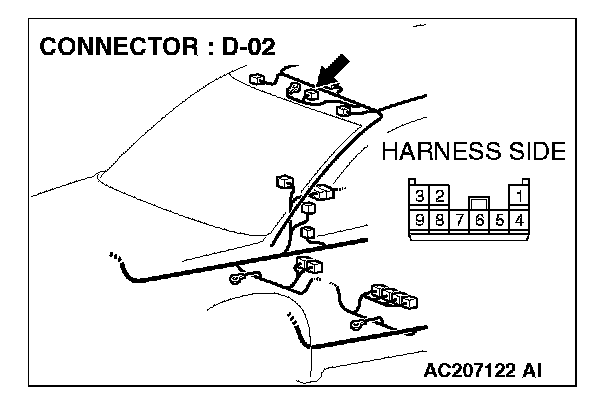
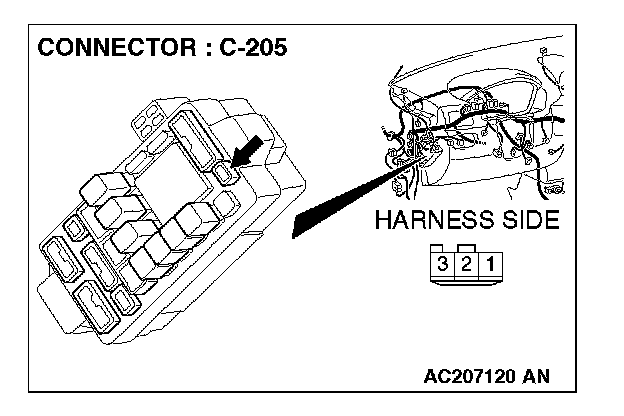
STEP 3. Check the wiring harness between overhead console assembly connector D-02 (terminal 1) and ETACS-ECU connector C-219 (terminal 6).
NOTE: Also check junction block connector C-205 for loose, corroded, or damaged terminals, or terminals pushed back in the connector. If junction block connector C-205 is damaged, repair or replace the damaged component(s) as described in Harness Connector Inspection.
Q: Is the wiring harness between overhead console assembly connector D-02 (terminal 1) and ETACS-ECU connector C-219 (terminal 6) in good condition?
YES: No action is necessary and testing is complete.
NO: The wiring harness may be damaged or the connector(s) may have loose, corroded or damaged terminals, or terminals pushed back in the connector. Repair the wiring harness as necessary. Verify that the dome lights, map lights, rear personal lights and cargo area light illuminates normally.
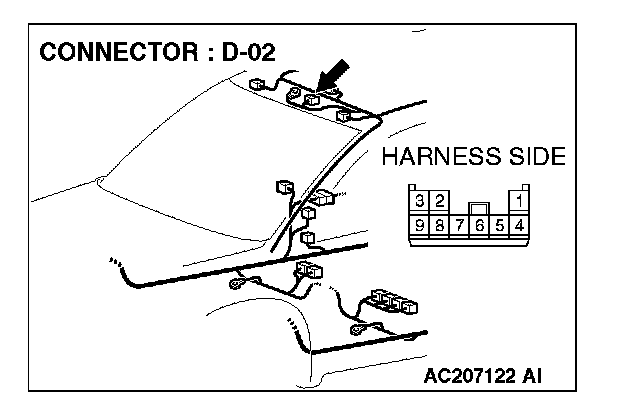
STEP 4. Check overhead console assembly connector D-02 for loose, corroded or damaged terminals, or terminals pushed back in the connector.
Q: Is overhead console assembly connector D-02 in good condition?
YES: Go to Step 5.
NO: Repair or replace the damaged component(s). Refer to Harness Connector Inspection. Verify that the dome lights and map lights illuminates normally.
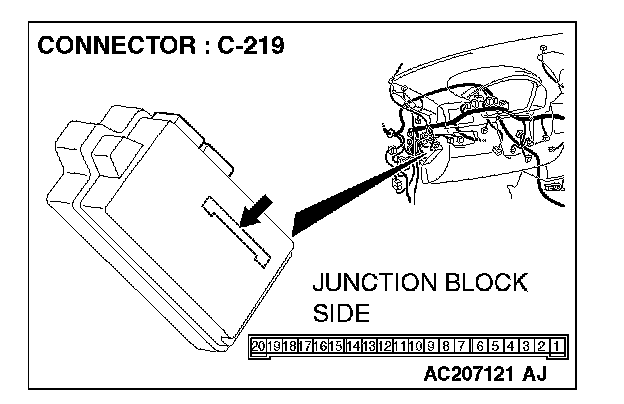
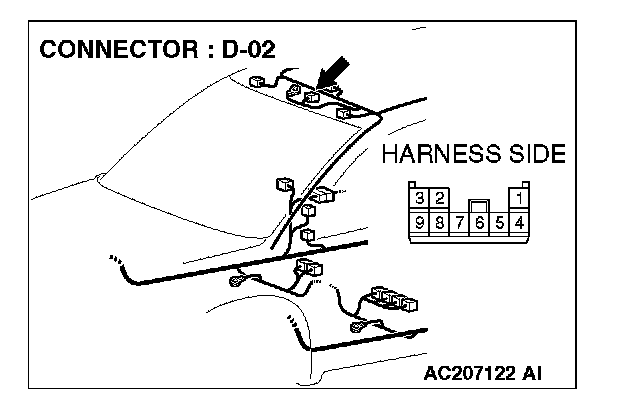
STEP 5. Check the wiring harness between overhead console assembly connector D-02 (terminals 1 and 6) and ETACS-ECU connector C-219 (terminals 6 and 5).
Q: Is the wiring harness between overhead console assembly connector D-02 (terminals 1 and 6) and ETACS-ECU connector C-219 (terminals 6 and 5) in good condition?
YES: No action is necessary and testing is complete.
NO: The wiring harness may be damaged or the connector(s) may have loose, corroded or damaged terminals, or terminals pushed back in the connector. Repair the wiring harness as necessary. Verify that the dome lights and map lights illuminates normally.
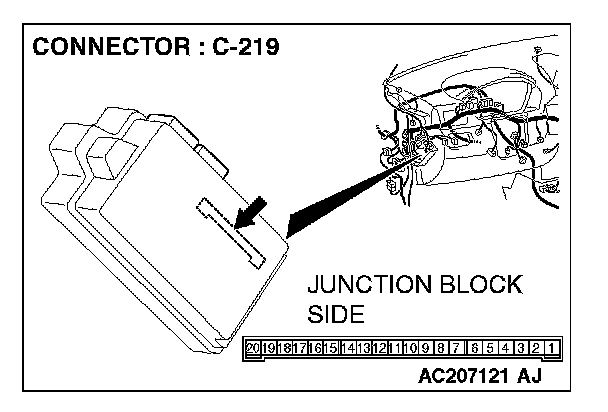
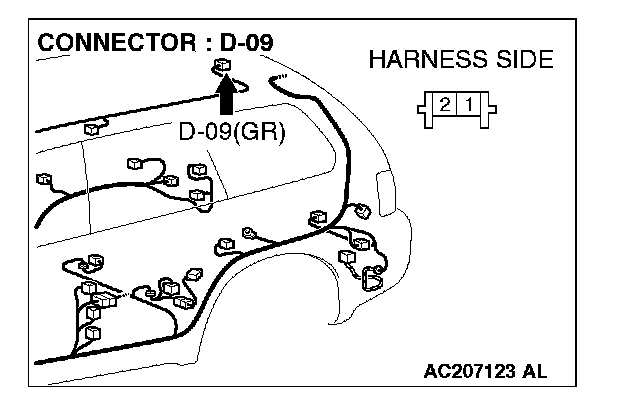
STEP 6. Check the wiring harness between cargo area light connector D-09 (terminals 1 and 2) and ETACS-ECU connector C-219 (terminals 6 and 5).
Q: Is the wiring harness between cargo area light connector D-09 (terminals 1 and 2) and ETACS-ECU connector C-219 (terminals 6 and 5) in good condition?
YES: No action is necessary and testing is complete.
NO: The wiring harness may be damaged or the connector(s) may have loose, corroded or damaged terminals, or terminals pushed back in the connector. Repair the wiring harness as necessary. Verify that the rear personal lights and cargo area light illuminates normally.
STEP 7. Check the dome light bulb.
Q: Is the dome light bulb in good condition?
YES: Replace the overhead console assembly. Verify that the dome light illuminates normally.
NO: Replace the front dome light bulb. Verify that the dome light illuminates normally.
STEP 8. Check whether the map light illuminates.
When the map light switch is turned to the "ON" position, check that the map light illuminates.
Q: Does the map light illuminate?
Both of the map lights illuminate.: Replace the overhead console assembly. Verify that the map light illuminates normally.
Only one light illuminates.: Go to Step 9.
Neither of the map lights illuminate.: Got to Step 10.
STEP 9. Check the map light bulb.
Q: Is the map light bulb in good condition?
YES: Replace the overhead console assembly.
NO: Replace the map light bulb. Verify that the map light illuminates normally.
STEP 10. Check the ground circuit to the map light. Measure the resistance at overhead console assembly connector D-02.
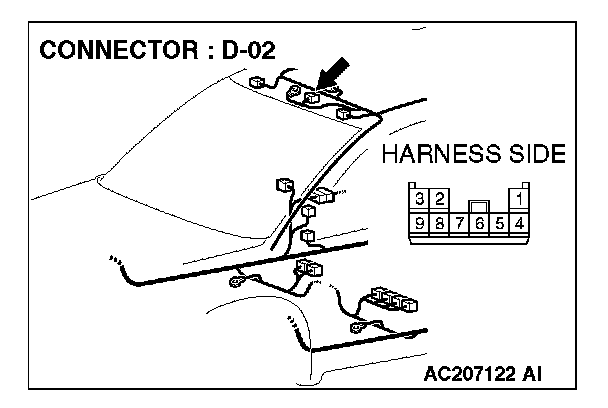
1. Disconnect overhead console assembly connector D-02 and measure the resistance available at the wiring harness side of the connector.
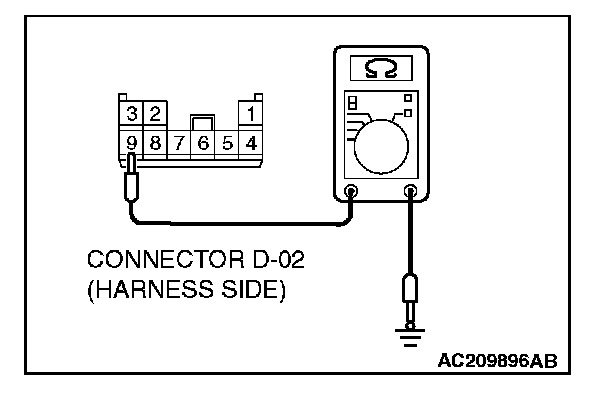
2. Measure the resistance value between terminal 9 and ground.
- The resistance should be 2 ohms or less.
Q: Is the measured resistance 2 ohms or less?
YES: Go to Step 13.
NO: Go to Step 11.
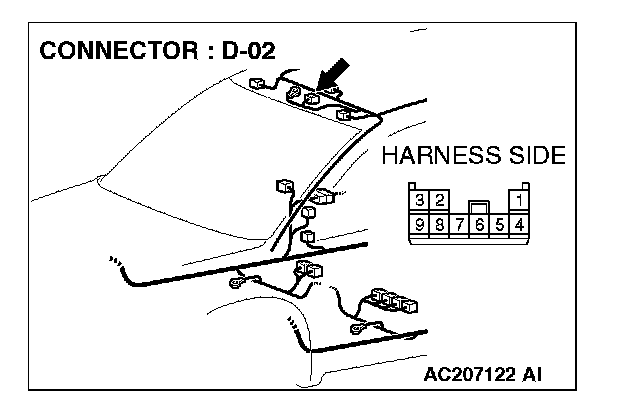
STEP 11. Check overhead console assembly connector D-02 for loose, corroded or damaged terminals, or terminals pushed back in the connector.
Q: Is overhead console assembly connector D-02 in good condition?
YES: Go to Step 12.
NO: Repair or replace the damaged component(s). Refer to Harness Connector Inspection. Verify that the map light illuminates normally.
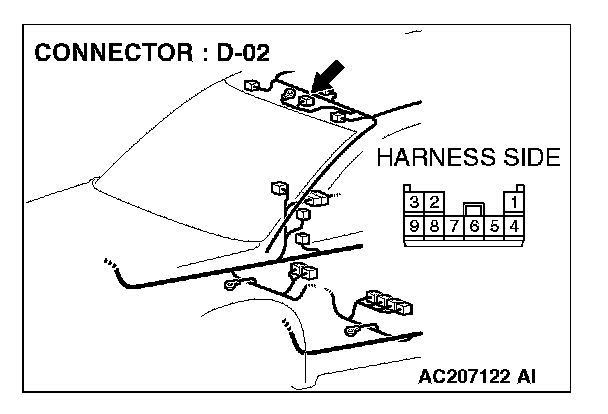
STEP 12. Check the wiring harness between overhead console assembly connector D-02 (terminal 9) and ground.
Q: Is the wiring harness between overhead console assembly connector D-02 (terminal 9) and ground in good condition?
YES: Replace the overhead console assembly. Verify that the map light illuminates normally.
NO: The wiring harness may be damaged or the connector(s) may have loose, corroded or damaged terminals, or terminals pushed back in the connector. Repair the wiring harness as necessary. Verify that the map light illuminates normally.
STEP 13. Check the map light bulb.
Q: Is the map light bulb in good condition?
YES: Replace the overhead console assembly. Verify that the map light illuminates normally.
NO: Replace the map light bulb. Verify that the map light illuminates normally.
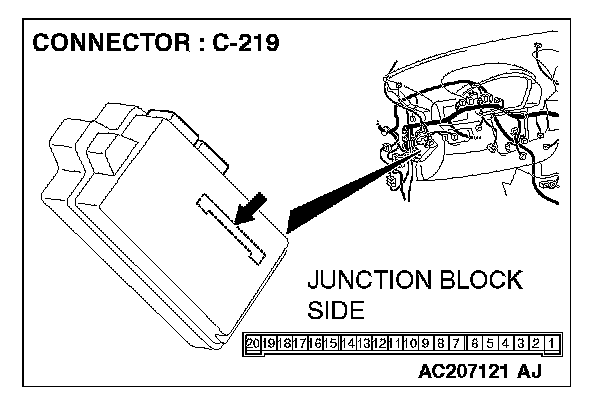
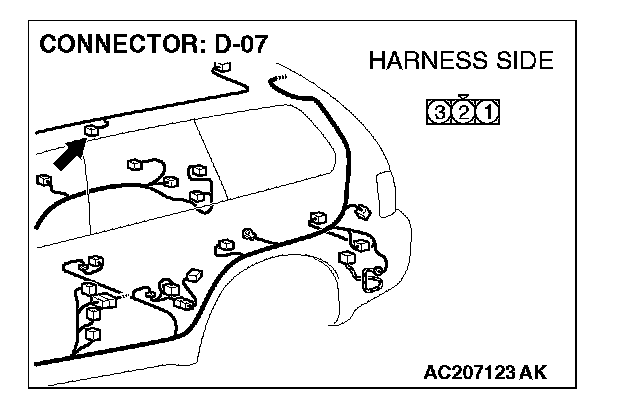
STEP 14. Check the wiring harness between rear personal light (LH) connector D-07 (terminals 1 and 3) and ETACS-ECU connector C-219 (terminals 6 and 5).
Q: Is the wiring harness between rear personal light (LH) connector D-07 (terminals 1 and 3) and ETACS-ECU connector C-219 (terminals 6 and 5) in good condition?
YES: No action is necessary and testing is complete.
NO: The wiring harness may be damaged or the connector(s) may have loose, corroded or damaged terminals, or terminals pushed back in the connector. Repair the wiring harness as necessary. Verify that the rear personal light (LH) and cargo area light illuminates normally.
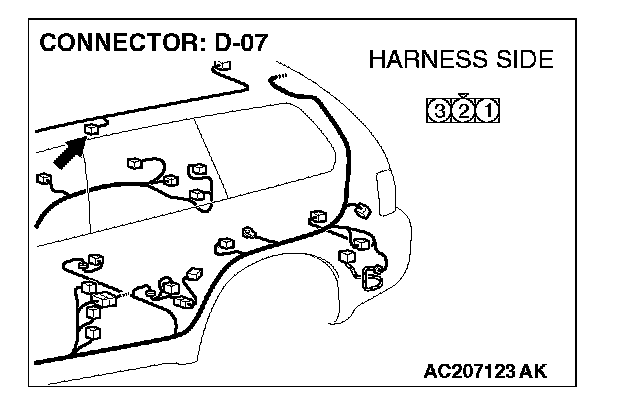
STEP 15. Check rear personal light (LH) connector D-07 for loose, corroded or damaged terminals, or terminals pushed back in the connector.
Q: Is rear personal light (LH) connector D-07 in good condition?
YES: Go to Step 16.
NO: Repair or replace the damaged component(s). Refer to Harness Connector Inspection. Verify that the rear personal light (LH) illuminates normally.
STEP 16. Check the rear personal light (LH) bulb.
Q: Is the rear personal light (LH) bulb in good condition?
YES: Go to Step 17.
NO: Replace the rear personal light (LH). Verify that the rear personal light (LH) illuminates normally.
STEP 17. Check whether the rear personal light (LH) illuminates.
When the rear personal light switch (LH) is turned to the "ON" position, check that the rear personal light (LH) illuminates.
Q: Does the rear personal light (LH) illuminate?
YES: Got to Step 21.
NO: Got to Step 18.
STEP 18. Check the ground circuit to the rear personal light (LH). Measure the resistance at rear personal light (LH) connector D-07.
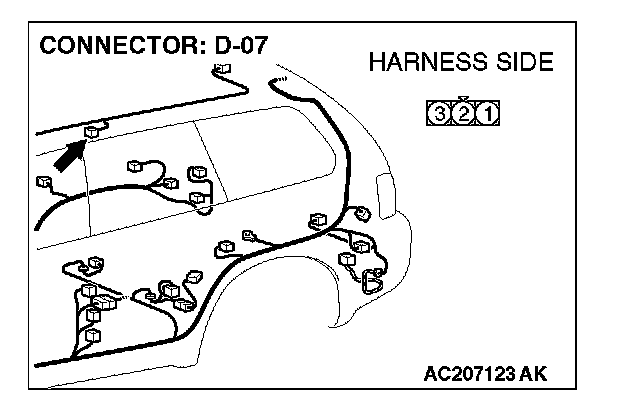
1. Disconnect rear personal light (LH) connector D-07 and measure the resistance available at the wiring harness side of the connector.
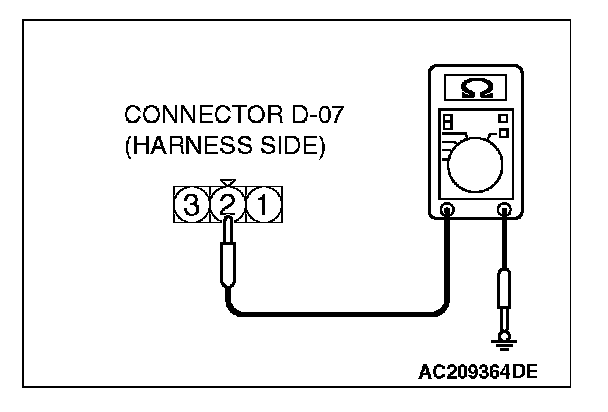
2. Measure the resistance value between terminal 2 and ground.
- The resistance should be 2 ohms or less.
Q: Is the measured resistance 2 ohms or less?
YES: Go to Step 20.
NO: Go to Step 19.
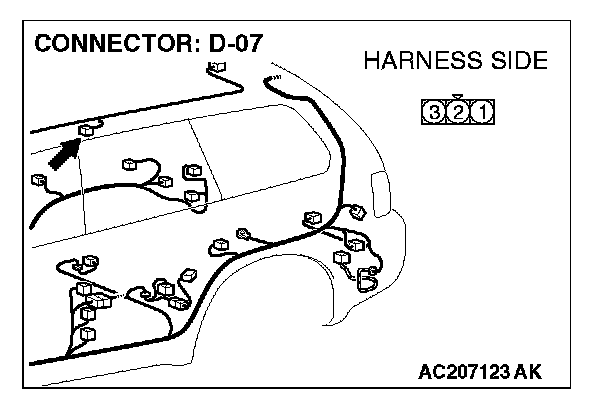
STEP 19. Check the wiring harness between rear personal light (LH) connector D-07 (terminal 2) and ground.
Q: Is the wiring harness between rear personal light (LH) connector D-07 (terminal 2) and ground in good condition?
YES: Replace the overhead console assembly. Verify that the rear personal light (LH) illuminates normally.
NO: The wiring harness may be damaged or the connector(s) may have loose, corroded or damaged terminals, or terminals pushed back in the connector. Repair the wiring harness as necessary. Verify that the rear personal light (LH) illuminates normally.
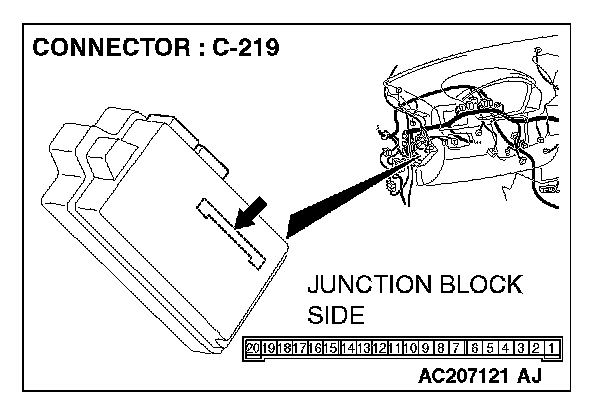
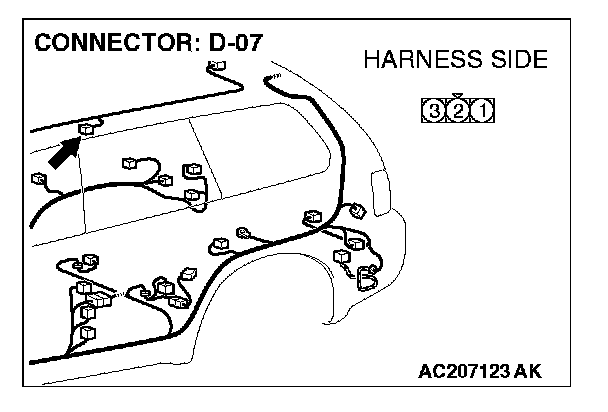
STEP 20. Check the wiring harness between rear personal light (LH) connector D-07 (terminal 1) and ETACS-ECU connector C-219 (terminal 6).
Q: Is the wiring harness between rear personal light (LH) connector D-07 (terminal 1) and ETACS-ECU connector C-219 (terminal 6) in good condition?
YES: Replace the overhead console assembly. Verify that the rear personal light (LH) illuminates normally.
NO: The wiring harness may be damaged or the connector(s) may have loose, corroded or damaged terminals, or terminals pushed back in the connector. Repair the wiring harness as necessary. Verify that the rear personal light (LH) illuminates normally.
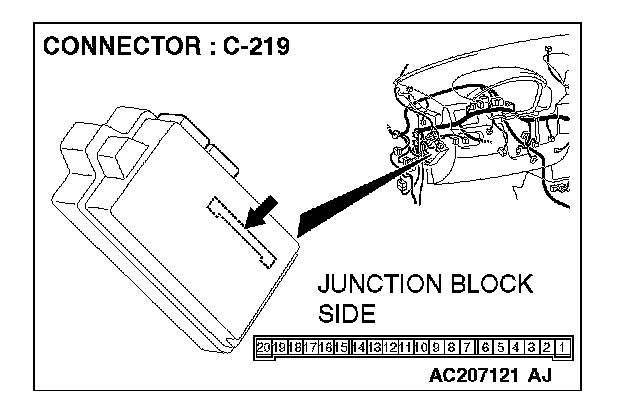
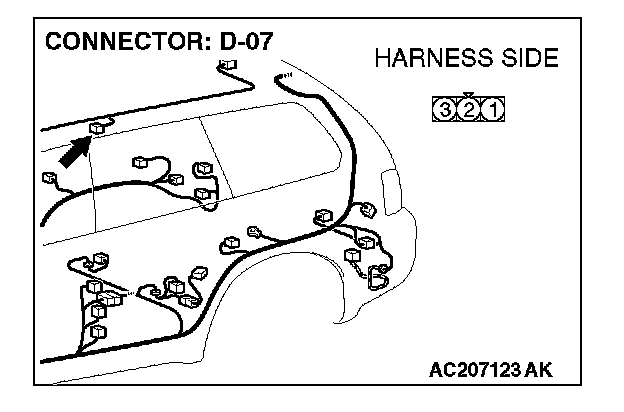
STEP 21. Check the wiring harness between rear personal light (LH) connector D-07 (terminal 3) and ETACS-ECU connector C-219 (terminal 5).
Q: Is the wiring harness between rear personal light (LH) connector D-07 (terminal 3) and ETACS-ECU connector C-219 (terminal 5) in good condition?
YES: Replace the overhead console assembly. Verify that the rear personal light (LH) illuminates normally.
NO: The wiring harness may be damaged or the connector(s) may have loose, corroded or damaged terminals, or terminals pushed back in the connector. Repair the wiring harness as necessary. Verify that the rear personal light (LH) illuminates normally.
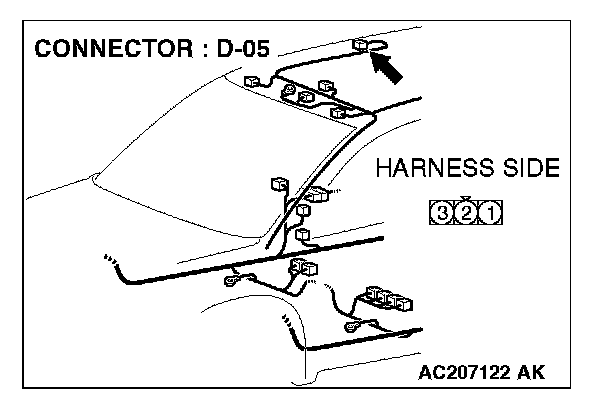
STEP 22. Check rear personal light (RH) connector D-05 for loose, corroded or damaged terminals, or terminals pushed back in the connector.
Q: Is rear personal light (RH) connector D-05 in good condition?
YES: Go to Step 23.
NO: Repair or replace the damaged component(s). Refer to Harness Connector Inspection. Verify that the rear personal light (RH) illuminates normally.
STEP 23. Check the rear personal light bulb (RH).
Q: Is the rear personal light (RH) bulb in good condition?
YES: Go to Step 24.
NO: Replace the rear personal light bulb (RH). Verify that the rear personal light (RH) illuminates normally.
STEP 24. Check whether the rear personal light (RH) illuminates.
When the rear personal light switch (RH) is turned to the "ON" position, check that the rear personal light (RH) illuminates.
Q: Does the rear personal light (RH) illuminate?
YES: Got to Step 28.
NO: Got to Step 25.
STEP 25. Check the ground circuit to the rear personal light (RH). Measure the resistance at rear personal light (RH) connector D-05.
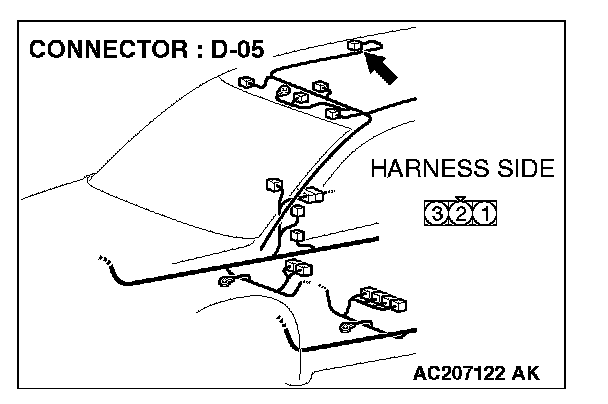
1. Disconnect rear personal light (RH) connector D-05 and measure the resistance available at the wiring harness side of the connector.
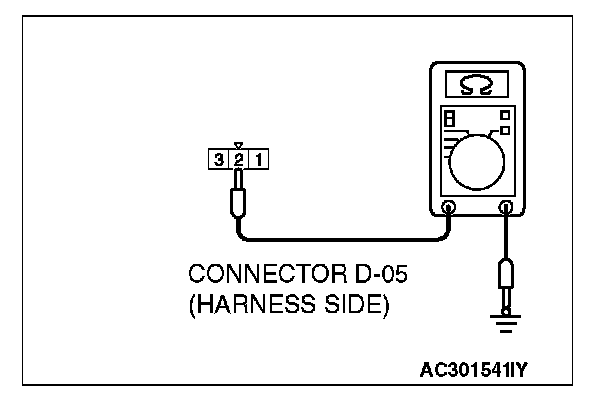
2. Measure the resistance value between terminal 2 and ground.
- The resistance should be 2 ohms or less.
Q: Is the measured resistance 2 ohms or less?
YES: Go to Step 27.
NO: Go to Step 26.
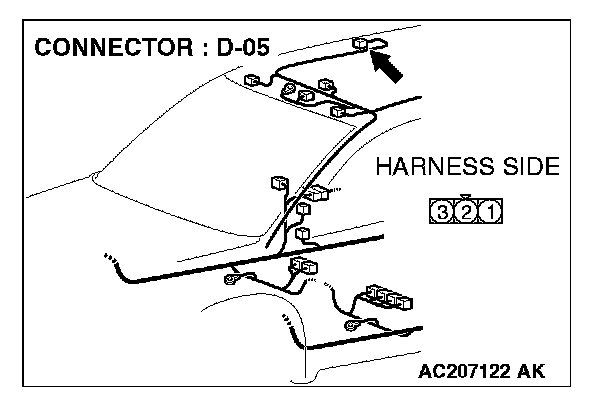
STEP 26. Check the wiring harness between rear personal light (RH) connector D-05 (terminal 2) and ground.
Q: Is the wiring harness between rear personal light (RH) connector D-05 (terminal 2) and ground in good condition?
YES: Replace the overhead console assembly. Verify that the rear personal light (RH) illuminates normally.
NO: The wiring harness may be damaged or the connector(s) may have loose, corroded or damaged terminals, or terminals pushed back in the connector. Repair the wiring harness as necessary. Verify that the rear personal light (RH) illuminates normally.
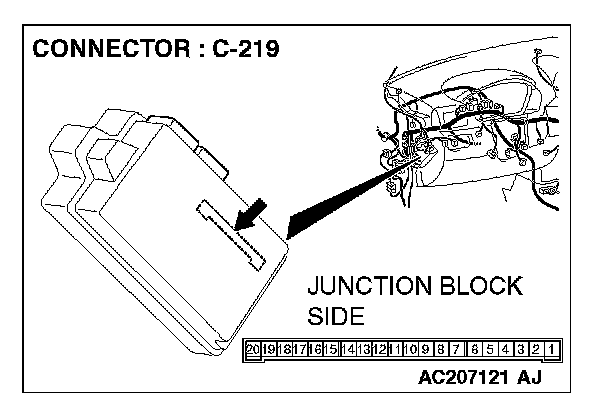
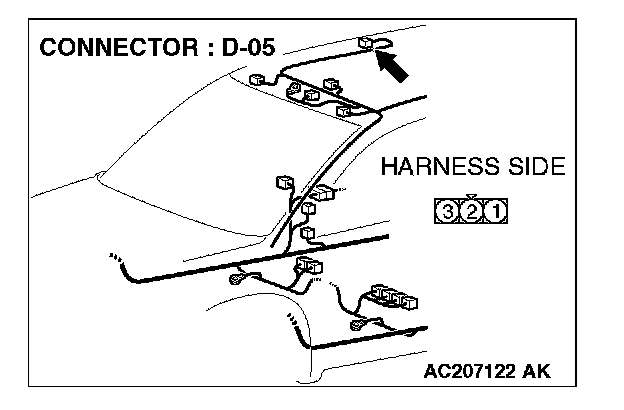
STEP 27. Check the wiring harness between rear personal light (RH) connector D-05 (terminal 1) and ETACS-ECU connector C-219 (terminal 6).
Q: Is the wiring harness between rear personal light (RH) connector D-05 (terminal 1) and ETACS-ECU connector C-219 (terminal 6) in good condition?
YES: Replace the overhead console assembly. Verify that the rear personal light (RH) illuminates normally.
NO: The wiring harness may be damaged or the connector(s) may have loose, corroded or damaged terminals, or terminals pushed back in the connector. Repair the wiring harness as necessary. Verify that the rear personal light (RH) illuminates normally.
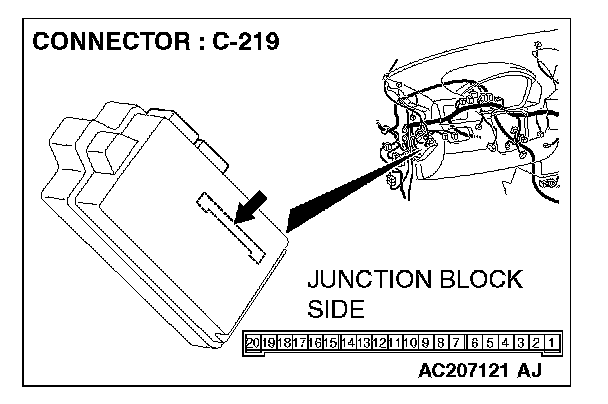
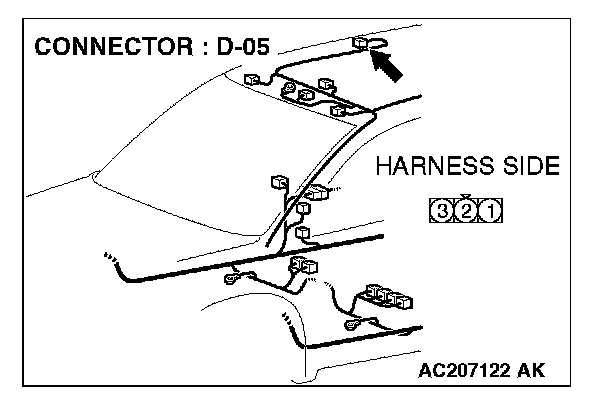
STEP 28. Check the wiring harness between rear personal light (RH) connector D-05 (terminal 3) and ETACS-ECU connector C-219 (terminal 5).
Q: Is the wiring harness between rear personal light (RH) connector D-05 (terminal 3) and ETACS-ECU connector C-219 (terminal 5) in good condition?
YES: Replace the overhead console assembly. Verify that the rear personal light (RH) illuminates normally.
NO: The wiring harness may be damaged or the connector(s) may have loose, corroded or damaged terminals, or terminals pushed back in the connector. Repair the wiring harness as necessary. Verify that the rear personal light (RH) illuminates normally.
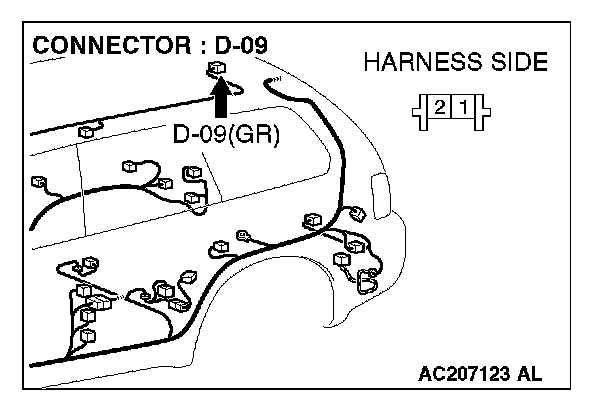
STEP 29. Check cargo area light connector D-09 for loose, corroded or damaged terminals, or terminals pushed back in the connector.
Q: Is cargo area light connector D-09 in good condition?
YES: Go to Step 30.
NO: Repair or replace the damaged component(s). Refer to Harness Connector Inspection. Verify that the cargo area light illuminates normally.
STEP 30. Check the cargo area light bulb.
Q: Is the cargo area light bulb in good condition?
YES: Go to Step 31.
NO: Replace the cargo area light bulb. Verify that the cargo area light illuminates normally.
STEP 31. Check if the cargo area light illuminates.
Turn the cargo area light switch to the ON position, and check if the light illuminates.
Q: Does the cargo area light illuminate?
YES: Got to Step 33.
NO: Got to Step 32.
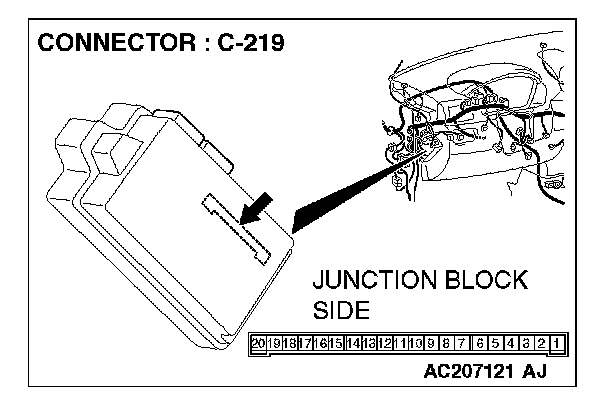
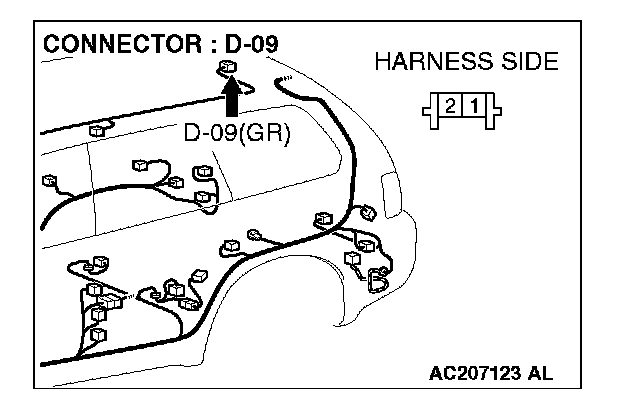
STEP 32. Check the wiring harness between cargo area light connector D-09 (terminal 1) and ETACS-ECU connector C-219 (terminal 6).
Q: Is the wiring harness between cargo area light connector D-09 (terminal 1) and ETACS-ECU connector C-219 (terminal 6) in good condition?
YES: Replace the overhead console assembly. Verify that the cargo area light illuminates normally.
NO: The wiring harness may be damaged or the connector(s) may have loose, corroded or damaged terminals, or terminals pushed back in the connector. Repair the wiring harness as necessary. Verify that the cargo area light illuminates normally.
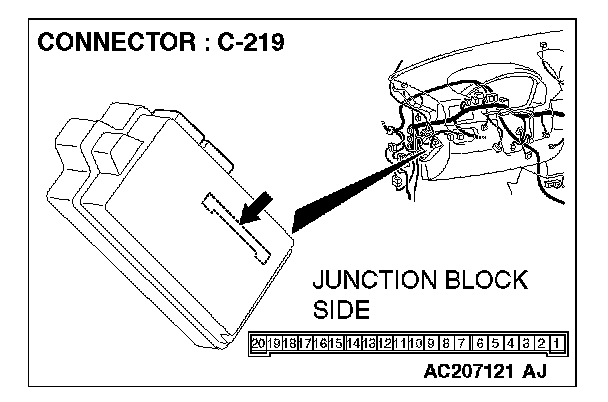
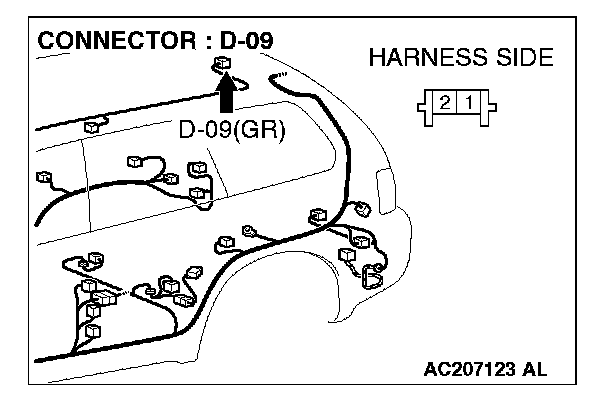
STEP 33. Check the wiring harness between cargo area light connector D-09 (terminal 2) and ETACS-ECU connector C-219 (terminal 5).
Q: Is the wiring harness between cargo area light connector D-09 (terminal 2) and ETACS-ECU connector C-219 (terminal 5) in good condition?
YES: Replace the overhead console assembly. Verify that the cargo area light illuminates normally.
NO: The wiring harness may be damaged or the connector(s) may have loose, corroded or damaged terminals, or terminals pushed back in the connector. Repair the wiring harness as necessary. Verify that the cargo area light illuminates normally.
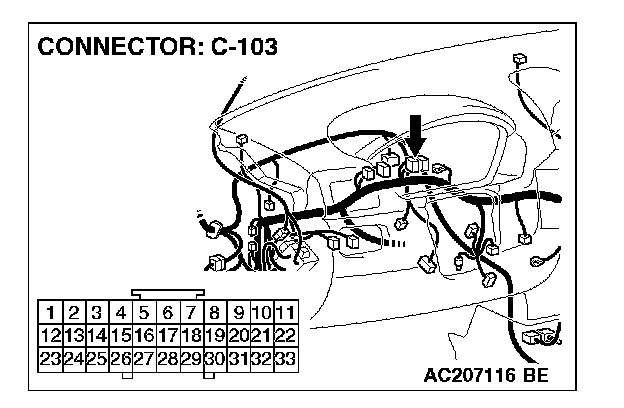
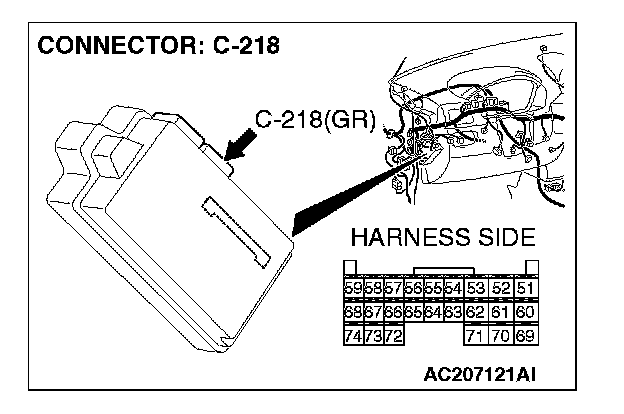
STEP 34. Check ETACS-ECU connector C-218 and joint connector C-103 for loose, corroded or damaged terminals, or terminals pushed back in the connector.
Q: Are ETACS-ECU connector C-218 and joint connector C-103 in good condition?
YES: Go to Step 35.
NO: Repair or replace the damaged component(s). Refer to Harness Connector Inspection. Verify that the front door lights illuminate normally.
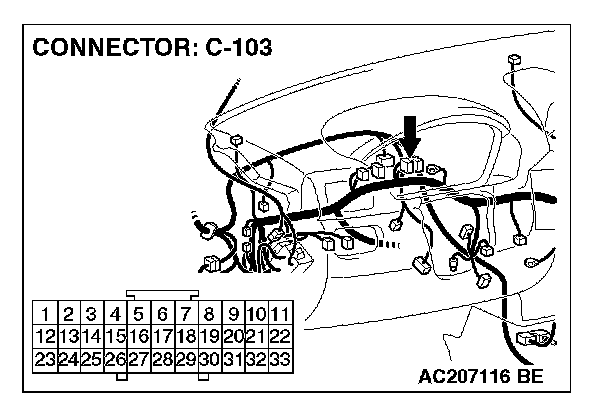
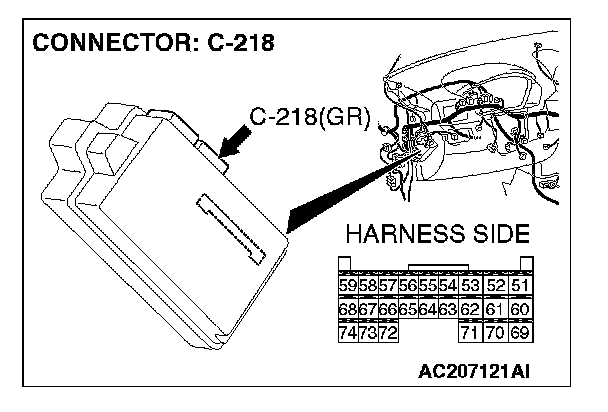
STEP 35. Check the wiring harness between ETACS-ECU connector C-218 (terminal 71) and joint connector C-103 (terminal 6).
Q: Is the wiring harness between ETACS-ECU connector C-218 (terminal 71) and joint connector C-103 (terminal 6) in good condition?
YES: Go to Step 36.
NO: The wiring harness may be damaged or the connector(s) may have loose, corroded or damaged terminals, or terminals pushed back in the connector. Repair the wiring harness as necessary. Verify that the front door lights illuminate normally.
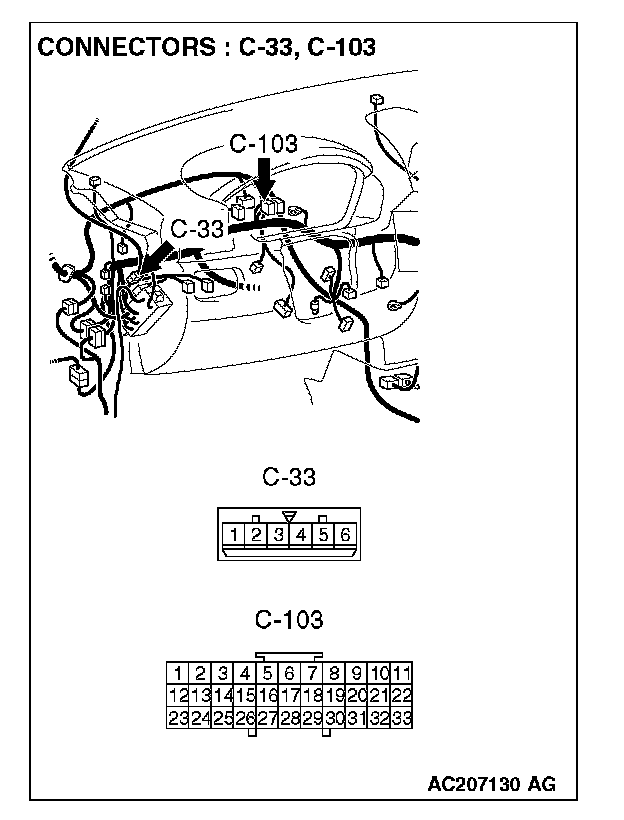
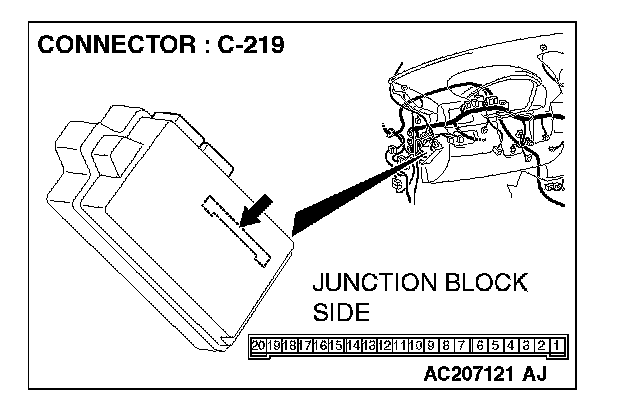
STEP 36. Check the wiring harness between ETACS-ECU connector C-219 (terminal 5) and joint connector C-103 (terminal 11).
NOTE: Also check intermediate connector C-33 for loose, corroded, or damaged terminals, or terminals pushed back in the connector. If intermediate connector C-33 is damaged, repair or replace the damaged component(s) as described in Harness Connector Inspection.
Q: Is the wiring harness between ETACS-ECU connector C-219 (terminal 5) and joint connector C-103 (terminal 11) in good condition?
YES: No action is necessary and testing is complete.
NO: The wiring harness may be damaged or the connector(s) may have loose, corroded or damaged terminals, or terminals pushed back in the connector. Repair the wiring harness as necessary. Verify that the front door lights illuminates normally.
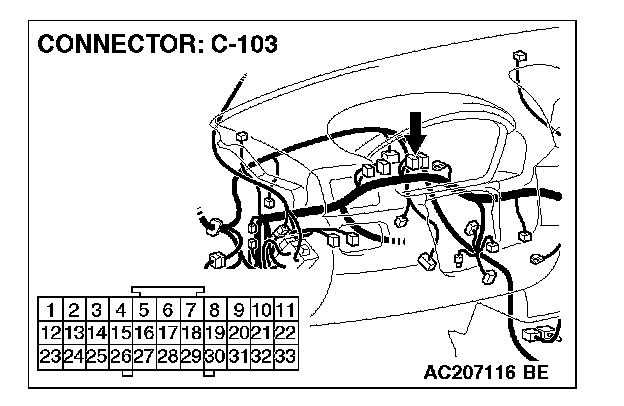
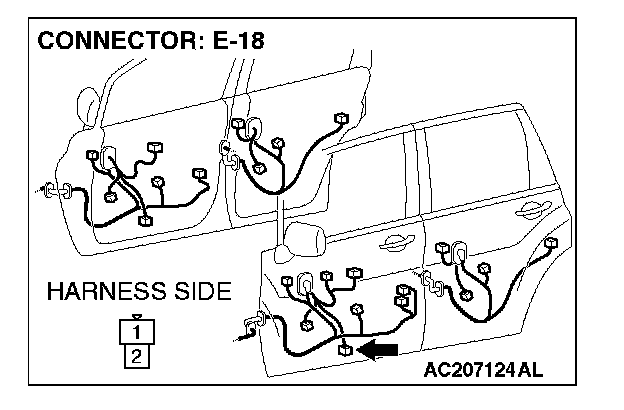
STEP 37. Check front door light (LH) connector E-18 and joint connector C-103 for loose, corroded or damaged terminals, or terminals pushed back in the connector.
Q: Are front door light (LH) connector E-18 and joint connector C-103 in good condition?
YES: Go to Step 38.
NO: Repair or replace the damaged component(s). Refer to Harness Connector Inspection. Verify that the front door light (LH) illuminates normally.
STEP 38. Check the front door light (LH) bulb.
Q: Is the front door light (LH) bulb in good condition?
YES: Go to Step 39.
NO: Replace the front door light (LH) bulb. Verify that the front door light (LH) illuminates normally.
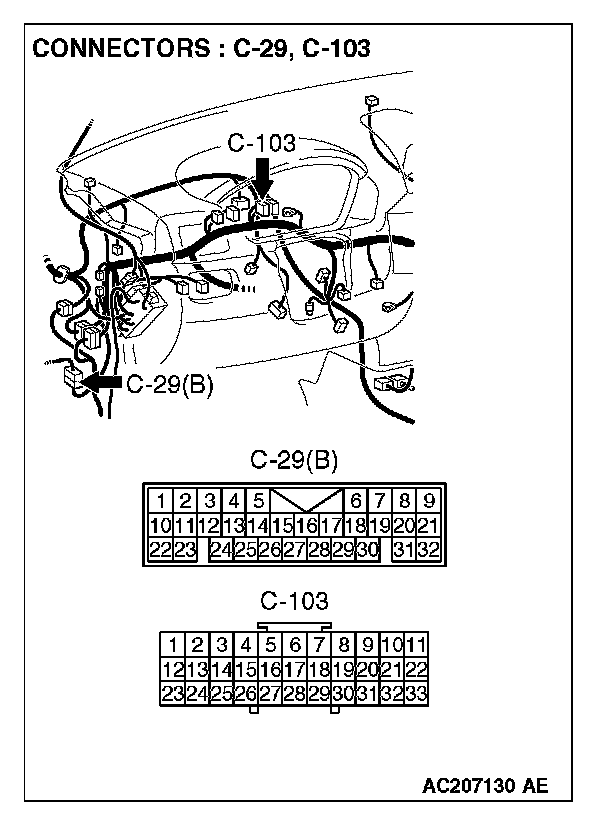
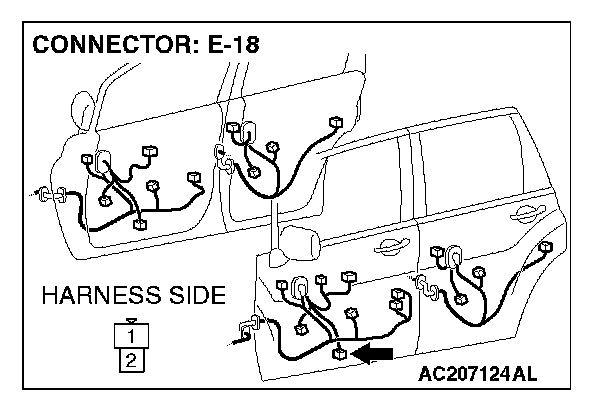
STEP 39. Check the wiring harness between front door light (LH) connector E-18 (terminals 1 and 2) and joint connector C-103 (terminals 1 and 7).
NOTE: Also check intermediate connector C-29 for loose, corroded, or damaged terminals, or terminals pushed back in the connector. If intermediate connector C-29 is damaged, repair or replace the damaged component(s) as described in Harness Connector Inspection.
Q: Is the wiring harness between front door light (LH) connector E-18 (terminals 1 and 2) and joint connector C-103 (terminals 1 and 7) in good condition?
YES: No action is necessary and testing is complete.
NO: The wiring harness may be damaged or the connector(s) may have loose, corroded or damaged terminals, or terminals pushed back in the connector. Repair the wiring harness as necessary. Verify that the front door light (LH) illuminates normally.
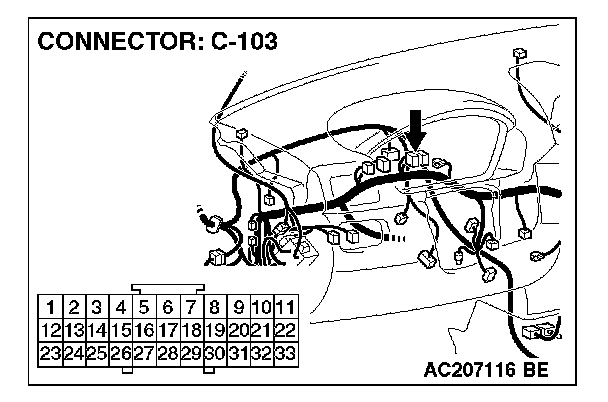
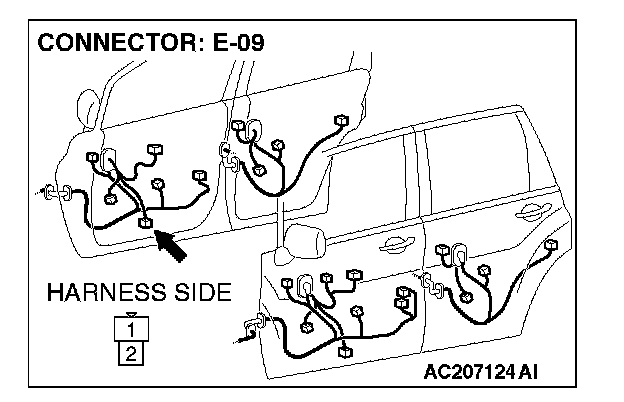
STEP 40. Check front door light (RH) connector E-09 and joint connector C-103 for loose, corroded or damaged terminals, or terminals pushed back in the connector.
Q: Are front door light (RH) connector E-09 and joint connector C-103 in good condition?
YES: Go to Step 41.
NO: Repair or replace the damaged component(s). Refer to Harness Connector Inspection. Verify that the front door light (RH) illuminates normally.
STEP 41. Check the front door light (RH) bulb.
Q: Is the front door light (RH) bulb in good condition?
YES: Go to Step 42.
NO: Replace the front door light (RH) bulb. Verify that the front door light (RH) illuminates normally.
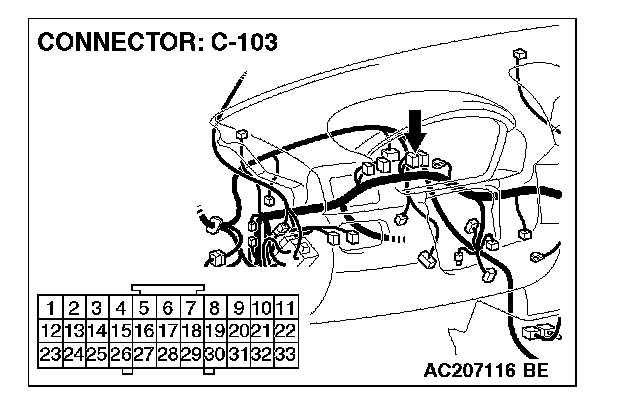
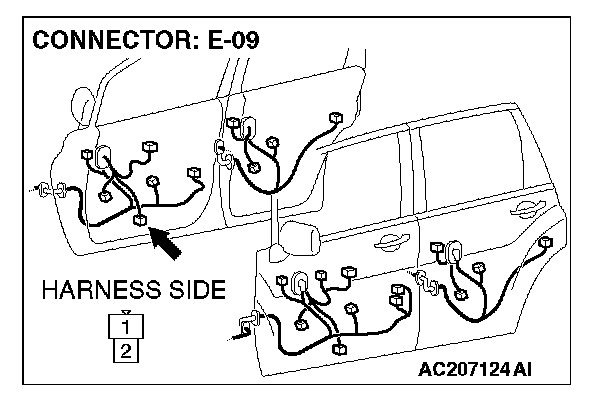
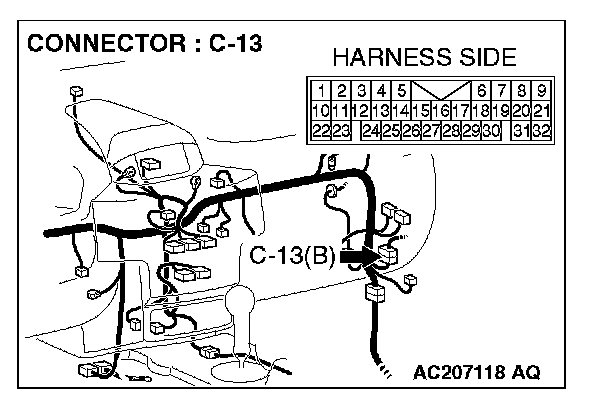
STEP 42. Check the wiring harness between front door light (RH) connector E-09 (terminals 1 and 2) and joint connector C-103 (terminals 3 and 8).
NOTE: Also check intermediate connector C-13 for loose, corroded, or damaged terminals, or terminals pushed back in the connector. If intermediate connector C-13 is damaged, repair or replace the damaged component(s) as described in Harness Connector Inspection.
Q: Is the wiring harness between front door light (RH) connector E-09 (terminals 1 and 2) and joint connector C-103 (terminals 3 and 8) in good condition?
YES: No action is necessary and testing is complete.
NO: The wiring harness may be damaged or the connector(s) may have loose, corroded or damaged terminals, or terminals pushed back in the connector. Repair the wiring harness as necessary. Verify that the front door light (RH) illuminates normally.
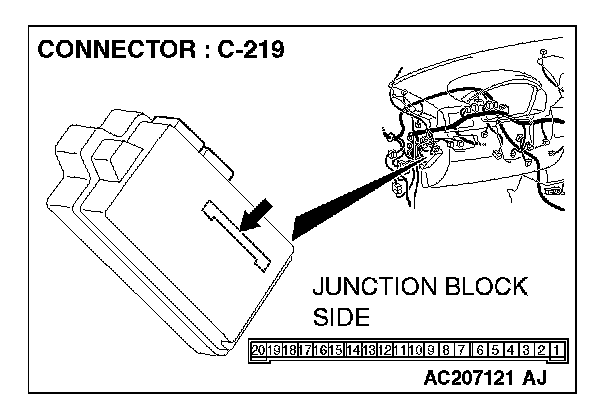
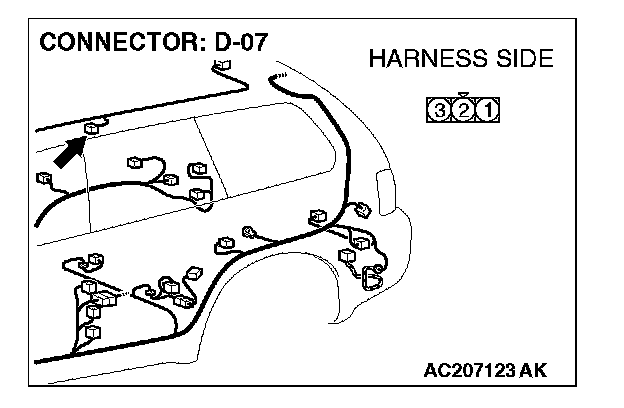
STEP 43. Check the wiring harness between rear personal light (LH) connector D-07 (terminal 3) and ETACS-ECU connector C-219 (terminal 5).
Q:Is the wiring harness between rear personal light (LH) connector D-07 (terminal 3) and ETACS-ECU connector C-219 (terminal 5) in good condition?
YES: No action is necessary and testing is complete.
NO: The wiring harness may be damaged or the connector(s) may have loose, corroded or damaged terminals, or terminals pushed back in the connector. Repair the wiring harness as necessary. Verify that the rear personal lights, cargo area light, front door lights illuminate normally.