Ribbed Belt
Ribbed Belt
Special tools, testers and auxiliary items required
• Locking Pin (T10060A)
Removing
- Remove the noise insulation.
- Remove the front part of the right front wheel housing liner.
Removing the Air Conditioning (A/C) Compressor Ribbed Belt
- Mark the direction of rotation of the ribbed belt.
- Rotate the tensioner - 1 - as shown using a 15 mm box end wrench - A - in the - direction of the arrow - and secure using the (T10060A).
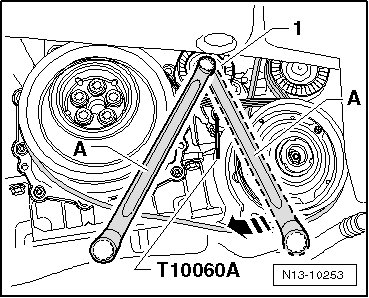
- Remove the A/C compressor ribbed belt.
Removing the Generator and Coolant Pump Ribbed Belt
- Relieve the tension on the tensioner - 1 - for the A/C compressor ribbed belt (pull out the (T10060A)).
- Mark the running direction of the generator and coolant pump ribbed belt.
- Insert the (T10060A) into the tensioner - 2 -.
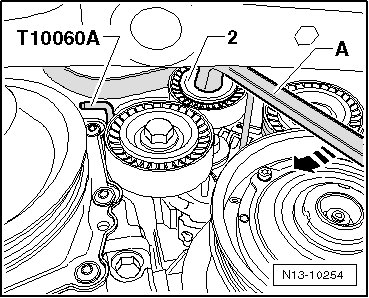
- Rotate the tensioner - 2 - using a 15 mm box end wrench - A - in the - direction of the arrow - and secure using the (T10060A).
- Remove the generator and coolant pump ribbed belt.
Installing
Installation is performed in the reverse order of removal, noting the following:
- Place the generator and coolant pump ribbed belt onto the pulleys, then lastly around the idler pulley - 3 -.
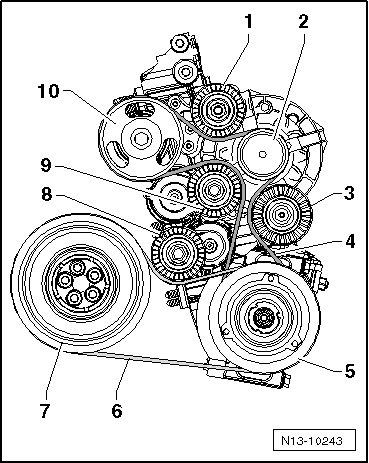
- Rotate the A/C compressor pulley before tensioning the generator and coolant pump ribbed belt. Make sure the generator and coolant pump ribbed belt is seated correctly on the pulleys.
- Before installing the A/C compressor ribbed belt, secure the tensioner using (T10060A).
• When installing the ribbed belt, note the direction of rotation of the belt and be sure that it is seated correctly on the pulley.
- Start the engine and check the belt running.