Engine, Installing
Engine, Installing
Installation is performed in the reverse order of removal, noting the following:
CAUTION!
When doing any repair work, especially in the engine compartment, pay attention to the following due to clearance issues:
• Route all lines and wires in their original locations.
• Make sure the wires have enough clearance to all moving or hot components.
- When installing the engine/transmission subassembly make sure there is enough clearance for the subframe and radiator.
- Align the engine mount as follows:
• There must be a distance of at least 10 mm - a - present between the engine mount bracket - 2 - and right longitudinal member.
• The casting edge on the engine mount bracket - 2 - must be parallel to the engine mount arm - 1 -.
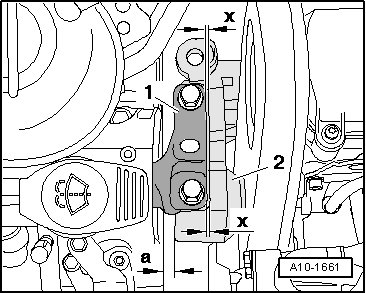
- Tighten the bolts for the engine mount to bracket. Tightening specification: 60 Nm + 90° (1/4) additional turn.
- Install the pendulum support.
• For the pendulum support bolt tightening specifications, refer to => [ Fastener Tightening Specifications ] Engine Assembly - Fastener Tightening Specifications.
- Install the front exhaust pipes with catalytic converters:
All Wheel Drive (AWD), refer to => [ Front Exhaust Pipes with Catalytic Converters and Front Mufflers ] Front Exhaust Pipes With Catalytic Converters and Front Mufflers.
Front Wheel Drive (FWD), refer to => [ Front Exhaust Pipes with Catalytic Converters and Front Mufflers ] Front Exhaust Pipes With Catalytic Converters and Front Mufflers.
- Install drive axles => Suspension, Wheels,
Steering 40 Removing and installing drive axles.
- Installed the right drive axle heat shield.
- Electrical connections and routing.
- Install the Air Conditioning (A/C) compressor.
- If necessary, fill the transmission fluid.
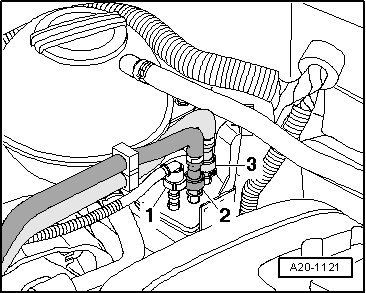
- Connect the ventilation line - 1 -, vacuum line - 2 - and fuel supply line - 3 -.
- Install the ribbed belt. Refer to => [ Ribbed Belt ] Ribbed Belt.
- Install the noise insulation.
- Fill the cooling system. Refer to => [ Draining and Filling ] Draining and Filling.
- Connect the vehicle diagnostic tester.
- Check all Diagnostic Trouble Code (DTC) memories and erase all DTC entries which may have occurred during the assembly.
- Perform a test drive and generate the readiness code. Refer to "Guided Function" in the vehicle diagnostic tester.
- Perform a vehicle system test and repair any occurring malfunctions.
• If the DTC memory was erased, the readiness code must be generated again, refer to "Guided Fault Finding" in the vehicle diagnostic tester.
Tightening Specifications
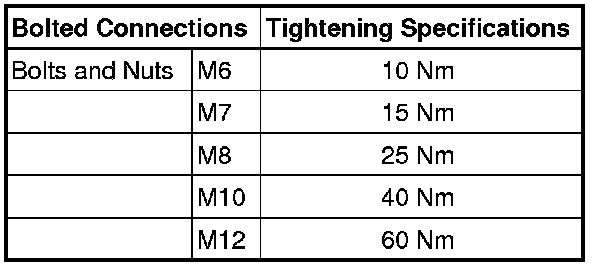
• For the engine and transmission mount tightening specifications, refer to => [ Fastener Tightening Specifications ] Engine Assembly - Fastener Tightening Specifications.