Heater Core: Service and Repair
Heater Core
Special tools, testers and auxiliary items required
• Hose Clamps Up To 40 mm Diameter (3093)
• Drip Tray For Shop Crane (VAS 6208)
• Engine Bung Set (VAS 6122)
• Compressed Air Gun, Commercially Available
Removing
- Disconnect the battery.
• Depending on engine and version of vehicle, it may be necessary to loosen or to remove the following components: top engine cover, pressurized air pipe to throttle valve part and depending on engine the intake manifold, etc.
• Bleed the coolant circuit after it has been opened.
• The cooling system is under pressure when the engine is warm. Reduce the pressure before repairing, if necessary (that is, carefully open the reservoir).
- Place (VAS 6208) under the engine.
- Drain the coolant circuit.
- Label the coolant hoses to the heating and A/C unit.
Contact with hot engine coolant can cause severe scalding.
Coolant temperature can be above 100 °C (212° F) with a warm engine. The cooling system is under pressure.
If necessary, reduce pressure and temperature before repairs.
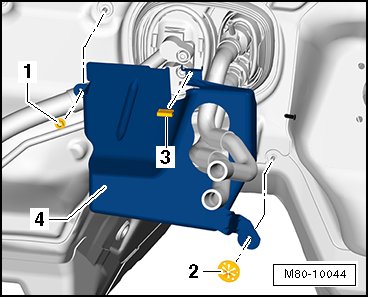
If equipped, remove the heat shield
- Remove nut - 1 - (10 Nm).
- Remove the lock washer - 2 - and the clip - 3 -.
- Remove the heat shield for the expansion valve - 4 - from the bulkhead.
All vehicles
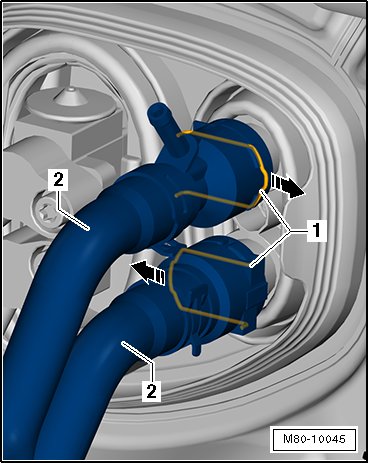
- Remove the coolant hoses for the heater core - 2 - with the (3093).
- Unclip the circlip - 1 - in the - direction of the arrow - and remove the coolant hoses- 2 -.
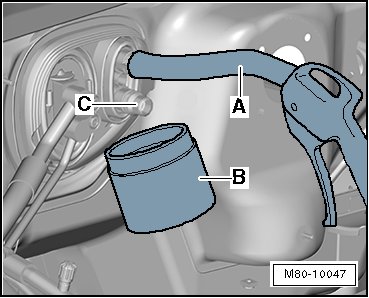
- Connect the hose - A - in the upper connection of the heater core.
- Support the container - B - under the lower connection for the heater core - C -.
- Carefully blow the remaining coolant above the hose- A - out of the heater core and into the container - B - with a compressed-air gun.
- Loosen the bolt - 1 - (6 mm inner hex socket) on the connection flange between the coolant lines for the heater core- 2 - (do not remove).
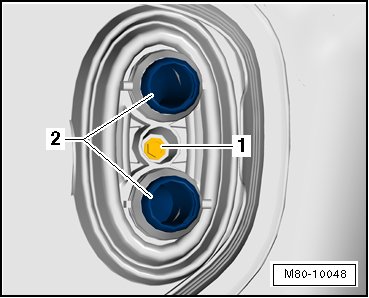
• Move the coolant lines for the heater core - 2 - by loosening the bolt - 1 -.
- Remove driver side footwell cover. Refer to Storage Compartments, Covers and Trim.
- Remove the left footwell (in the middle console). Refer to Storage Compartments, Covers and Trim.
- If equipped, remove the knee airbag.
- Remove the driver footwell vent. Refer to => [ Footwell Vent, Driver Side ] Footwell Vent, Driver Side.
Observe the general safety regulations when working on airbag, belt tensioner, and battery cut-out units (pyrotechnic components).
Vehicles with a gasoline engine
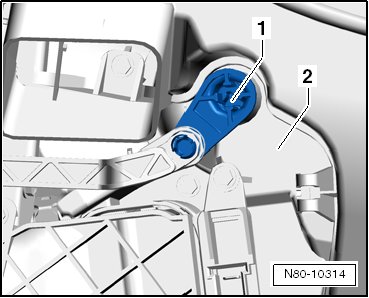
- Adjust the knob on the controls for the heat and fresh air so that the temperature door - 1 - is in the position displayed in the illustration. In this way the upper heater core bolt becomes accessible.
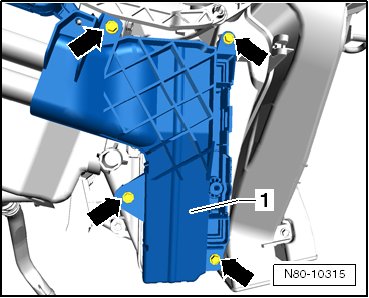
- Remove the bolts - arrows -; 2 Nm and remove the heater core cover - 1 - from the heater and A/C unit.
Vehicle with diesel engine
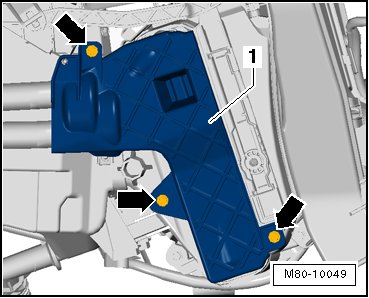
- Remove the bolts - arrows -; 2 Nm and remove the heater core cover - 1 - from the heater and A/C unit.
All vehicles
- Cover the carpet the in area under heater core with waterproof foil and water absorbing paper.
- Remove bolts - 1 - from the hose clamp for the - 3 - coolant line - 2 - (2 Nm).
- Slide the hose clamp - 3 - toward the rear off the coolant line- 2 -.
- Disconnect the coolant lines - 2 - slowly from the heater core - 4 -. Collect any flowing coolant with a suitable container.
- Remove heater core- 4 - from the heater and A/C unit - 6 -.
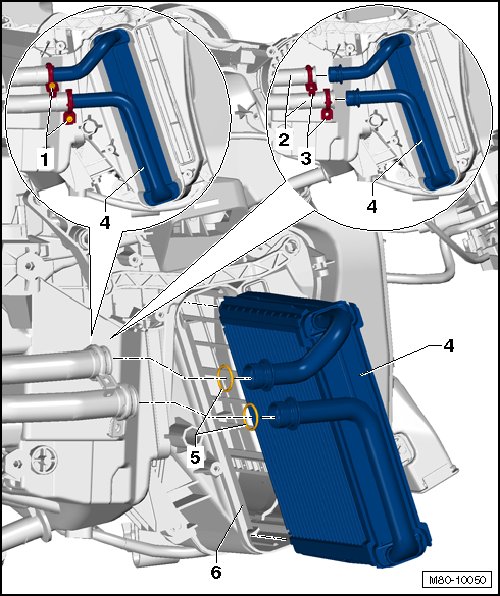
• Replace the seals - 5 - before installing the heater core - 4 -.
Installing
Install in reverse order of removal. When doing this, note the following:
- Check seals - 1 - and - 2 - on the heater core for damage.
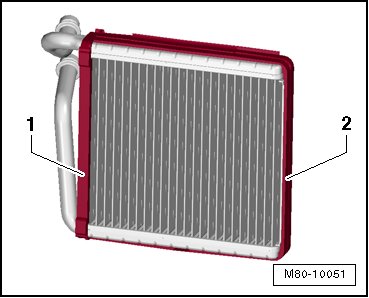
• An incorrectly glued seal can roll up into heater when sliding in the heater core.
• Cold air may flow past heater core if seal is damaged or not properly fitted.
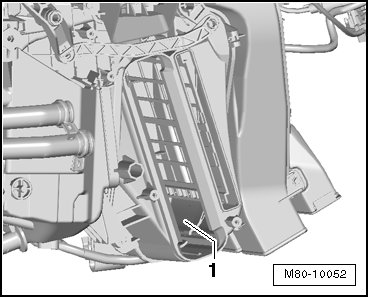
- Inspect the heater core installation slot- 1 - on the heater and A/C unit of the disassembled heater core for debris.
- Remove any dirt or coolant which has leaked out of the heater and A/C unit (for example, after removing a leaking heater core).
- Replace the seal - 5 - for the heater core- 4 -.
- Position the heater core - 4 - in the heater and A/C unit - 6 -.
- Connect the coolant lines- 2 - to the heater core - 4 -.
- Attach the hose clamp - 3 - at the separating point and tighten the bolts - 1 - (2 Nm).
- Install heater core cover.
• Coat the seals - 5 - with refrigerant oil before installation and before connecting them with the coolant lines- 2 -.
• Replace deformed hose clamps.
• Install the clamps - 3 - as shown in the illustration.
• Tighten the bolts- 1 - and then check to see that both hose clamps - 3 - are in their correct positions. The hose clamps must enclose the flange on the heater core and coolant pipe completely. They must not touch other components.
• After replacing heater core, coolant must be replaced completely.
• Check coolant circuit for leaks, pay particular attention to the connection between coolant hoses and heater core.
- Tighten the bolt - 1 - (6 mm inner hex socket) on the connection flange between the coolant lines for the heater core- 2 -.
- Make sure the seal - C - fits correctly inside the plenum chamber bulkhead.
- Seal flange for coolant pipes to heater core - A - and for expansion valve (to evaporator, only in vehicles with A/C system) - B - at pass-through of the seal - C - with silicon adhesive sealant if necessary (to prevent water from penetrating).
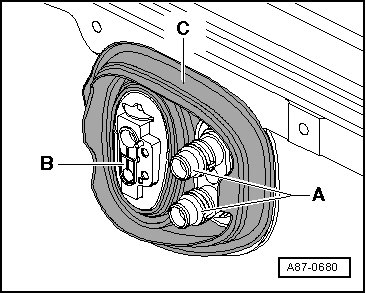
- Connect coolant lines.
- If equipped, install heat shield.
- Refill the coolant and bleed the coolant system.
- Install driver side footwell cover. Refer to Storage Compartments, Covers and Trim.
- Install left footwell (in the middle console). Refer to Storage Compartments, Covers and Trim.
- Install footwell vent on the driver side. Refer to => [ Footwell Vent, Driver Side ] Footwell Vent, Driver Side.
- If equipped, install the knee airbag.
Observe the general safety regulations when working on airbag, belt tensioner, and battery cut-out units (pyrotechnic components) General Information.
- Connect the battery.