Valve Body: Service and Repair
Valve Body
Do not run the engine or tow the vehicle when the pan is removed or when there is no transmission fluid in the transmission.
• The valve body and the wiring harnesses can also be removed with the transmission installed.
• Install seals using transmission fluid. Other types of lubricants can lead to faults in the transmission hydraulics.
• Always replace a dirty or faulty valve body.
• Only use lint free cloths
• Check the fluid level after installing the pan. Refer to => [ Transmission Fluid Level, Checking and Filling ] Transmission Fluid Level, Checking and Filling.
Special tools, testers and auxiliary items required
• Torque Wrench (5-50 Nm) (V.A.G 1331)
• Digital Torque Wrench (V.A.G 1756)
Removing
- Remove the transmission fluid filter. Refer to => [ Transmission Fluid Filter ] Service and Repair.
- Disconnect the connector from the solenoid valves.
To unlock the connector housing on the solenoid valves, use a flat head screwdriver with a 2.5 mm diameter shaft.
If a connector or the connector housing are damaged, then the wiring harness or solenoid valve must be replaced.
- Disconnect the connectors, see - items A and B - in the => [ Wire Routing, Connectors and Bracket on Valve Body ] Wire Routing, Connectors and Bracket on Valve Body.
- Remove the brackets (- items 1 and 2 - under "Bracket for Connectors, Securing the Wires" in the => [ Wire Routing, Connectors and Bracket on Valve Body ] Wire Routing, Connectors and Bracket on Valve Body) for the connectors.
- Disconnect the transmission fluid temperature sensor, see - item 3 - under "Bracket for Connectors, Securing the Wires" in the => [ Wire Routing, Connectors and Bracket on Valve Body ] Wire Routing, Connectors and Bracket on Valve Body and carefully remove it from the valve body.
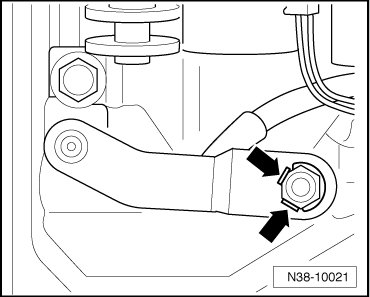
- Bend the securing plate - arrows - on the selector lever back.
- Remove the selector lever - 1 - from the selector shaft.
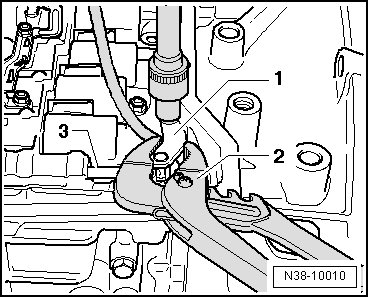
- Hold the selector lever - 1 - steady with pliers - 2 - to prevent transferring the torque onto the multifunction transmission range switch.
- Make sure the valve - A - on the valve body is not damaged.
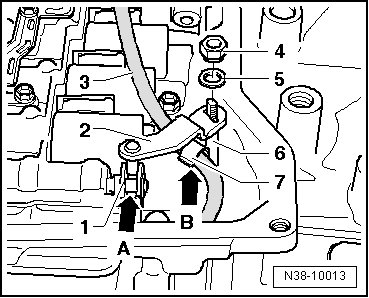
The valve is very "sensitive". Even minor damage can lead to a malfunction.
- Always slide the valve into the body, secure it against falling out and never exchange it.
- Loosen the bolts - arrows - (quantity 12).
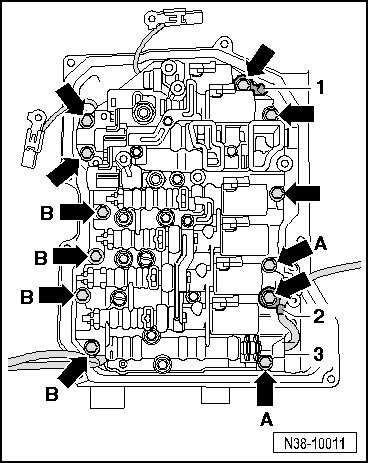
If other bolts are loosened, the valve body will distort.
- Remove the brackets - 1 and 2 -.
- Disconnect the valve body and remove it.
- When removing the valve body, pay attention to the piston - 2 -.
- Remove the piston with the spring.
Installing
To make sure that the wires do not get pinched during installation:
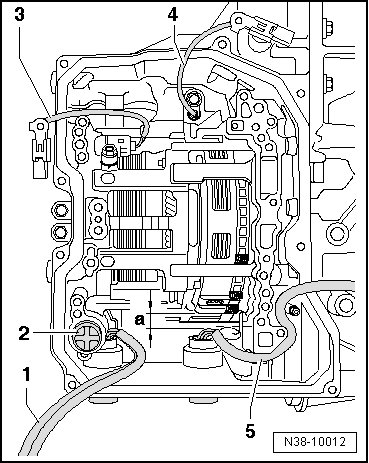
- Route and secure the wires - 1, 3, 4 and 5 - as illustrated.
The distance - a - must be maintained so that the wiring harness - 5 - does not touch the planetary gear and get damaged when the vehicle is being driven.
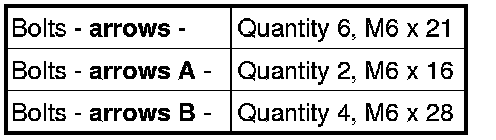
The valve body is secured with bolts with three different lengths.
- Sort the bolts according to length before installing the valve body.
- Coat the piston - 2 - with transmission fluid and install the spring.
- Install the valve body carefully and secure it using 2 bolts.
Bolt Lengths and Locations on the Valve Body
- Make sure the wires are not pinched.
- Install the remaining bolts and the brackets - 1 and 2 - and tighten by hand.
- Install the transmission fluid temperature sensor and tighten to specification. Refer to => [ Fastener Tightening Specifications ] Fastener Tightening Specifications.
- Connect the connectors (quantity 8) to the solenoid valves. Refer to => [ Wire Routing, Connectors and Bracket on Valve Body ] Wire Routing, Connectors and Bracket on Valve Body.
- Connect the bracket for the connectors => [ Wire Routing, Connectors and Bracket on Valve Body ] Wire Routing, Connectors and Bracket on Valve Body, tightening specifications, refer to => [ Fastener Tightening Specifications ] Fastener Tightening Specifications.
- Connect the connectors see - items A and B - in the => [ Wire Routing, Connectors and Bracket on Valve Body ] Wire Routing, Connectors and Bracket on Valve Body.
- Tighten the valve body bolts working from the inside toward the outside diagonally. Tightening specification, refer to => [ Fastener Tightening Specifications ] Fastener Tightening Specifications.
- Install the selector lever.
- Tighten the nut on the selector lever - 1 -. For the correct tightening specification refer to => [ Fastener Tightening Specifications ] Fastener Tightening Specifications.
- Hold the selector lever - 1 - steady with pliers - 2 - to prevent transferring the torque onto the multifunction transmission range switch.
- Bend the securing plate - arrows - on the nut up.
- Install the transmission fluid filter. Refer to => [ Transmission Fluid Filter ] Service and Repair.
- Fill the transmission fluid and check the level. Refer to => [ Transmission Fluid Level, Checking and Filling ] Transmission Fluid Level, Checking and Filling.
- Connect the vehicle diagnostic tester and move through the selections until "Functions-/component selection" is displayed.
- Press "Drive (Repair Groups 01;10 through.26; 28 through.39)".
- After that "6-speed automatic transmission 09G".
- Press "01 - OBD".
- Press "Functions".
- Press "basic setting".