Disassembly and Assembly
DISASSEMBLYRemove Piston Boot:
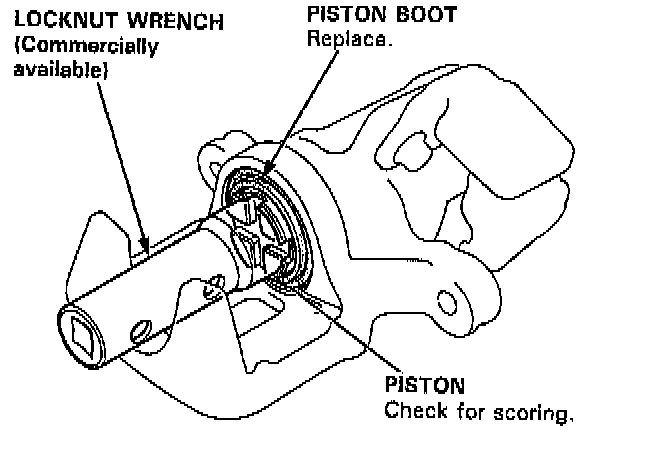
1. Remove the piston by rotating the piston counter-clockwise with the special tool (locknut wrench) and remove the piston boot.
CAUTION: Avoid damaging the piston seal.
Remove Piston Seal:
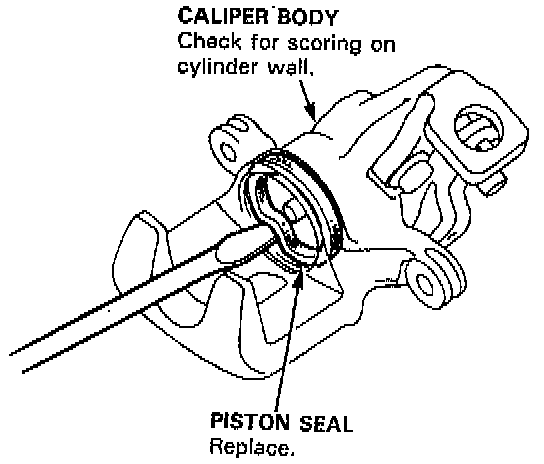
2. Remove the piston seal.
CAUTION: Take care not to damage the cylinder bore.
Caliper Body And Spring Cover:
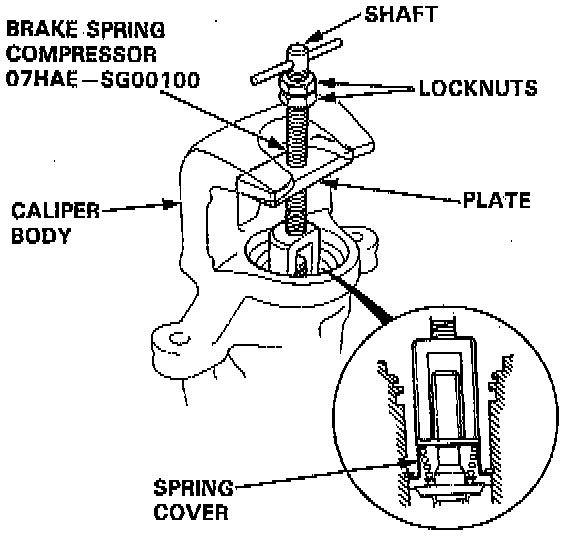
3. Install the special tool between the caliper body and the spring cover then position the locknuts as shown. Turn the shaft until the plate just contacts the caliper body.
Special Tool:
Brake Spring Compressor # 07HAE-SG00100
CAUTION: Be careful not to damage the inside of the caliper cylinder during caliper disassembly.
NOTE: Do not compress the spring under the spring cover.
Adjusting Spring B And Shaft:
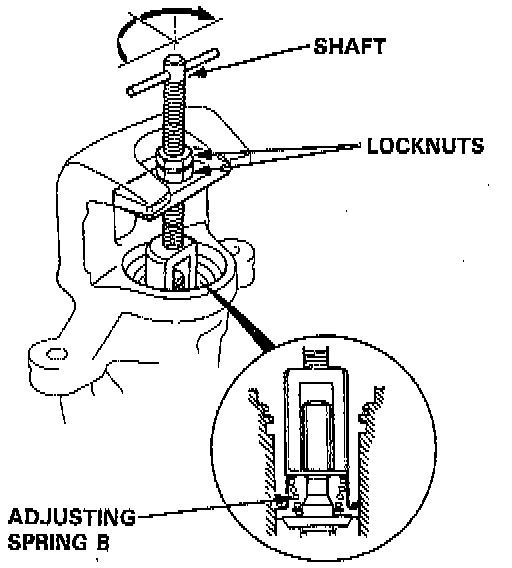
4. Turn the shaft counter-clockwise 1/4-1/2 turn to compress the adjusting spring B in the caliper body.
CAUTION: To prevent damage to the inner components, do not turn the shaft more than 1/2 turn.
Locknuts:
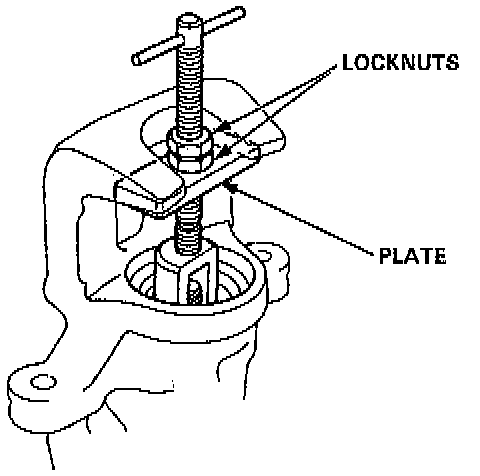
5. Lower the locknuts fully and tighten the locknuts securely.
NOTE: Keep the locknuts in this position until you reinstall the circlip.
Circlip:
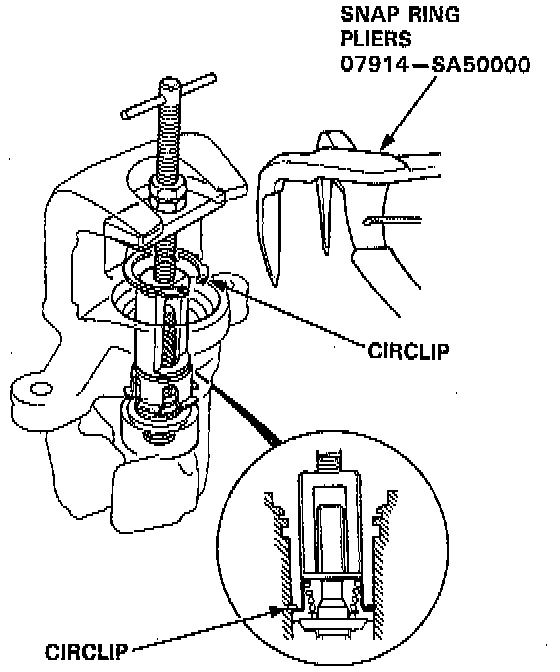
6. Remove the circlip with snap ring pliers.
Special Tool:
Snap Ring Pliers # 07914-SA50000
Locknuts:
7. Hold the plate with your fingers and turn the shaft counter-clockwise. Remove the special tool from the caliper.
8. Remove the adjusting bolt.
Spring Cover And Adjusting Bolt:
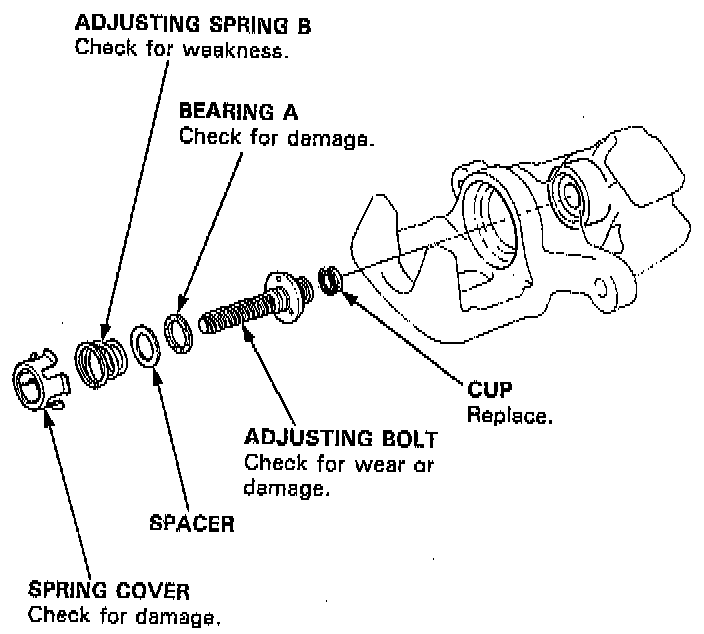
9. Remove the spring cover, adjusting spring B, spacer, bearing A and cup from the adjusting bolt.
Sleeve Piston And Pin:
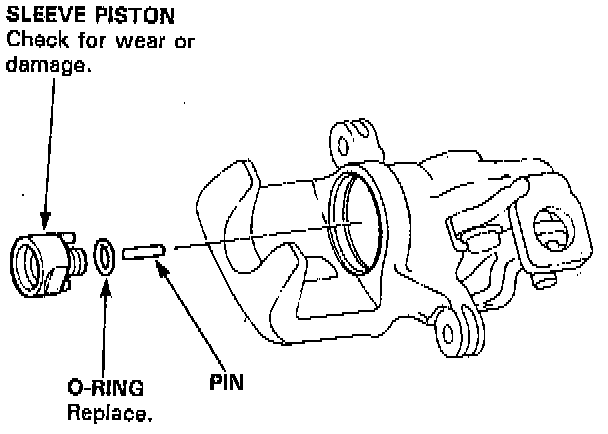
10. Remove the sleeve piston and remove the pin from the cam.
Parking Lever/Cam Assembly:
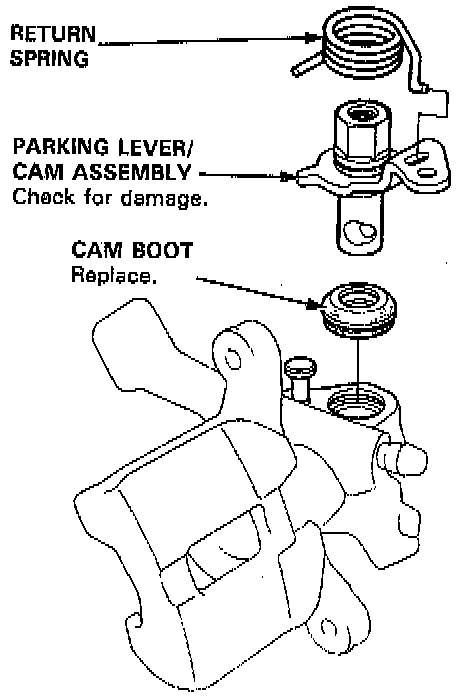
11. Remove the return spring.
12. Remove the parking lever and cam as an assembly from the caliper body.
CAUTION: Do not loosen the parking nut with the cam installed in the caliper body. If the lever and shaft must be separated hold the lever in a vise and loosen the parking nut.
13. Remove the cam boot.
REASSEMBLY

1. Pack all cavities of the needle bearing with grease.
Cam And Lever Assembly:
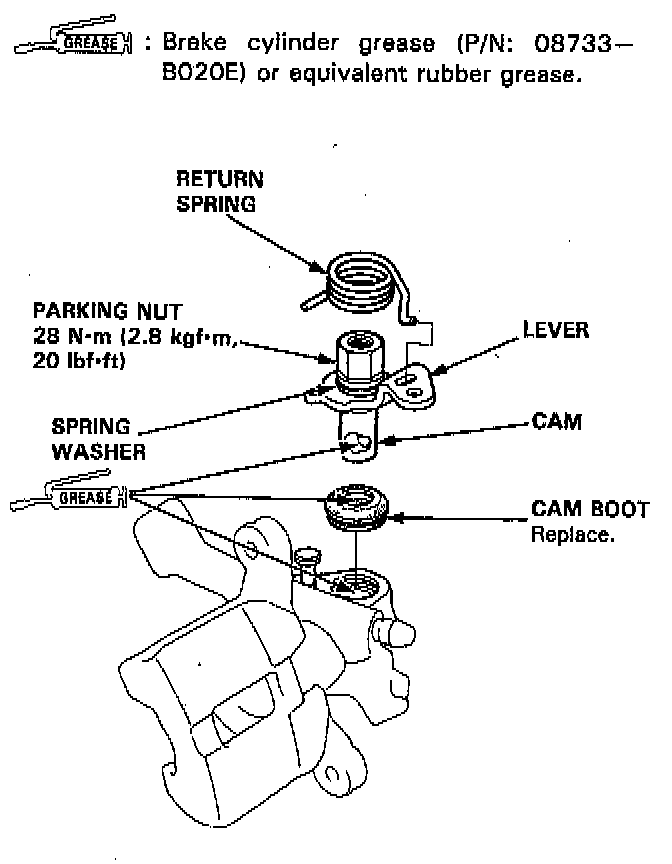
2. Coat the new cam boot with grease and install it in the caliper body.
3. Apply grease to the pin contacting area of the cam and install the cam lever assembly into the caliper body.
4. Instal the return spring.
CAUTION:
- When the cam and lever are separated be sure to assemble them before installing the cam in the caliper body. Install the lever and spring washer, apply locking agent to the threads and tighten the parking nut while holding the lever with a vise.
- Avoid damaging the cam boot since it must be installed before the cam.
- When installing the cam do not allow the cam boot lips to turn inside out.
5. Install the pin in the cam.
6. Apply grease to the new O-ring and install it on the sleeve piston.
Sleeve Piston And Pin:
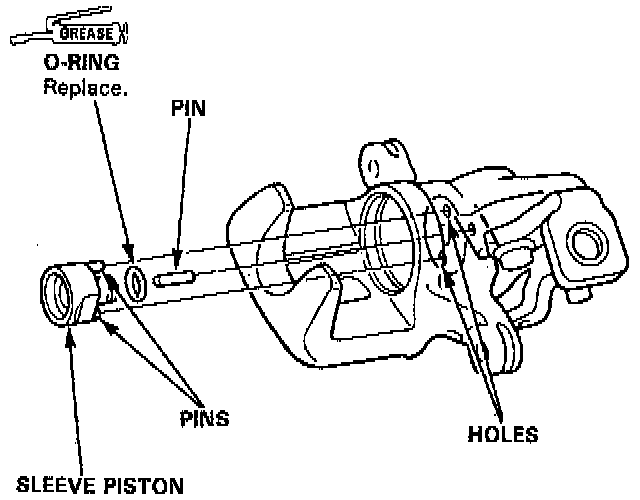
7. Install the sleeve piston so the hole in the bottom of the piston is aligned with the pin in the cam and the two pins in on the piston are aligned with the holes in the caliper.
8. Coat a new cup with grease and install it with its groove facing the bearing A side of the adjusting bolt.
Spring Cover And Adjusting Bolt:
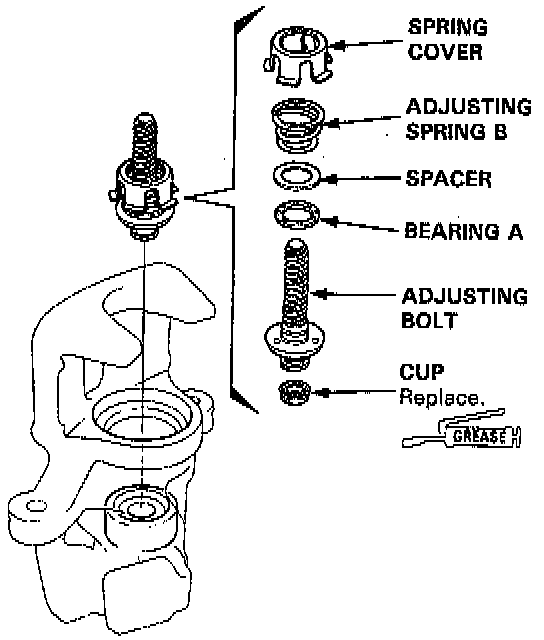
9. Fit the bearing A, spacer, adjusting spring B and spring cover on the adjusting bolt, then install them in the caliper body.
Brake Spring Compressor And Shaft:
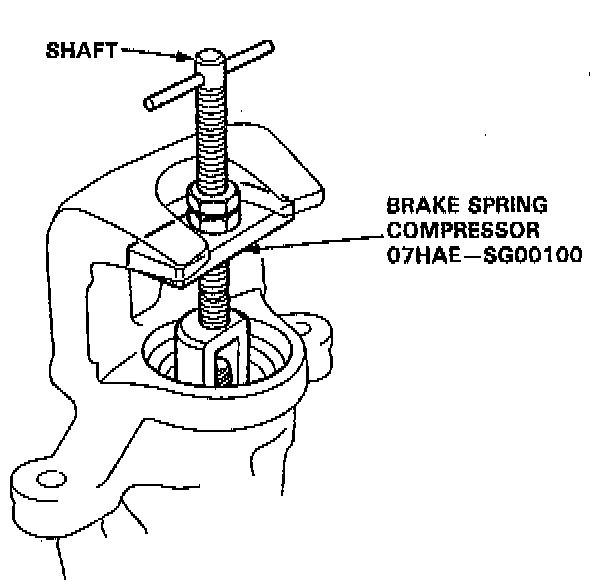
10. Install the special tool on the spring cover and turn the shaft until the locknut contacts the plate.
Special Tool:
Brake Spring Compressor # 07HAE-SG00100
11. Check that the flared end of the spring cover is below the circlip groove.
Install Circlip:
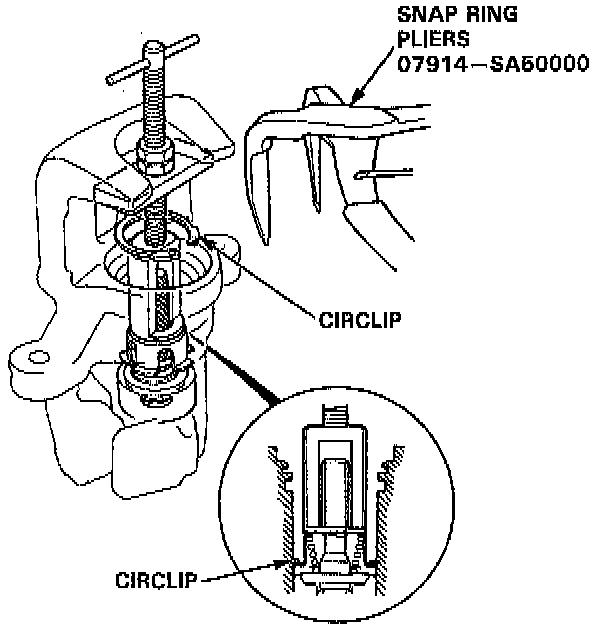
12. Install the circlip in the groove then remove the special tool.
Special Tool:
Snap Ring Pliers # 07914-SA50000
NOTE: Check that the circlip is seated in the groove properly.
13. Coat a new piston seal with silicone grease and install it in the caliper.
Piston Seal And Piston Boot:
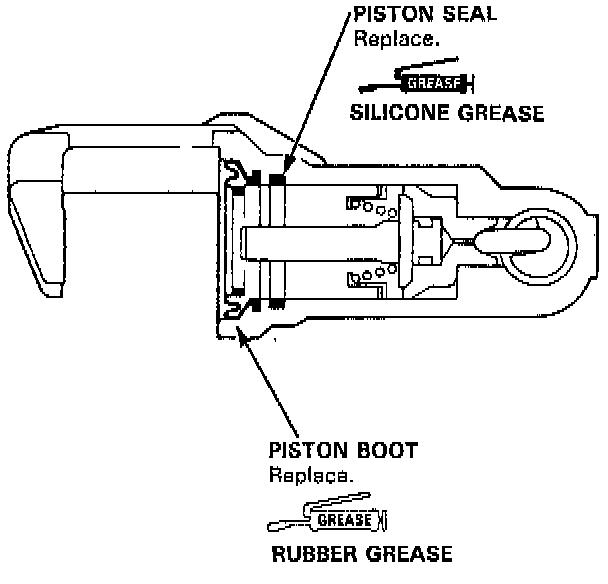
14. Apply brake cylinder grease (P/N: 08733-B020E) or equivalent rubber grease to the sealing lips and inside of a new piston boot then install it in the caliper.
15. Coat the outside of the piston with brake fluid and install it on the adjusting bolt while rotating it clockwise with the special tool (locknut wrench).
CAUTION: Avoid damaging the piston and the piston boot.