Multifunction Transmission Range Switch
Multifunction Transmission Range Switch
Special tools, testers and auxiliary items required
• Pry Lever - Rmv Outside Mirror (80 - 200)
• Setting Gauge (T10173)
Removing
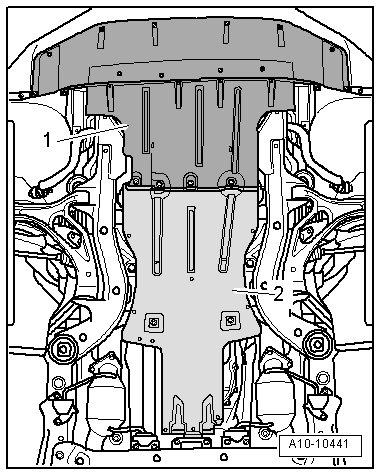
- Move the selector lever into the "N" position.
- Remove the rear noise insulation - 2 -.
Vehicles with a 4.2L Engine
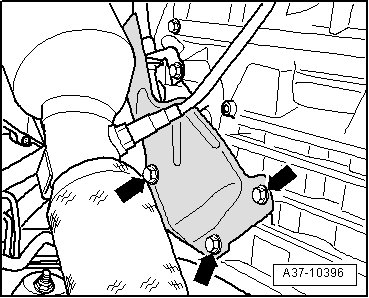
- Remove the heat shield bolts - arrows - and shield for the selector lever cable.
Vehicles with a 3.0L Engine
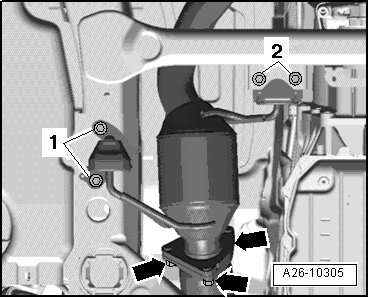
- Remove the particulate filter.
- Remove the bolts - 1, 3 and 4 - from the heat shield.
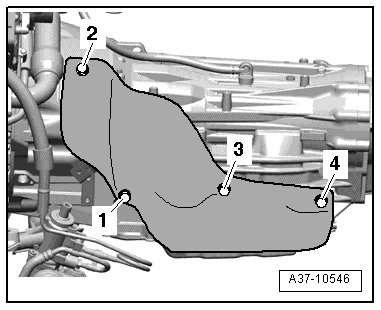
- Turn heat shield slightly to side.
• Ignore - 2 -.
Continuation for All
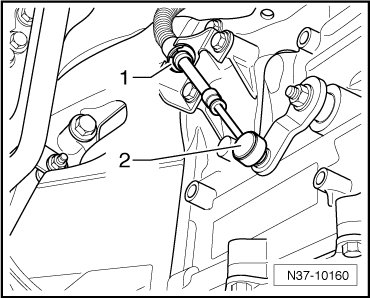
- Remove the ball head - 2 - on the selector lever cable from the selector lever shaft using (80 - 200).
Vehicles with a 4.2L Engine
- Remove the heat shield over the multifunction transmission range switch (F125).
Vehicles with a 3.0L Engine
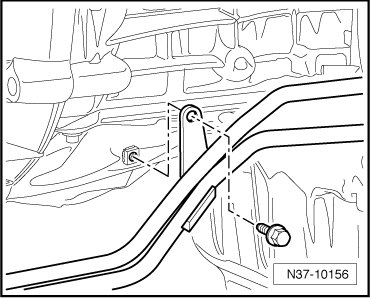
- Remove bolts from the ATF pipe bracket on the engine and transmission.
- Remove the bolt - arrow - and pull the ATF pipes out of the transmission.
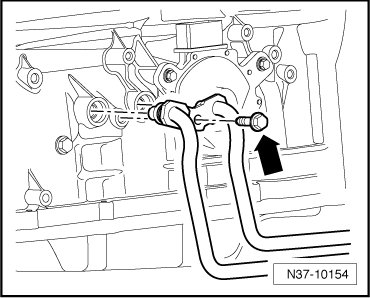
- Seal any open lines and connections with a clean plug from the (VAS 6122).
Continuation for All
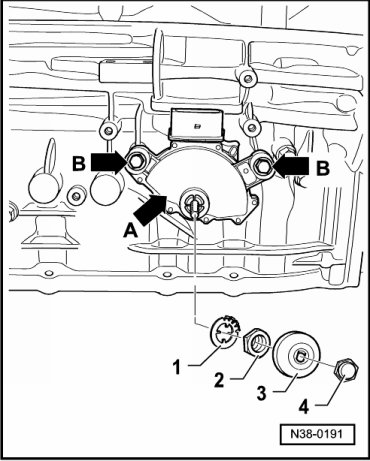
- Remove the nut - 4 - from the cover - 3 -.
- Remove the cover - 3 - from the selector shaft.
- Bend back the hooks on the lock washer - 1 - using a screwdriver.
- Remove the nut - 2 - and the lock washer - 1 - from the selector shaft.
- Disconnect the connector from the multifunction transmission range switch.
- Remove the bolts - arrows B - and the multifunction transmission range switch - arrow A - from the selector shaft.
Installing
• Selector lever in the "N" position.
Tightening specifications, refer to one of the following:
=> [ Selector Lever and Multifunction Transmission Range Switch Overview ] Description and Operation.
=> [ Selector Lever Cable Overview ] Description and Operation.
- Install the multifunction transmission range switch onto the selector shaft.
- Install the bolts - arrows B - for the multifunction transmission range switch hand-tight.
- Install the (T10173) on the selector shaft.
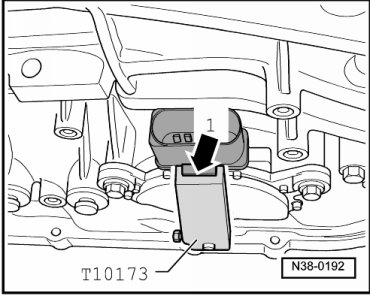
• If the connector tab cannot engage in the (T10173) groove, the transmission is not in "N" or the selector lever cable is adjusted incorrectly.
- Turn the multifunction transmission range switch - A - until the tab on the connector - arrow 1 - locks into the groove on the (T10173).
- Secure the (T10173) with the side screw.
- Tighten the bolts- arrows B - from the multifunction transmission range switch.
- Remove the (T10173) from the selector shaft.
- Connect the connector to the multifunction transmission range switch.
- Turn the ignition on.
The following conditions must be met:
• The "N" in the "P R N D S" display in the transmission range display (Y6) must be lit.
• The "N" in the selector lever transmission range position display unit (Y26) must light up.
• The shift lock solenoid (N110) must lock the selector lever in the "N" position.
- Turn off the ignition.
- Attach the lock washer - 1 - to the selector shaft.
- Tighten the nut - 2 -.
- Secure the nut - 2 - by bending the hooks on the lock washer downward - 1 -.
• Replace the lock washer if several of the hooks break off while being bent.
- Place the cover - 2 - on the selector shaft and tighten the nut - 1 -.
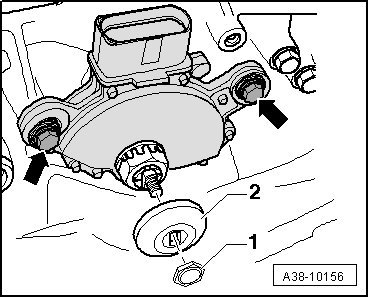
• Selector lever shaft must not be bent when pressing the selector lever cable on, counterhold if necessary.
- Carefully press the selector lever cable - 2 - onto the selector lever shaft. Be careful not to bend the selector lever.
Vehicles with a 4.2L Engine
- Install the heat shield over the multifunction transmission range switch.
Vehicles with a 3.0L Engine
- Install the ATF pipes. Refer to => [ ATF Pipes and Cooler ] Removal and Replacement.
- Check the ATF level. Refer to => [ ATF Level, Checking and Filling ] ATF Level, Checking and Filling.
Continuation for All
Install in reverse order, paying attention to the following:
- Check the selector lever cable adjustment. refer to => [ Selector Lever Cable, Adjusting ] Service and Repair.