Windshield Assembly Overview
Windshield Assembly Overview
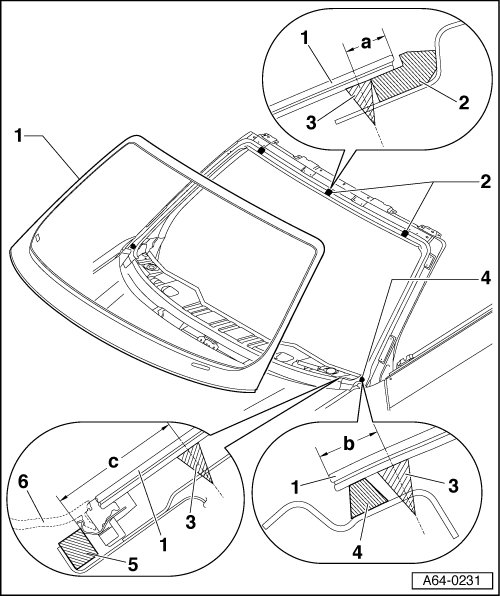
1 Windshield
• Removing => [ Windshield ] Windshield.
• Installing => [ Preparing for Window Installation ] Preparing for Window Installation.
• When installing, slide up to stop on spacer buffer => [ (Item 2) Upper spacer buffer ].
• Align distance - d - at sides.
• Stickers on windshield (e.g. for airbag) must be replaced in same position on new windshield.
2 Upper spacer buffer
• Qty. 3, self-adhesive.
• Attach in regular intervals to retaining strip.
• Attach 1 in center of vehicle on window flange at a distance of 430 mm to left and right.
3 Adhesive sealing material
• Observe curing times => [ Minimum Curing Times ] Minimum Curing Times.
• Note varying spacing dimensions to window edge.
• Distances from upper and side window edge, dimension - a - = 16 mm and dimension - b - = 12 mm.
• The distance on the lower window edge is measured from the outer side of the clip outward.
• The distance to the lower window edge does not run in parallel distance to window edge.
• Distances => Windshield.
• Bead cross section.
• Bead width = 8 mm + +2 mm.
• Bead height = 13.5 mm + +1.5 mm.
4 Lower spacer buffer
• Qty. 2, self-adhesive.
• Attach in corners on lower window edge.
5 Window adjuster
• Slide sideways on lower window edge as far as stop.
6 Plenum chamber cover
• Pull protective piping from retaining strip before installing plenum chamber cover => [ Removing protective piping for grip channel ].
• Press into fastening strip only after window adhesive curing time has elapsed.
Removing protective piping for grip channel
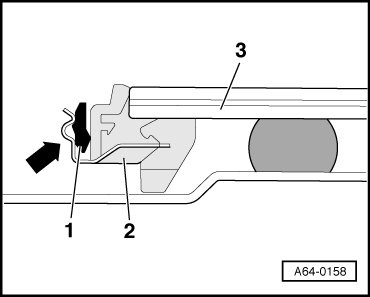
- Pull off protective piping from grip channel only after installing window.
- Before installing plenum chamber cover, protective piping - 1 - must be pulled out of grip channel - 2 - of windshield - 3 -.