Heater Core: Service and Repair
Heat Exchanger
• Hose clamps up to dia. 40 mm (3093) or hose clamps up to dia. 25 mm (3094)
• Compressed air gun, commercially available
• Cooling system tester (V.A.G 1274/) (with hand pump and corresponding adapters)
Removing
- Remove the plenum chamber cover.
- Unclamp the Battery (A) and remove it.
• Before disconnecting Battery (A), obtain anti-theft radio security code if necessary.
• In vehicles with electrically adjustable seats, move the seats back as far as possible before disconnecting the Battery (A).
- Dissipate pressure in coolant circuit by opening cap at coolant expansion tank.
- Mark arrangement of coolant hoses - A - and - B -.
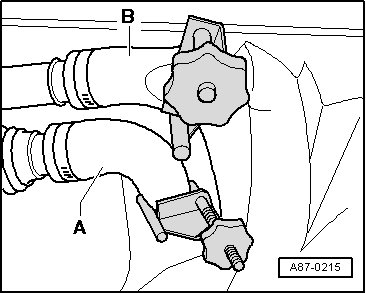
- Clamp off both coolant hoses to the heat exchanger of the A/C unit (e.g. using hose clamps up to dia. 25 mm (3094)) and remove them.
• Connect the coolant hoses on the proper side:
• Coolant hose - A - supply hose from the cylinder head.
• Coolant hose - B - return hose to water pump.
• Bleed coolant circuit.
- Place a container under connection - A -.
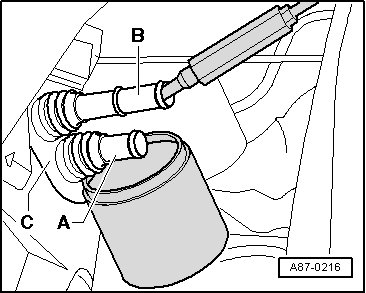
- Attach a piece of hose to connection - B - and carefully blow the coolant with a compressed air gun out of the heat exchanger (into the container).
- Remove grommet - C -.
- Remove the storage compartment on the driver side.
- Remove the gas pedal module.
- Remove screws - A - and remove cover - B - from the coolant pipes.
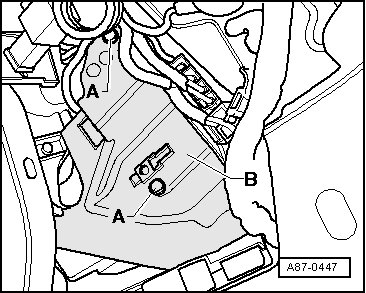
- Cover the carpet under the connections to the heat exchanger with absorbent paper.
- Release clamps - A - and remove both coolant pipes - B - and - C - from the heat exchanger connections.
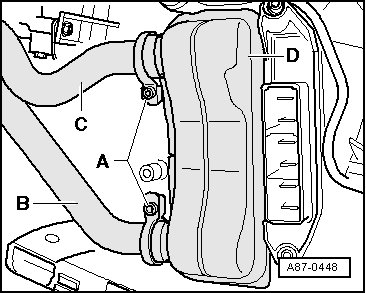
- Pull heater core - D - out of air conditioner.
Installing
- With the heat exchanger removed, check the A/C unit for soiling (via the heat exchanger shaft).
- If necessary remove the dirt or residual coolant from the A/C unit (for example after removing a leaky heat exchanger).
- Check seals - A -, - B -, and - C - installed on the heat exchanger. Only install a heat exchanger with undamaged seals.
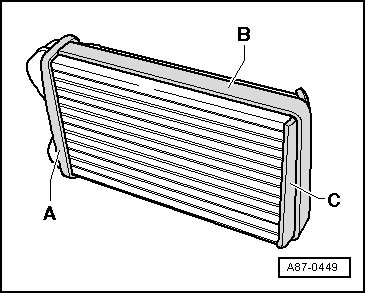
- Moisten new seals - A - lightly with coolant.
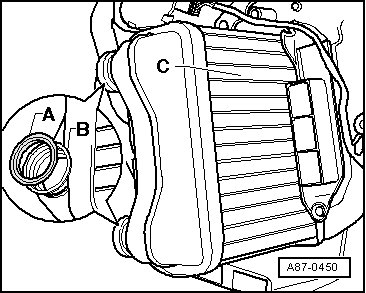
- Insert new seals - A - (included in the delivery scope of the heat exchanger) in the connections of heat exchanger - B -.
- Insert heat exchanger - C - into the A/C unit.
- Remove old clamps - A - from both coolant pipes - B - and - C -.
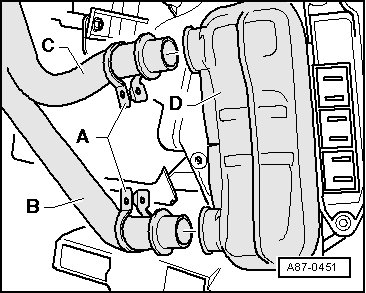
- Install new (included in delivery of heater core) clamps - A - on both coolant pipes for heater core according to illustration.
- Push both coolant pipes - B - and - C - into heat exchanger connections - D -.
- Recheck the seating of the seals between the coolant pipes and heat exchanger.
- Secure both coolant pipes - B - and - C - with clamps - A - on the heat exchanger.
- Check the seating of both clamps - A -. They must enclose the flange on the heat exchanger and coolant pipe completely and must not touch other components.
- Tighten bolts on clamps - A - to 2.5 Nm.
- Connect coolant hoses properly to heater core. Observe markings:
A Supply hose from cylinder head
B Return hose to water pump
- Reinstall the removed components in reverse order of removal except the driver side storage compartment.
- Bleed the cooling circuit.
• The heat exchanger must be additionally bled by the arrangement of the coolant pipes to the heat exchanger of the A/C unit. Proceed as follows:
• - Bleed the coolant circuit.
• - Switch the ignition off.
• - Carefully open the coolant reservoir cap (observe safety precautions when opening the cap).
• Release the clamp on coolant hose - B -.
• Push hose - B - back until the bore in the hose is no longer closed by the pipe.
• Increase the pressure in the coolant circuit e.g. using the hand pump of the cooling system tester (V.A.G 1274/)
• Bleed the heat exchanger via hose - B - until the coolant is bubble-free.
• Connect coolant hose - B - and secure it with the clamp.
• If necessary add coolant.
- Check coolant circuit for leaks, pay particular attention between coolant hoses and heater core.
- Reinstall driver's side storage compartment and remaining removed components.