Air Flow Door Motor
Air Flow Door Motor
• This control motor is only installed in vehicles with steering on the left.
• The flaps operated by this motor are the fresh air and back pressure flaps in a vehicle with steering on the left (these flaps are operated by the back pressure flap motor (V113) in a vehicle with steering on the right. Back pressure control is not provided).
Removing
- Remove glove box.
- Disconnect connector - A -.
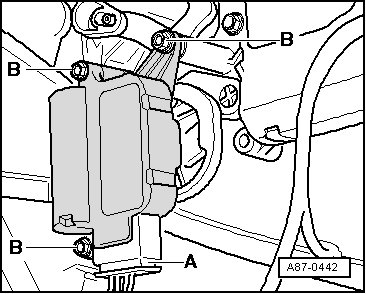
- Remove bolts - B -.
- Remove the back pressure flap motor (V71).
Installing
• The cam plate on the control motor is color-coded. In the back pressure flap control motor (V71) it is light blue.
- Insert pin - A - in groove - C - and pin - B - in groove - D - of the cam plate (pins - A - and - B - and grooves - C - and - D - have a different ground).
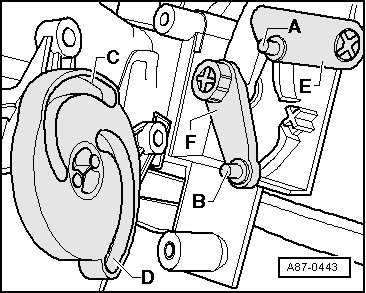
• During insertion ensure that actuator arms - E - and - F - are correctly seated on the corresponding bearing journal.
Reinstall all removed components in the opposite sequence while observing the following:
- Install the wiring harness so that it cannot come in contact with any moving parts (e.g. the lever of the control motor).
- Query the DTC memory. Refer to => [ DTC Memory, Interrogating ] DTC Memory, Interrogating and erase the DTC memory. Perform the basic setting => [ Basic Setting ] Basic Setting.
• The function of the control motor can be checked for example: Connect both terminals "5" and "6" in control motor connector to 12 V (DC), the motor moves in one direction until stop, the direction of rotation changes by interchanging B+ and Ground. Use an adapter cable for this. Refer to => [ Preparing Adapter Cables for Control Motor Actuation ] A/C System Control and Regulation Components.