Brake Intervention Sensor / Switch: Service and Repair
Brake Lamp Sensor
Special tools, testers and auxiliary items required
• Release Tool for Brake Light Switch (T40168)
• After removing, the brake lamp sensor can be re-used.
• The brake light sensor programs itself. It is not necessary to calibrate it after installation.
Removing
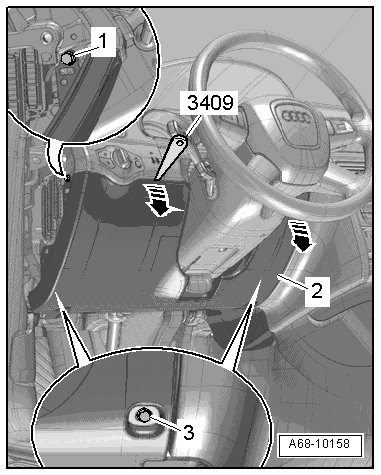
- Remove the driver side storage compartment - 1 to 3 -.
- Disconnect the connector - C - for the footwell vent.
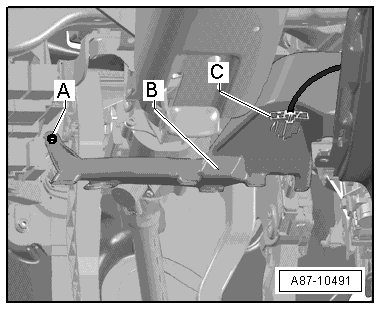
- Remove the footwell vents - A-B -.
- Disconnect the electrical connector to the brake light sensor.
The stop - 17 - on the brake pedal is an assembly aid during production and does not need to be installed again.
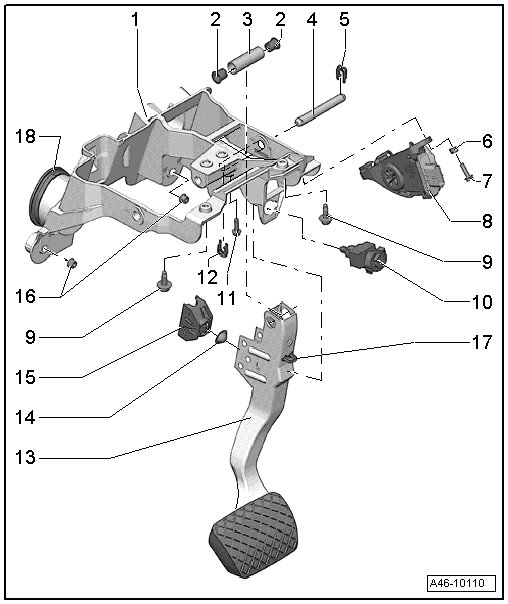
- Press the brake light sensor plunger - 10 - all the way in using a finger.
- With the plunger pressed in, rotate the colored piece on the brake light sensor left as far as the stop to release the switch.
• The plunger must remained pressed in when releasing the brake light sensor.
- Let go of the brake light sensor plunger after releasing.
- Insert a (T40168) between the brake light sensor plunger and the brake pedal.
• The cone on the tool must face in the direction of the driver seat. The opening on the tool must align with the bulge on the brake light sensor.
- Press the (T40168) against the brake lamp sensor. This releases the three retaining tabs on the brake lamp sensor.
- Remove the brake lamp sensor from the mount.
Installing
The stop - 17 - on the brake pedal is an assembly aid during production and does not need to be installed again.
• The plunger adjusts itself automatically when inserting the brake lamp sensor.
• The brake pedal must remain in end position during installation and must not be moved.
• The brake pedal must be connected with the brake booster.
- Insert the brake lamp sensor in the mount on the brake pedal and press it in lightly.
• The brake lamp sensor must engage audibly with all three retaining tabs.
• The switch must not be rotated in the mount on the brake pedal.
• The plunger adjusts itself automatically when inserting the brake lamp sensor.
- Rotate the colored piece on the brake lamp sensor to the right as far as the stop to secure the switch.
- Connect the electrical connector.
- Install the footwell vents - A-B -.
- Connect the connector - C - for the footwell vent.
- Install the driver side storage compartment - 1 to 3 -.
• Check the brake lamp sensor function after installing it and before driving.