Fuel Injectors, Checking
Fuel Injectors, Checking
Observe all safety precautions: => [ Safety Precautions ] General Information
View clean working conditions: => [ Clean Working Conditions ] Clean Working Conditions
Use only gold-plated terminals when servicing any component with gold-plated electrical harness connector terminals.
For wiring diagrams, component locations, and connector views, Refer to the applicable wiring diagram.
Special tools, testers and auxiliary items required
• multimeter.
• Diode test lamp (12V).
• Wiring diagram.
Test requirements
• The Engine Speed (RPM) Sensor (G28) OK.
• Battery voltage at least 12.5 volts.
• All electrical consumers such as, lights and rear window defroster, switched off.
• Vehicles with automatic transmission, shift selector lever into position "P" or "N".
• A/C switched off.
• Ground (GND) connections between engine/transmission/chassis OK.
• Ignition switched off.
- Observe safety precautions.
- Observe rules for cleanliness.
Test procedure
- Perform a preliminary check to verify the customers complaint. Refer to => [ Preliminary Check ] Preliminary Check
Start diagnosis
- Remove the engine cover with air filter. Refer to appropriate service information.
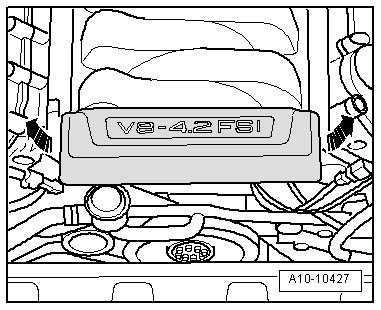
- Disconnect the 16 pin connector from the fuel injector assembly harness (located just below and to the right of the electronic throttle motor assembly).
- Using a multimeter connected to ground, check terminal 1 of each injector for the correct voltage.
Specified value: 22 - 25 V.
If voltage is below specification:
Checking internal resistance
- Using a multimeter, check the Fuel Injector electrical terminals (1 to 2 for each injector) for resistance.
Specified value: 1.4 - 2.6 ohms (at approx. 20° C)
If the specified value was not obtained:
- Replace the malfunctioning Fuel injector(s). Refer to appropriate service information.
If the specified value was obtained:
Checking activation and wiring
- Connect a diode test lamp (12V) from Battery + to the injector harness connector terminal (1 for each injector)of the Fuel Injector to be tested.
- Operate the starter and test the activation of the Fuel Injector.
LED should flicker.
- Switch the ignition off.
If LED does not flicker:
If the manufacturers test box is being used, perform the following step.
- Install the test box.
If the manufacturers test box is not being used, perform the following step.
- Remove the Motronic Engine Control Module (ECM) (J623). Refer to appropriate service information.
- Using a multimeter, check the Fuel Injector electrical harness connector terminal 2 of each injector to the Motronic Engine Control Module (ECM) (J623) electrical harness connector T105 terminals for an open or short to ground circuit.
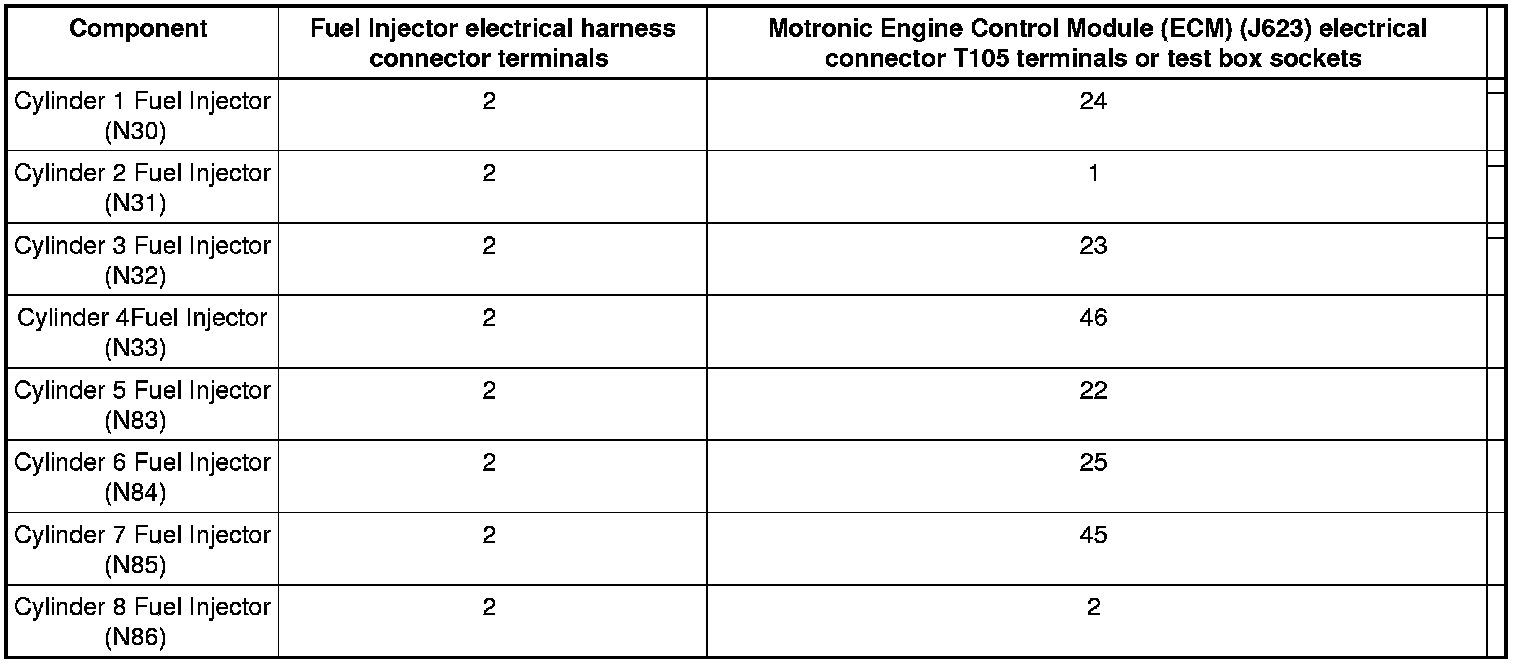
Specified values: 1.5 ohms max. for wire continuity, and for circuit to ground check; Infinite or "OL" is displayed
If the specification is not obtained:
- Check the wiring for an open, high resistance or short to ground.
- Check the electrical harness connector for damage, corrosion, loose or broken terminals.
- If necessary, repair the faulty wiring connection.
If no malfunction is detected in the wiring:
- Replace the Motronic Engine Control Module (ECM) (J623). Refer to appropriate service information.
- Install the engine cover with air filter. Refer to appropriate service information.
Final procedures
After the repair work, the following work steps must be performed in the following sequence:
1. Check the DTC memory. Refer to => [ Diagnostic Mode 03 - Read DTC Memory ] Diagnostic Modes 01 - 0A.
2. If necessary, erase the DTC memory. Refer to => [ Diagnostic Mode 04 - Erase DTC Memory ] Diagnostic Modes 01 - 0A.
3. If the DTC memory was erased, generate readiness code. Refer to => [ Readiness Code ] Programming and Relearning.