Sanden A/C Compressor
Sanden A/C Compressor
• Belt pulley is sensitive to impact. Handle it with special care
• If overload protection of pulley triggers, check the A/C compressor for ease of motion before replacing the pulley. If the A/C compressor creates friction, replace it completely.
• To remove belt pulley, it depends on engine version if it is necessary to remove A/C compressor from engine. Refer to => [ A/C Compressor, Removing From Bracket ] A/C Compressor, Removing From Bracket.
• Different versions of the belt pulley may be installed depending on the A/C compressor and engine. Make sure to use the correct allocation. Refer to the Electronic Parts Catalog.
- Perform preliminary work as for removing belt pulley, refer to => [ A/C Compressor Belt Pulley, Replacement ] A/C Compressor Belt Pulley, Replacement.
Replacing a version 1 belt pulley (installed in 5 cylinder TFSI vehicles)
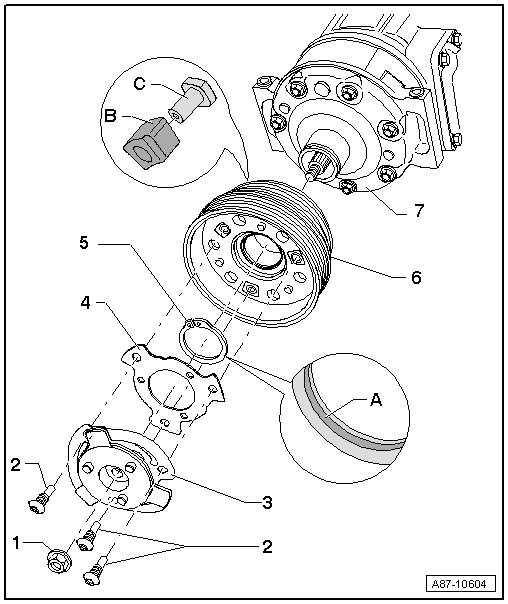
1 Hex Head Nut
• The A/C compressor shaft may be covered with a plastic cap to protect the threads on it (the plastic cap is not illustrated).
• To loosen and tighten hex nut, hold belt pulley firmly in place using a standard band wrench (with webbing).
• Clean threads of hex nut and threads of A/C compressor shaft of old thread locking compound before screwing on.
• Install the hex nut with thread locking compound (e.g. with D 000 600 A2). Refer to Electronic Parts Catalog (ETKA).
• Nut tightening specification: 25 Nm
2 Screw
• To loosen and tighten bolts, hold belt pulley firmly in place using a standard band wrench (with webbing).
• Tightening specification: 12 Nm
• Clean old bolt locking compound from thread of bolts and threads of belt pulley before screwing on.
• Install the bolts with thread locking compound (for example, D 000 600 A2). Refer to the Electronic Parts Catalog.
3 Drive Plate
• The overload protection (securing spring elements), takes over when the torque is excessive (for example, if the A/C compressor runs with resistance) and the belt pulley runs freely without driving the A/C compressor.
• Drive plate spring elements damp vibrations and noise.
4 Spacer
5 Circlip
• Replace
• Install on proper side, beveled insertion edge - A - faces away from A/C compressor (install flat side facing the A/C compressor).
• When installing circlip, note that it cannot be bent open more than is necessary for installation.
6 Belt Pulley With Double Belt Guide
• Clean A/C compressor flange before sliding on pulley.
• With rubber elements - B - and threaded plates - C - for decoupling belt pulley from A/C compressor input shaft (rubber elements damp vibrations and noise).
• The threaded plates - C - can also be connected to each other by a ring, depending on the version.
• The belt pulley will control 2 belts on vehicles with a 5 cylinder engine.
7 A/C Compressor
• Different versions may be installed, depending on engine version and country version of vehicle. Refer to Electronic Parts Catalog (ETKA).
• Clean A/C compressor flange before sliding on pulley.
Replacing a version 2 belt pulley (installed in 4 or 6 cylinder engines)
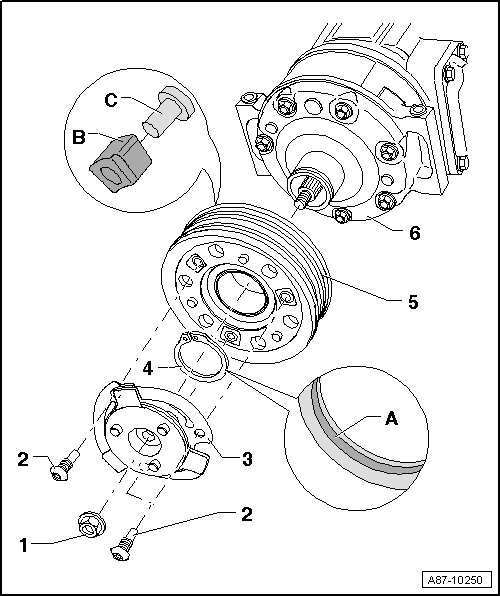
1 Hex Head Nut
• The A/C compressor shaft may be covered with a plastic cap to protect the threads on it (the plastic cap is not illustrated).
• To loosen and tighten hex nut, hold belt pulley firmly in place using a standard band wrench (with webbing).
• Clean threads of hex nut and threads of A/C compressor shaft of old thread locking compound before screwing on.
• Install the hex nut with thread locking compound (e.g. with D 000 600 A2). Refer to Electronic Parts Catalog.
• Nut tightening specification: 25 Nm
2 Screw
• To loosen and tighten bolts, hold belt pulley firmly in place using a standard band wrench (with webbing).
• Tightening specification 12 Nm
• Clean old bolt locking compound from thread of bolts and threads of belt pulley before screwing on.
• Install the bolts with thread locking compound (for example, D 000 600 A2). Refer to the Electronic Parts Catalog.
3 Drive Plate
• The overload protection (securing spring elements), takes over when the torque is excessive (for example, if the A/C compressor runs with resistance) and the belt pulley runs freely without driving the A/C compressor.
• Drive plate spring elements damp vibrations and noise.
4 Circlip
• Replace
• Install on proper side, beveled insertion edge - A - faces away from A/C compressor (install flat side facing the A/C compressor).
• When installing circlip, note that it cannot be bent open more than is necessary for installation.
5 Belt Pulley
• Clean A/C compressor flange before sliding on pulley.
• With rubber elements - B - and threaded plates - C - for decoupling belt pulley from A/C compressor input shaft (rubber elements damp vibrations and noise).
• The threaded plates - C - can also be connected to each other by a ring, depending on the version.
6 A/C Compressor
• Different versions may be installed, depending on engine version and country version of vehicle. Refer to Electronic Parts Catalog (ETKA).
• Clean A/C compressor flange before sliding on pulley.