Cellular Mobile Telephone System - Installation
90caddy10 NO.: 90-I-60DATE: June, 1990
GROUP: 9 CORP. NO.: 019003R
SUBJECT: CELLULAR MOBILE TELEPHONE SYSTEM
SECTION 1 - 1990 FACTORY PHONE PROGRAMS
1.1 1990 Allante Factory Phone Program
For 1990, Allante was the only Cadillac model with factory cellular phone as an available option. The Allante could have been ordered with one of the following options:
UZ3......Complete phone installation (including handset and transceiver)
UZ1......Cellular phone provisions package (does not include handset and transceiver)
IMPORTANT: The UZ1 provisions package equips a 1990 Allante for the new E&C Bus (Entertainment and Comfort Bus) cellular transceiver and handset. The UZ1 provisions package is not compatible with any previous model year cellular phones offered by Cadillac (the earlier systems use a mute module for interface with the audio system). To install an owner's pre-1990 transceiver and handset in a 1990 Allante, refer to Section 2.2 below.
1.2 1990 Eldorado and Seville Factory Phone Programs
The cellular telephone option was not available for the 1990 Eldorado and Seville. Neither a complete installation nor a provisions package were offered as a factory option. Refer to Section 3.0 below for dealer installation package information.
1.3 DeVille/Fleetwood Factory Phone Programs
The cellular telephone option for DeVille/Fleetwood was cancelled in 1989 and remains cancelled in 1990 and 1991. No factory or dealer provisions package is available.
SECTION 2 - DEALER INSTALLATION PACKAGES FOR 1990 ALLANTES
2.1 Dealer Installation on 1990 Allante
If an owner of a 1990 Allante wishes to purchase the Cadillac cellular phone for a dealer installation, two part numbers must be ordered from GMSPO by the dealership:
^ Provision Package...........................................3523285 (UZ1)
(Contains wiring harness, tri-band antenna, hang-up cup, installation instructions, etc.)
^ Mirror with Microphone...........................................1649581 (For semi-automatic top equipped vehicles only)
^ Components Package........................................1648756 (UZ3) (Contains transceiver, handset, and owner's manual)
The provisions package will include all necessary installation instructions.
2.2 Transferring a 1987, 1988, or 1989 Cadillac Down-Sized Transceiver and Handset into a
1990 Allante
A dealer installation package has been made available to allow an owner with a 1987, 1988, or 1989 Cadillac Down-Sized transceiver and handset to move the phone into a 1990 Allante. Order the provisions package listed below from GMSPO:
Allante Provisions Package.........................................1647054 (Instructions are included in the package)
Mirror: Microphone Assembly.....................................1649581 (For semi-automatic top equipped vehicles only)
If a 1990 Allante has been ordered with the UZ1 provisions kit, it must be removed prior to installing the above provisions kit.
Due to changes to the system harnesses, it is not possible to install any of the Cadillac cellular telephone systems in a 1991 Allante.
SECTION 3 - 1990 ELDORADO/SEVILLE DEALER INSTALLATION PACKAGES
To install a 1988 or 1989 cellular telephone in a 1990 or 1991 Eldorado or Seville:
1. Order the appropriate provisions package from GMSPO:
^ Non-Bose provisions package.........................................1644540
^ Bose provisions package................................................1644541
2. To complete the installation of the telephone provisions kit, it is necessary to order and install additional wiring. This wiring includes:
^ Power and ground jumper
^ Microphone jumper
^ Radio jumper
A limited number of wiring kits consisting of these three jumpers are available through CAD-STAR. Install the wiring kits in conjunction with the appropriate provisions package from GMSPO.
Figure 1 - Jumpers Included in Wiring Kits:
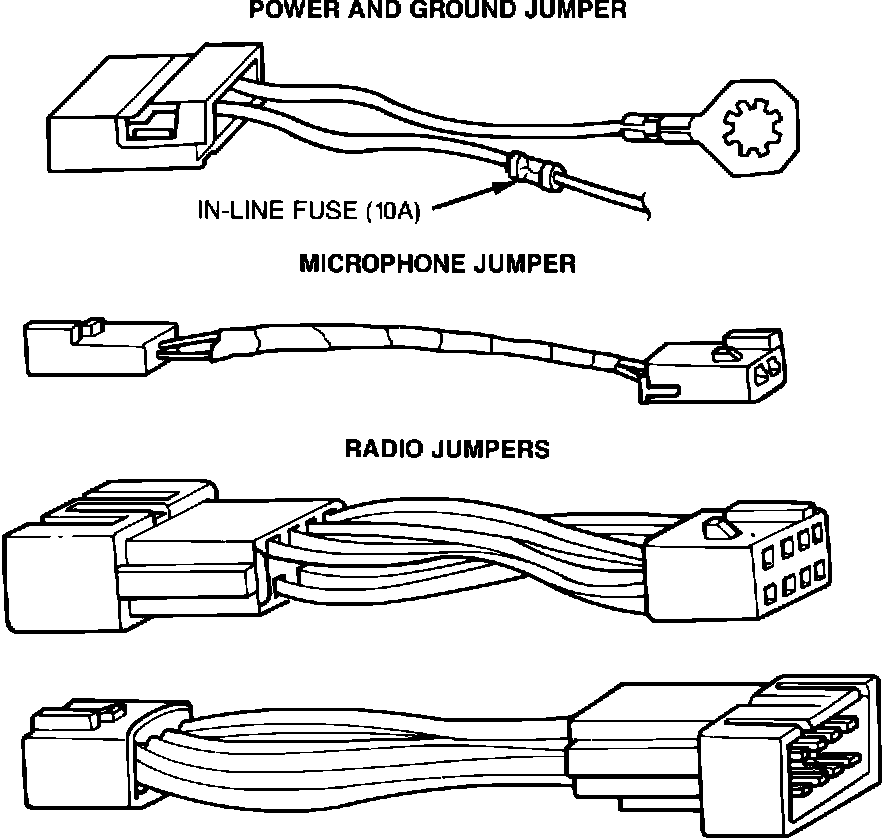
Refer to Figure 1.
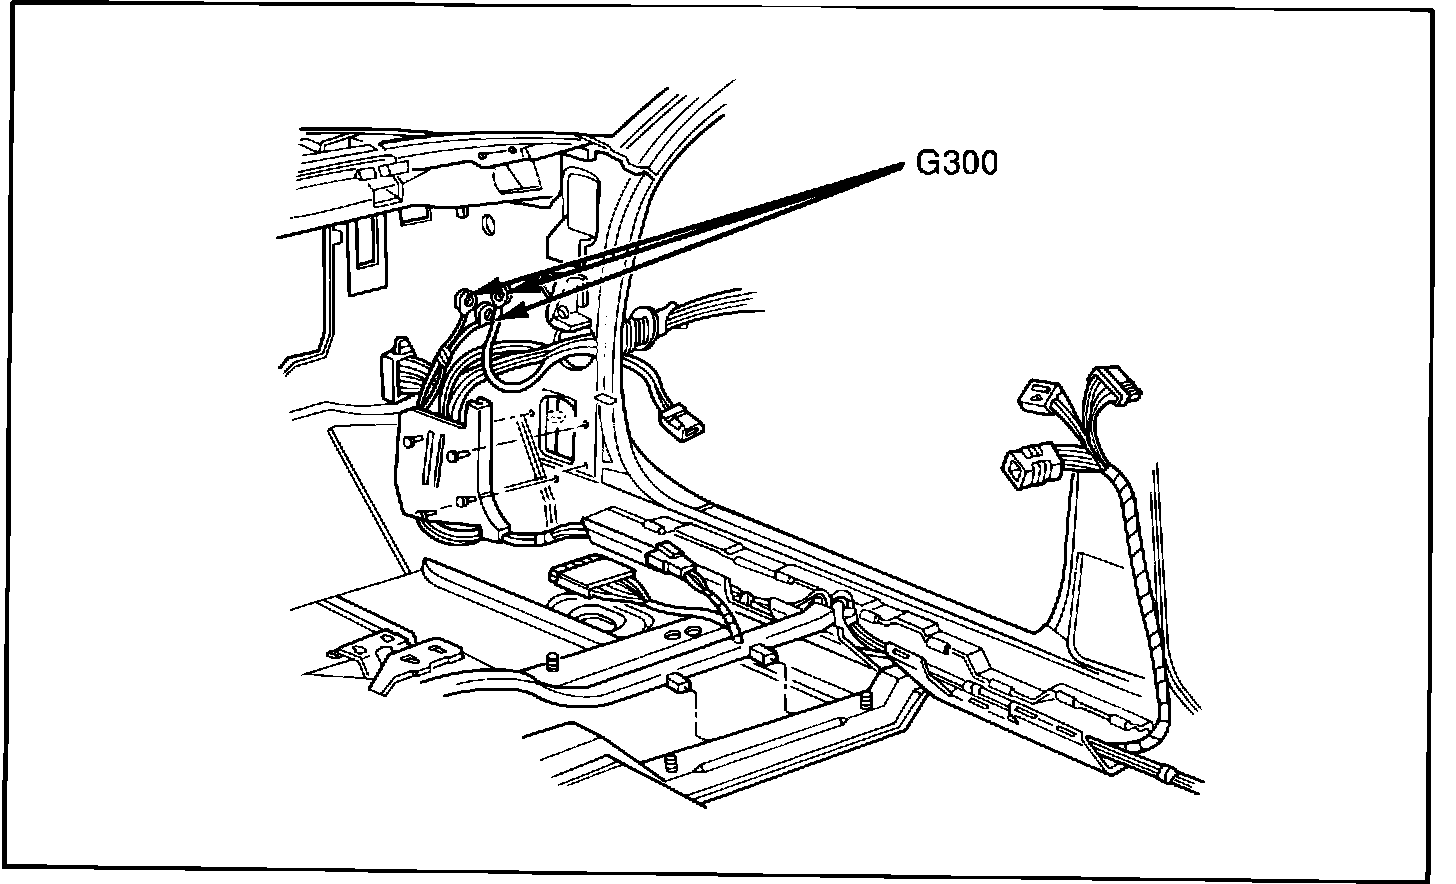
Figure 2 - Connect Ring Terminal to Body Ground G300:
PROCEDURES FOR JUMPER INSTALLATION
Power Jumper:
a. Disconnect battery.
b. Connect ring terminal to body ground G300 located behind I/P on upper RH shroud. Refer to Figure 2.
Figure 3 - Splice Fused Jumper to Hot Side:
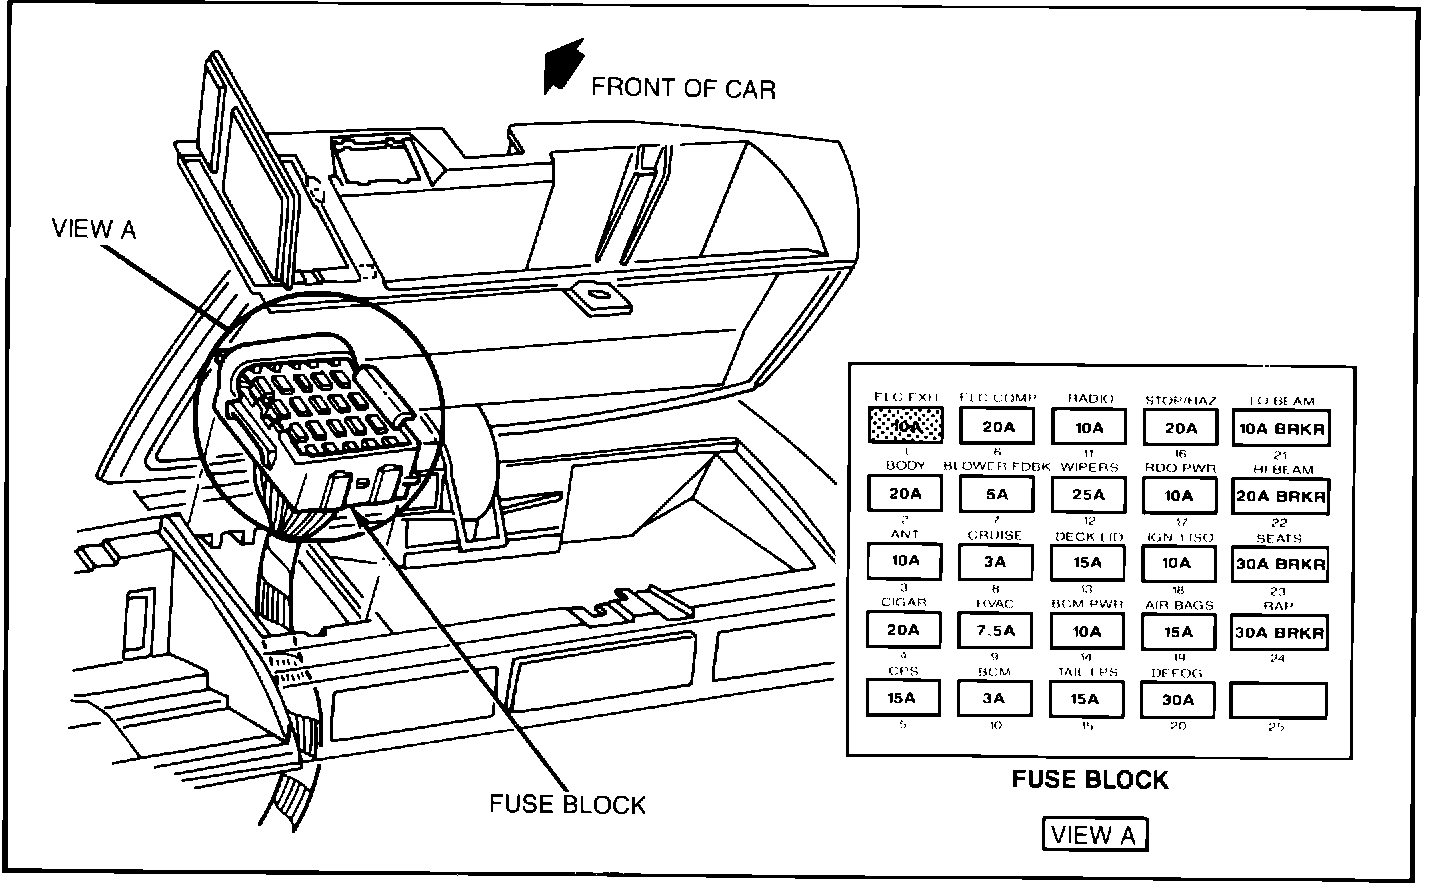
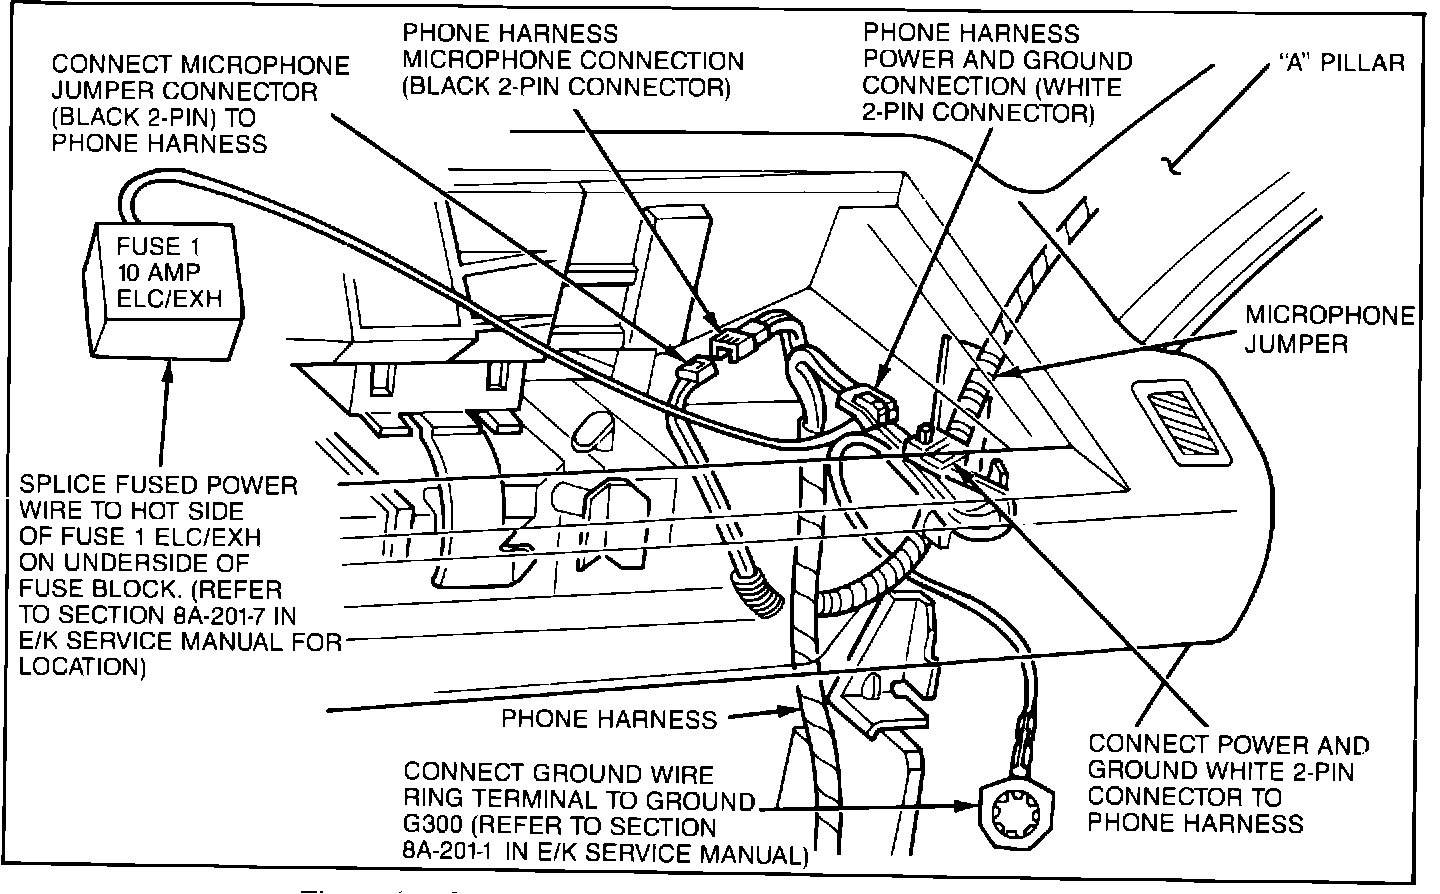
Figure 4 - Connect Black Two Pin Connector to Phone Harness:
c. Remove fuse block from fixed position.
d. Splice the fused jumper wire to the hot side of fuse 1 (10 amp - elc exh). Refer to Figure 3.
e. Connect white 2 pin connector on power jumper to phone harness white 2 pin connector. Refer to Figure 4.
Microphone Jumper:
a. Connect black 2 pin connector to phone harness. Refer to Figure 4.
b. Route the other end up pillar A to dome light for microphone connection.
c. Connect black 2 pin connector for microphone connection.
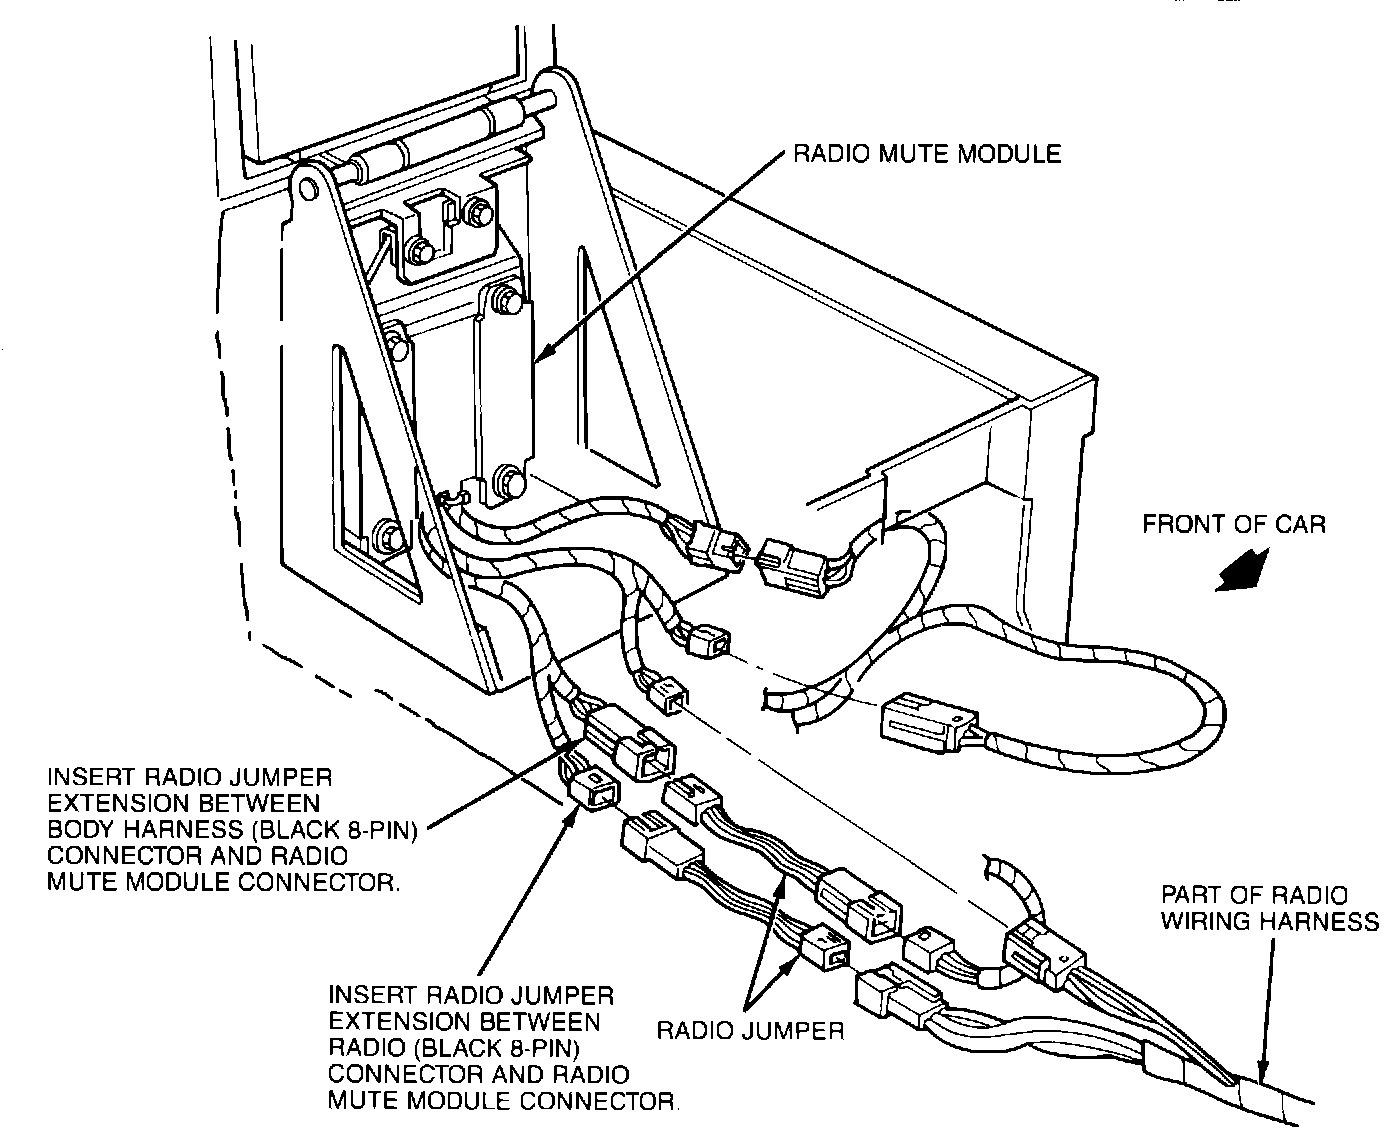
Figure 5 - Insert Radio Jumper Extension:
Radio Jumper:
a. Insert radio jumper extension between 8 pin male black connector from radio mute module to cross car body harness 8 pin connector. Refer to Figure 5.
b. Insert radio jumper extension between 8 pin female black connector from radio mute module to 8 pin radio connector. Refer to Figure 5.
Parts are currently available from GMSPO.