Brake Pressure Modulator Valve Replacement
Brake Pressure Modulator Valve Replacement (with LC3 - 8 Cyl, 4.4L, SC, DOHC)
Removal Procedure
Notice: Always connect or disconnect the wiring harness connector from the EBCM/EBTCM with the ignition switch in the OFF position. Failure to observe this precaution could result in damage to the EBCM/EBTCM.
Important:
* The ignition switch must be placed in OFF mode ONLY, before disconnecting the negative battery cable during this procedure. If the ignition switch is accidentally placed into ignition ON engine OFF mode, the control modules will be activated and disconnecting the negative battery cable will cause various DTCs to be set. Refer to Keyless Entry System Description and Operation (Description and Operation) .
* After the ignition switch is placed into OFF mode, a waiting period of 2 minutes must be observed to allow the high-speed LAN control modules to deactivate before disconnecting or connecting the negative battery cable during this procedure. If the waiting period is not observed, one or more of these control modules may still be active, this will cause various DTCs to be set.
1. Place the ignition switch into OFF mode . Do NOT place the ignition switch into ignition ON engine OFF mode.
2. Wait for a minimum of 2 minutes to allow the high-speed LAN control modules to deactivate.
3. Disconnect the negative battery cable. Refer to Battery Negative Cable Disconnection and Connection (Service and Repair) .
4. Partially drain the cooling system. Refer to Cooling System Draining and Filling (Static Fill) (Service and Repair)Cooling System Draining and Filling (GE 47716) (Service and Repair) .
5. Remove the intake manifold sight shield. Refer to Intake Manifold Sight Shield Replacement (Service and Repair) .
6. Disconnect the upper radiator hose. Refer to Radiator Inlet Hose Replacement (Service and Repair) .
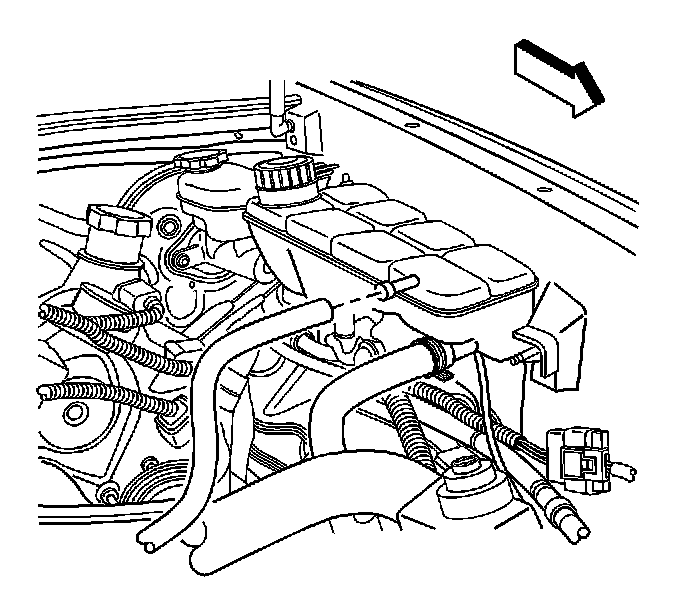
7. Disconnect the surge tank inlet hose. Refer to Radiator Surge Tank Inlet Hose/Pipe Replacement (Service and Repair) .
8. Position both hoses aside in order to gain access.
9. Remove the drive belt tensioner. Refer to Drive Belt Tensioner Replacement - Supercharger (Drive Belt Tensioner Replacement - Supercharger) .
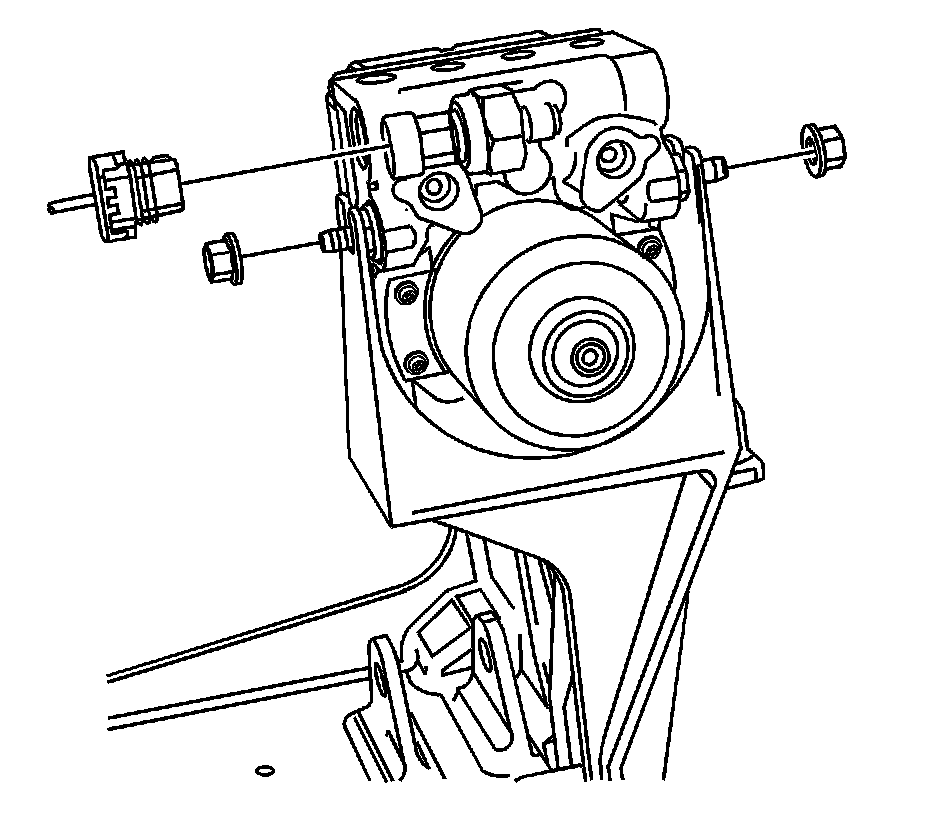
10. Disconnect the brake fluid pressure sensor connector.
11. Loosen the two insulator nuts located on each side of the brake pressure modulator valve (BPMV).
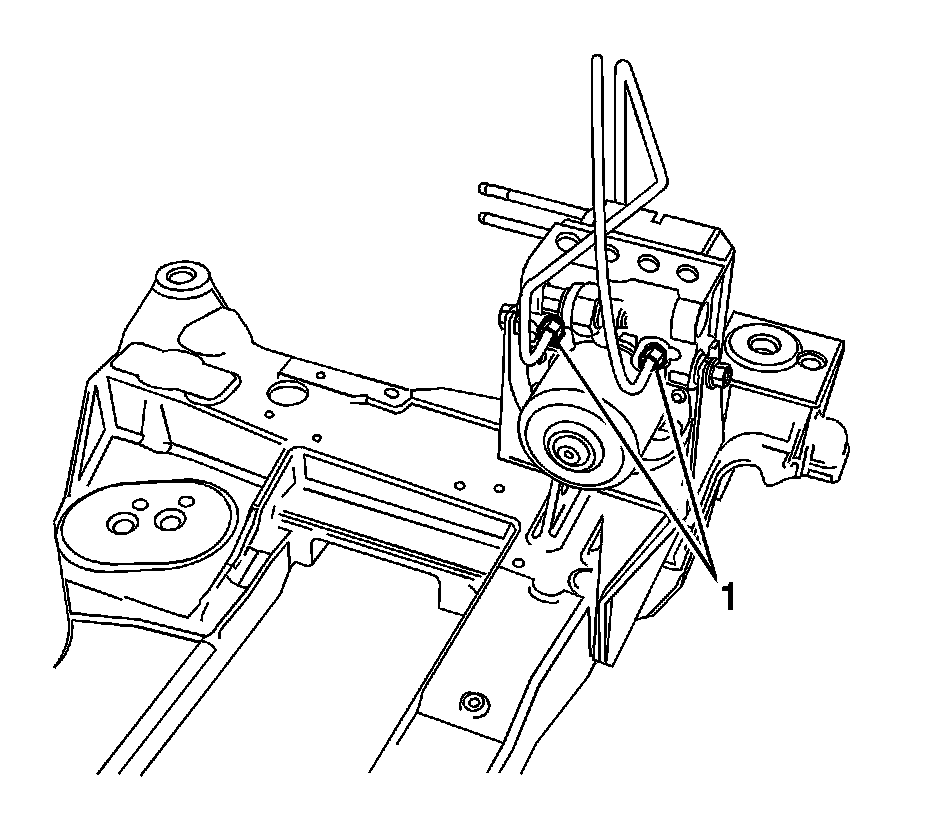
12. Disconnect and plug the brake pipes that enter the BPMV from the master cylinder (1).
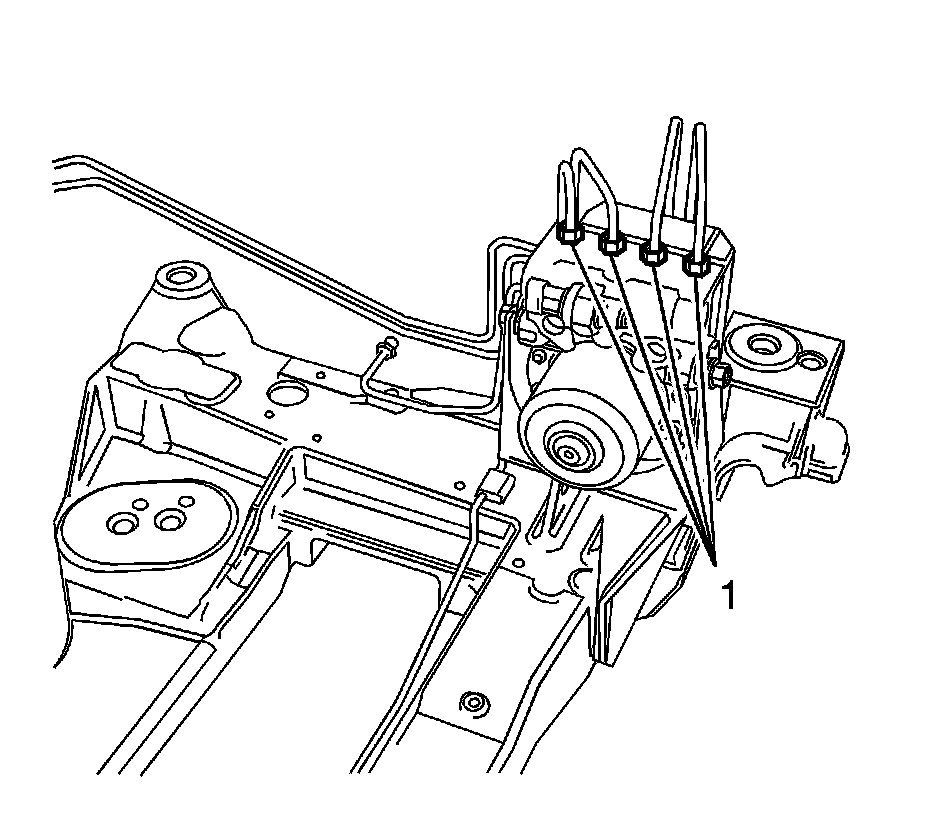
13. Disconnect and plug the brake pipes that enter the BPMV from the front and rear calipers, noting their locations (1).
14. Disconnect the electronic brake control module (EBCM) connector.
15. Remove the BPMV/EBCM.
Installation Procedure
1. Connect the EBCM connector.
2. Connect the brake fluid pressure sensor connector.
Notice: Refer to Fastener Notice (Fastener Notice) .
3. Place the BPMV in the bracket and tighten the 2 insulator nuts.
Tighten the nuts to 12 N.m (106 lb in).
4. Connect the brake pipes that enter the BPMV from the front and rear calipers (1).
Tighten to 16 N.m (12 lb ft).
5. Connect the brake pipes that enter the BPMV from the master cylinder (1).
Tighten to 16 N.m (12 lb ft).
6. Install the drive belt tensioner. Refer to Drive Belt Tensioner Replacement - Supercharger (Drive Belt Tensioner Replacement - Supercharger) .
7. Connect the upper radiator hose. Refer to Radiator Inlet Hose Replacement (Service and Repair) .
8. Connect the surge tank inlet hose. Refer to Radiator Surge Tank Inlet Hose/Pipe Replacement (Service and Repair) .
9. Install the intake manifold sight shield. Refer to Intake Manifold Sight Shield Replacement (Service and Repair) .
10. Fill the cooling system. Refer to Cooling System Draining and Filling (Static Fill) (Service and Repair)Cooling System Draining and Filling (GE 47716) (Service and Repair) .
11. Connect the negative battery cable. Refer to Battery Negative Cable Disconnection and Connection (Service and Repair) .
12. Bleed the brake system. Refer to Hydraulic Brake System Bleeding (Manual) (Service and Repair)Hydraulic Brake System Bleeding (Pressure) (Service and Repair) .