Camshaft Replacement - Right Side
Camshaft Replacement - Right Side
Special Tools
* EN-46111 - Crankshaft Rotation Socket
* EN-48313 - Timing Chain Retention Tool
For equivalent regional tools, refer to Special Tools Special Tools.
Removal Procedure
1. Remove the intake manifold. Refer to Intake Manifold Replacement Intake Manifold Replacement.
2. Remove the camshaft cover. Refer to Camshaft Cover Replacement - Right Side Camshaft Cover Replacement - Right Side.
3. Remove the camshaft sensors. Refer to Camshaft Position Sensor Replacement - Bank 1 (Right Side) Exhaust Camshaft Position Sensor Replacement - Bank 1 (Right Side) Exhaust and Camshaft Position Sensor Replacement - Bank 1 (Right Side) Intake Camshaft Position Sensor Replacement - Bank 1 (Right Side) Intake.
4. Remove the intake camshaft position actuator solenoid. Refer to Camshaft Position Actuator Solenoid Valve Solenoid Replacement - Bank 1 (Right Side) Intake Camshaft Position Actuator Solenoid Valve Solenoid Replacement - Bank 1 (Right Side) Intake.
5. Remove the Camshaft Position Actuator. Refer to Camshaft Position Actuator Replacement - Bank 1 (LF1, LFW or LFX) Camshaft Position Actuator Replacement - Bank 1 (LF1, LFW or LFX).
6. Remove the crankshaft balancer. Refer to Crankshaft Balancer Replacement Service and Repair.
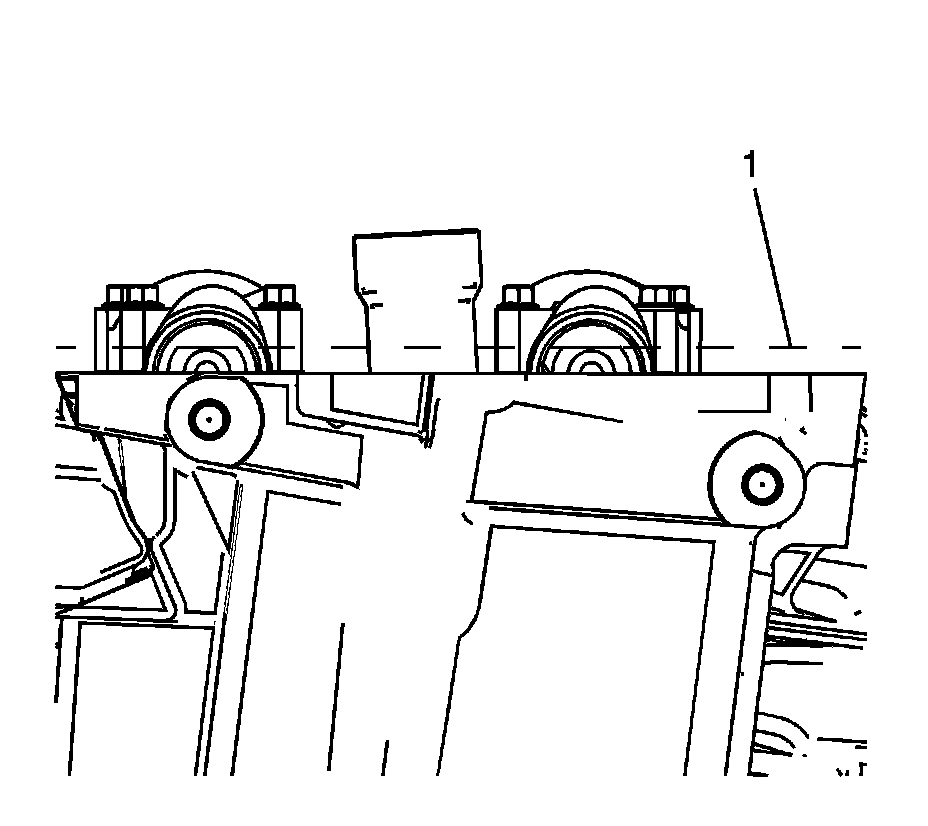
7. Rotate the crankshaft with the EN-46111 - socket until the camshafts are in a neutral (low tension) position.
The camshaft flats will be parallel with the camshaft cover rail (1).
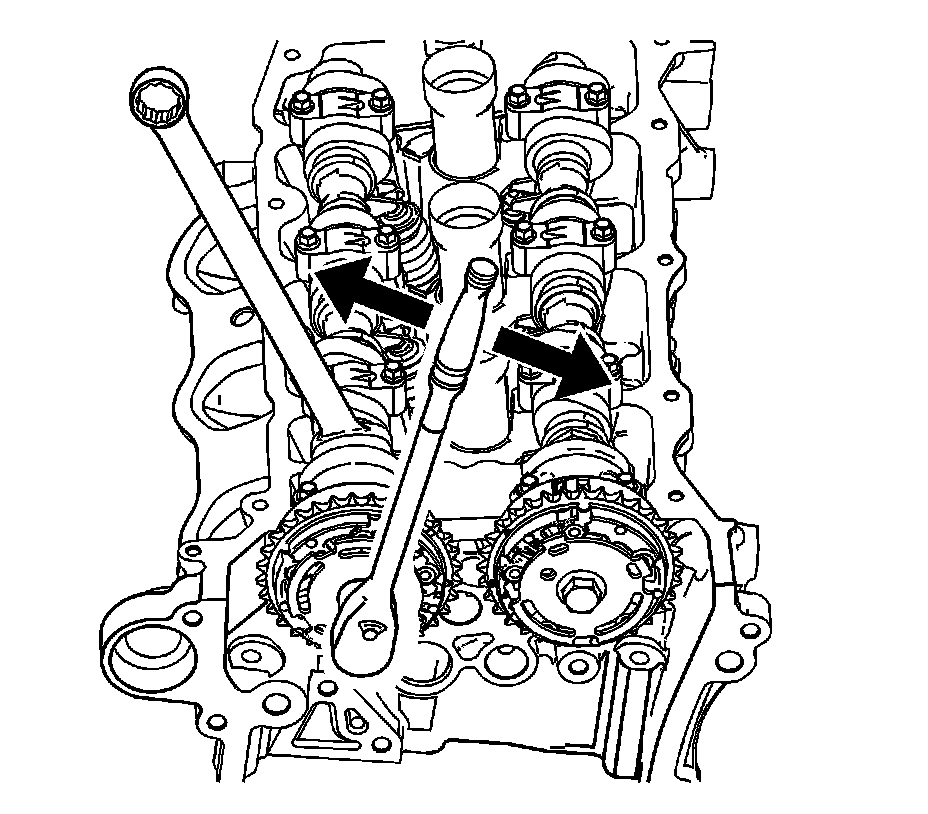
Caution: Refer to Torque Reaction Against Timing Drive Chain Caution Service Precautions.
Note:
* Use an open-end wrench at the camshaft hex to prevent camshaft/engine rotation.
* DO NOT remove the camshaft position actuator bolt at this time.
8. Loosen the camshaft position actuator bolt.
Note: Ensure that the tips of the EN-48313 - tool are fully engaged into the timing chain.
9. Install the EN-48313 - tool in order to retain the timing chain.
Firmly tighten the EN-48313 - tool nuts.
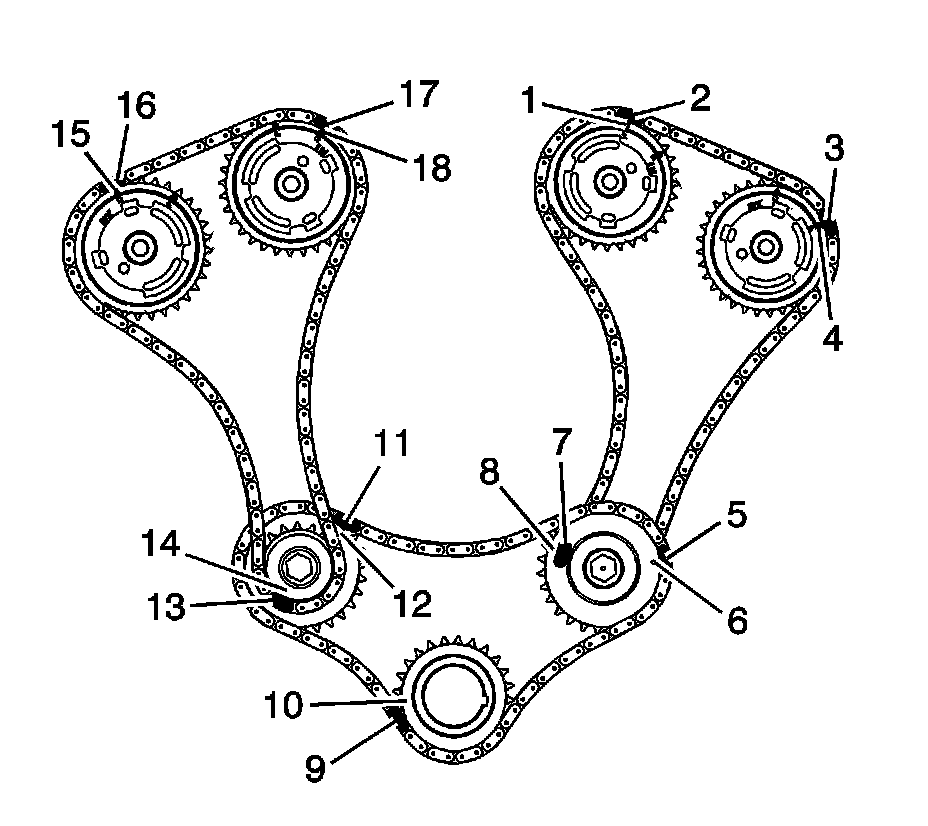
Note: Ensure that the camshaft timing chain and the camshaft position actuators are marked for proper assembly.
10. Mark the timing chain and the respective locations on camshaft position actuators (15-18).
11. Remove the camshaft position actuator bolt.
12. Remove the camshaft bearing caps and the camshaft. Refer to Camshaft Removal - Right Side 39. Camshaft Removal - Right Side.
Installation Procedure
Note:
* Ensure that the marks on the camshaft position actuators and the timing chain (15-18) are aligned.
* DO NOT tighten the camshaft position actuator bolt at this time.
1. Locate the camshafts to the cylinder head and assemble the camshaft actuators to the camshafts.
2. Install the camshafts and the camshaft bearing caps. Refer to Camshaft Installation - Right Side 102. Camshaft Installation - Right Side.
3. Remove the EN-48313 - tool.
4. Install the crankshaft balancer. Refer to Crankshaft Balancer Replacement Service and Repair.
Caution: Refer to Torque Reaction Against Timing Drive Chain Caution Service Precautions.
Note: Use an open-end wrench at the camshaft hex to prevent camshaft/engine rotation.
5. Install and tighten the camshaft position actuators. Refer to Camshaft Position Actuator Installation - Right Side Intake 109. Camshaft Position Actuator Installation - Right Side Intake and Camshaft Position Actuator Installation - Right Side Exhaust 110. Camshaft Position Actuator Installation - Right Side Exhaust.
6. Install the intake camshaft position actuator solenoid. Refer to Camshaft Position Actuator Solenoid Valve Solenoid Replacement - Bank 1 (Right Side) Intake Camshaft Position Actuator Solenoid Valve Solenoid Replacement - Bank 1 (Right Side) Intake.
7. Install the camshaft sensors. Refer to Camshaft Position Sensor Replacement - Bank 1 (Right Side) Exhaust Camshaft Position Sensor Replacement - Bank 1 (Right Side) Exhaust and Camshaft Position Sensor Replacement - Bank 1 (Right Side) Intake Camshaft Position Sensor Replacement - Bank 1 (Right Side) Intake.
8. Install the camshaft cover. Refer to Camshaft Cover Replacement - Right Side Camshaft Cover Replacement - Right Side.
9. Install the intake manifold. Refer to Intake Manifold Replacement Intake Manifold Replacement.