Power Steering Pressure Test - Revised Procedure
89chevy30Number: 90-27-3B
Section: 3B
Date: July 1989
Subject: POWER STEERING SYSTEM PRESSURE TEST PROCEDURE
Model and Year: 1990 W CAR (LUMINA)
TO: ALL CHEVROLET DEALERS
This power steering pressure test procedure replaces the procedure found in the 1990 Lumina Service Manual on pages 3-11 and 3-14.
Figure 1:
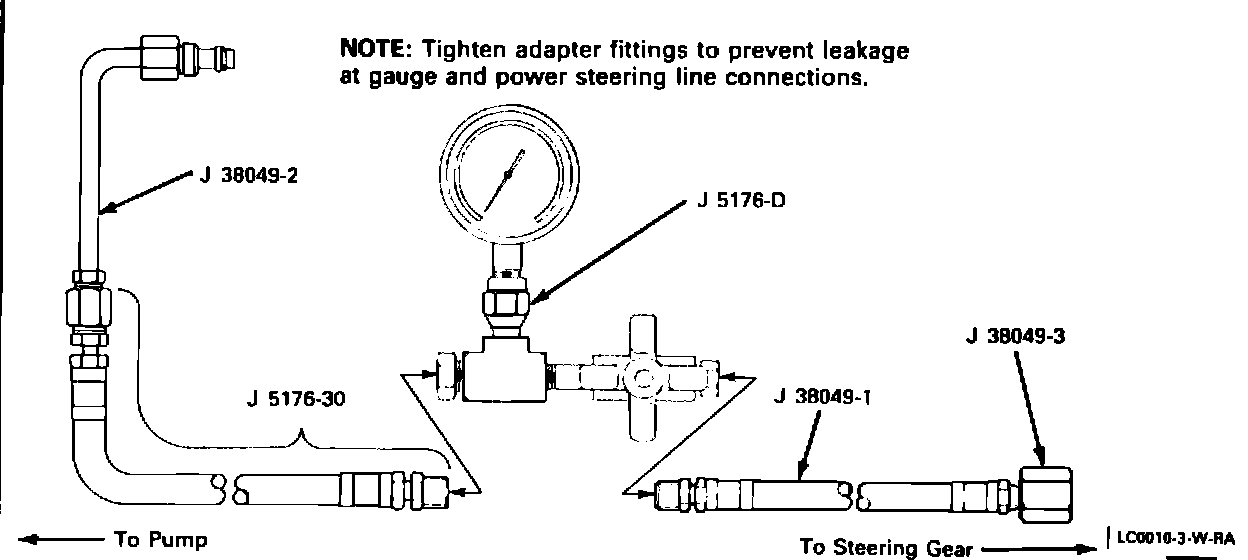
POWER STEERING SYSTEM TEST PROCEDURE:
3.1 L Engine
Tools Required:
J 5176-D Power Steering Pressure Tester J 5176-30 Hose Assembly J 25323-A Power Steering System Analyzer J 38049-2 Tube Assembly J 38049-3 Tube Nut
1 Remove fuse block shield.
2. Remove A.I.R. pump belt (manual transaxle only).
3. Remove serpentine belt from power steering pump pulley.
4. Remove retaining clip from high pressure pipe.
5. Remove high pressure pipe from pump.
- Place a drain pan under vehicle to catch any fluid that may drain.
6. Position high pressure pipe towards right strut.
7. Install serpentine belt.
8. Install J 5176-D as shown in Figure 1.
9. Open the valve on J 5176-D.
10. Start engine and allow system to reach operating temperature. Stop engine and check fluid level, adding fluid if required. When system is at normal operating temperature, the pressure reading on the gage (valve open) should be under 1034 kPa (150 psi). If this pressure is above 1034 kPa (150 psi) stop engine, check the hoses for restriction.
11. Start the engine and let it idle. Close valve fully 3 times (to shut-off flow completely), and record the highest pressure attained each time. DO NOT leave valve fully CLOSED for more than 5 seconds.
a. If the pressures recorded are high and within 345 kPa (50 psi) of each other, the pump is functioning within specifications.
b. If the pressures recorded are not within 345 kPa (50 psi) of each other, the control valve in the pump is sticking. Remove, but do not disassemble the control valve assembly, clean and remove any burrs using crocus cloth or fine hone. If the system contains foreign material, flush it.
c. If the pressures recorded are within 345 kPa (50 psi) of each other, but low pressure, replace the control valve assembly and recheck. If the pressures are still low, inspect the rotor and vanes.
12. Shut off engine and remove J 5176-D.
13. Partially remove serpentine belt.
14. Install high pressure pipe to pump and close retaining clip to high pressure pipe.
15. Install serpentine belt to power steering pump pulley.
16. Install A.I.R. pump belt (manual transaxle only).
17. Install fuse block shield.
18. Bleed system and check fluid level.
Figure 2:
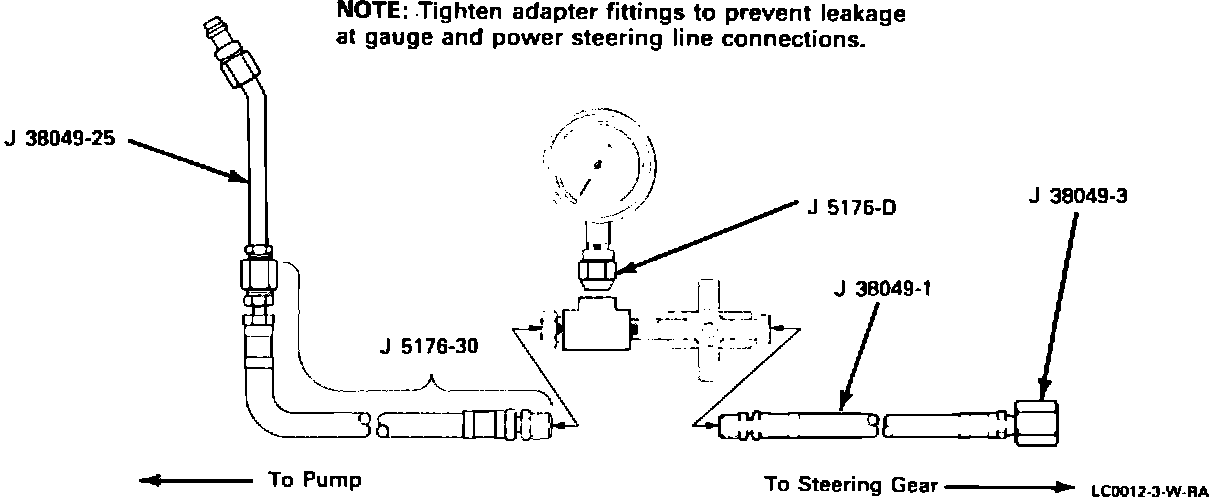
2.5L ENGINE
Tools Required:
J 5176-D Power Steering Pressure Tester
J 5176-30 Hose Assembly
J 25323-A Power Steering System Analyzer
J 38049-1 Hose Assembly
J 38049-25 Tube Assembly
J 38049-3 Tube Nut
1. Raise vehicle, refer to GENERAL INFORMATION (SECTION 0A).
2. Remove pressure pipe from pump.
- Place a drain pan under vehicle to catch any fluid that may drain.
3. Install J 38049-25 to pump and to J 5176-30.
4. Lower vehicle, partially.
5. Install J 51276-D as shown in Figure 2.
6. Open the valve on J 5176-D or J 25323.
7. Start engine and allow system to reach operating temperature.
8. Start the engine and let it idle. Close valve fully 3 times (to shut-off flow completely), and record the highest pressure attained each time. DO NOT leave valve fully CLOSED for more than 5 seconds.
a. If the pressures recorded are not within 345 kPa (50 psi) of each other, the pump is functioning within specifications.
b. If the pressures recorded are not within 345 kPa (50 psi) of each other, the control valve in the pump is sticking. Remove but do not disassemble the control valve assembly, clean it and remove any burrs using crocus cloth or fine hone. If the system contains foreign material, flush it.
c. If the pressures recorded are within 345 kPa (50 psi) of each other, but low pressure, replace the flow control valve assembly and recheck. If the pressures are still low, inspect the rotor and vanes.
9. Shut-off engine and remove J 5176-D.
10. Raise vehicle, refer to GENERAL INFORMATION (SECTION 0A).
11. Install high pressure pipe to pump.
12. Lower vehicle.
13. Bleed system and check fluid level.