Brake Caliper Replacement (Front)
REMOVAL PROCEDURE1. Remove two-thirds of the brake fluid from the master cylinder.
2. Raise and suitably support the vehicle. .
3. Remove the tire and wheel.
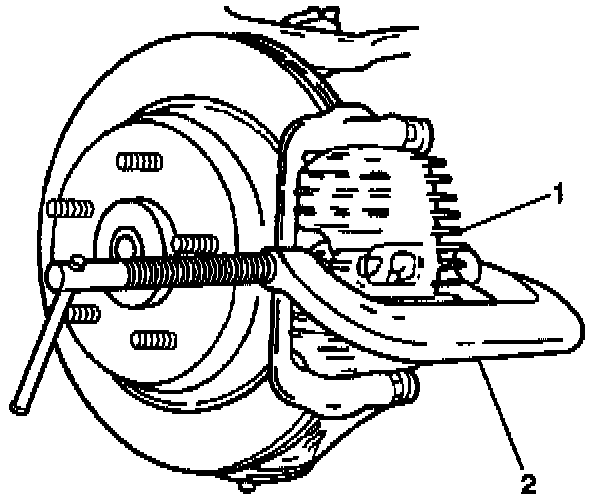
4. Push the piston into the housing bore in order to provide clearance between the pads and the rotor.
4.1. Install a large C-clamp over the top of the caliper housing and against the back of the outboard pad.
4.2. Slowly tighten the C-clamp until the piston is pushed into the caliper bore enough to slide the caliper off the rotor. Do not overtighten the C-clamp. Overtightening the C-clamp will deform the outboard shoe.
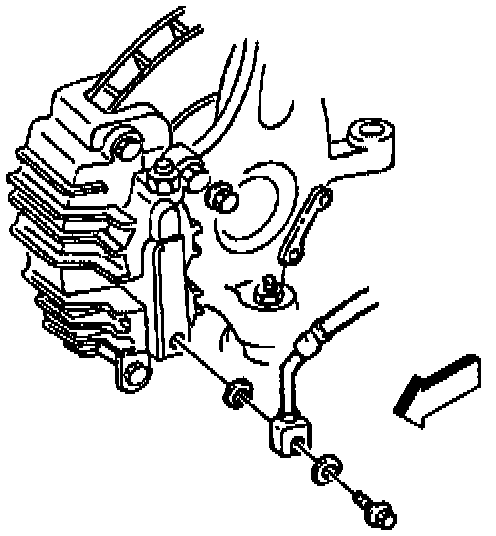
5. Complete the following steps if the caliper is being removed from the vehicle for overhaul or replacement:
5.1. Remove the brake hose bolt attaching the brake hose fitting to the caliper.
5.2. Remove the following components:
^ The brake hose fitting
^ The copper gaskets
Discard the copper gaskets.
^ The brake hose from the caliper
5.3. Plug the openings in the caliper housing and the hose in order to prevent loss or contamination of the brake fluid.
5.4. Bleed the caliper after it is reinstalled.
6. If the caliper is being removed for service of the mounting plate or the brake pads, do not disconnect the inlet fitting.
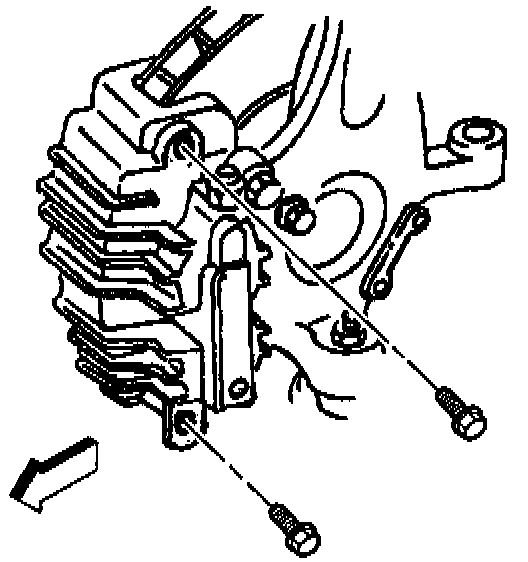
7. Remove the brake caliper guide pin bolts.
8. Remove the caliper housing from the rotor and the knuckle. If the caliper is not being removed the vehicle, suspend the caliper from the front suspension using a fabricated wire hook.
9. Inspect the following parts for corrosion, cuts, nicks or blockage. Replace any damaged parts. The caliper guide pin bolts The caliper guide pin bushings . The brake hose fitting If corrosion and/or excessive wear is found, use new parts, including bushings, when installing the caliper. Do not attempt to polish away corrosion.
INSTALLATION PROCEDURE
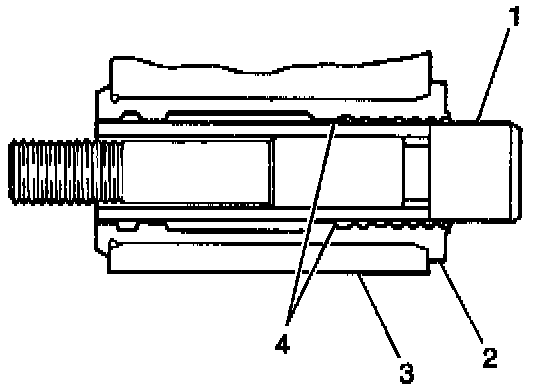
1. Lubricate the inner diameters of the caliper bolt bushings (2) with silicone grease.
2. Lubricate the caliper bolts (1). Use silicone grease. Do not lubricate the threads.
3. Inspect the caliper guide pins.
^ The caliper pin should slide through the pin bushings and caliper pin bores using only hand pressure.
^ If greater force is required, remove the caliper pin and the bushings.
4. Inspect the mounting bores for corrosion.
^ If corrosion exists, remove the corrosion using a 1-inch wheel cylinder brush.
^ Clean the mounting bores using clean denatured alcohol.
5. Replace the caliper pin and bushings. Refer to Brake Caliper Overhaul (Front).
6. Install the caliper onto the mounting plate and pads.
NOTICE: Always use the correct fastener in the proper location. When you replace a fastener, use ONLY the exact part number for that application. The manufacturer will call out those fasteners that require a replacement after removal. The manufacturer will also call out the fasteners that require thread lockers or thread sealant. UNLESS OTHERWISE SPECIFIED, do not use supplemental coatings (paints, greases, or other corrosion inhibitors) on threaded fasteners or fastener joint interfaces. Generally, such coatings adversely affect the fastener torque and joint clamping force, and may damage the fastener. When you install fasteners, use the correct tightening sequence and specifications. Following these instructions can help you avoid damage to parts and systems.
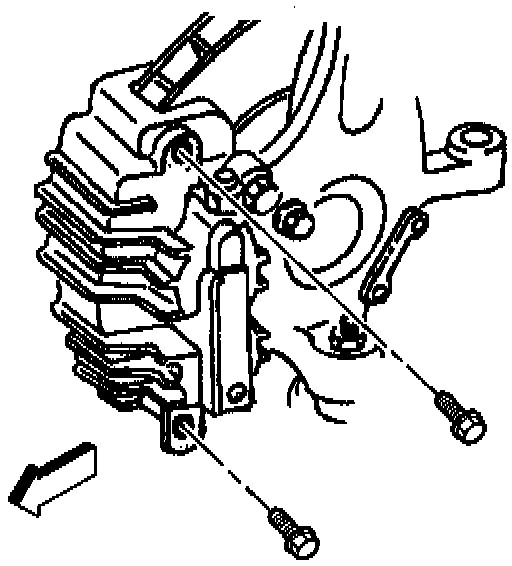
7. Install the front brake caliper guide pins.
Tighten the front brake caliper guide pins to 31 Nm (23 ft. lbs.).
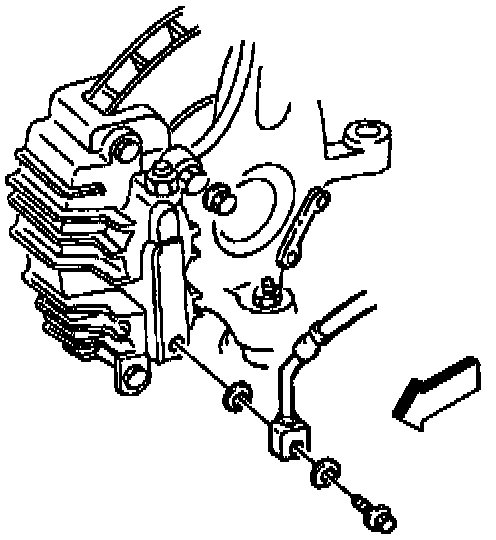
8. If the following components were removed, install them onto the caliper housing using new copper gaskets:
^ The brake hose fitting
^ The brake hose
Tighten the front brake hose fitting to 40 Nm (30 ft. lbs.).
9. Install the tire and the wheel.
10. Lower the vehicle.
Important: If the brake hose was removed, bleed the caliper. Refer to Hydraulic Brake System Bleeding.
11. Fill the master cylinder reservoir to the proper level with clean brake fluid.
12. With engine running, pump brake pedal until firm brake pedal is attained.
13. Check for leaks.