Fuel Injector: Service and Repair
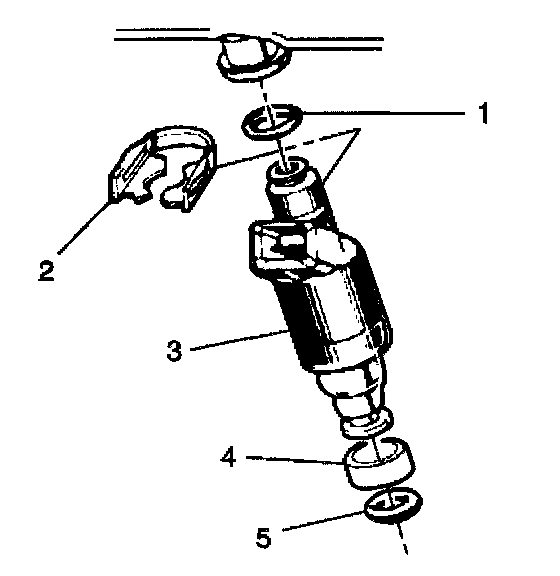
CAUTION: Use care in removing the fuel injectors to prevent damage to the fuel injector electrical connector pins or the fuel injector nozzles. The fuel injector is an electrical component and should not be immersed in any type of cleaner as damage to the fuel injector may result.
NOTE: The fuel injector is serviced as a complete assembly only. If the fuel injectors are found to be leaking, the engine oil may be contaminated with fuel.
REMOVE OR DISCONNECT
1. Fuel Rail Assembly.
2. Fuel injector retaining clips (2).
3. Fuel injectors (3).
4. Fuel Injector Upper O-rings (1).
5. Fuel injector lower O-rings (5).
6. Fuel Injector O-ring back ups (4).
INSTALL OR CONNECT
NOTE: Each fuel injector is calibrated for a specific flow rate. Be sure to use the correct part number when ordering replacement fuel injectors. When replacing the fuel injector 0-rings, be sure to install the brown 0-ring in the lower position.
The fuel injector lower 0-ring uses a nylon collar, called the 0-ring backup, to properly position the 0-ring on the fuel injector. Be sure to reinstall the 0-ring backup, or the sealing 0-ring may move on the fuel injector when installing the fuel rail. If the sealing 0-ring is not seated properly, a vacuum leak is possible and driveability complaints may occur.
1. Coat all new O-rings with clean engine oil before installing.
2. Fuel injector O-ring back ups (4).
3. Fuel injector lower O-rings (5).
4. Fuel injector upper O-rings (1).
5. Fuel injectors (3).
6. Fuel injector retaining clips (2).
7. Inspect for leaks.
A. Turn the ignition switch ON for 2 seconds.
B. Turn the ignition switch OFF for 10 seconds.
C. Turn the ignition switch ON.
D. Visually inspect the fuel system for fuel leaks.