Brake Caliper Replacement (Front)
Removal ProcedureCaution: Do not move the vehicle until a firm brake pedal is obtained. Failure to obtain a firm pedal before moving vehicle may result in personal injury.
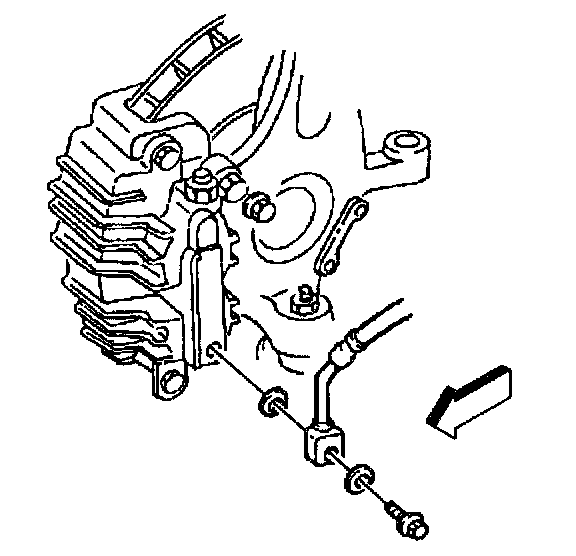
1. Raise the vehicle and support. Refer to Vehicle Lifting.
2. Remove the tire and wheel assembly. Refer to Tire and Wheel Removal and Installation.
3. Remove the inlet fitting bolt, inlet fitting, and two gaskets only if the brake caliper is being removed from the vehicle.
3.1. Discard the two gaskets.
3.2. Plug the openings in the brake caliper and the inlet fitting.
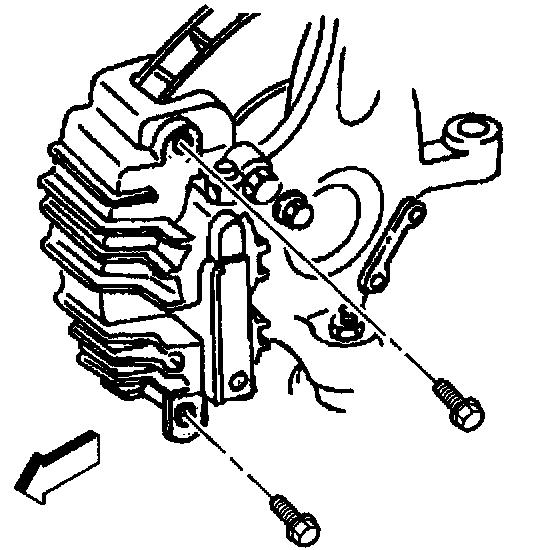
Caution: These fasteners MUST be replaced with new fasteners anytime they become loose or are removed. Failure to replace these fasteners after they become loose or are removed may cause loss of vehicle control and personal injury.
4. Remove the brake caliper guide pin bolts.
5. Remove the brake caliper housing from the brake rotor and the brake caliper mounting bracket.
Notice: Do not allow calipers to hang from the flexible hoses. Doing so can damage the hoses.
6. If a brake caliper housing overhaul or replacement is not required, support the brake caliper housing using a wire hook or equivalent to avoid damage to the brake hose.
7. Remove the brake pads only if they are being replaced or if the brake caliper mounting bracket is being removed.
Installation Procedure
1. Install the brake pads, if removed.
1.1. Install the outboard brake pad with the insulator installed toward the brake caliper housing.
1.2. Install the inboard brake pad with the wear sensor installed nearest the brake caliper piston.
1.3. The wear sensor must be in the trailing position during forward wheel rotation.
2. Install the brake caliper housing over the brake rotor and into the brake caliper mounting bracket.
3. Use silicone grease GM P/N 18010909 or equivalent, to lubricate inner diameters of the of the caliper bolt boots.
4. Use silicone grease GM P/N 18010909 or equivalent, to lubricate the brake caliper bolt shaft. Do not lubricate the bolt threads.
Caution: These fasteners MUST be replaced with new fasteners anytime they become loose or are removed. Failure to replace these fasteners after they become loose or are removed may cause loss of vehicle control and personal injury.
Notice: Refer to Fastener Notice in Service Precautions.
5. Install the brake caliper guide pin bolts.
^ Tighten the brake caliper guide pin bolts to 31 Nm (23 lb ft).
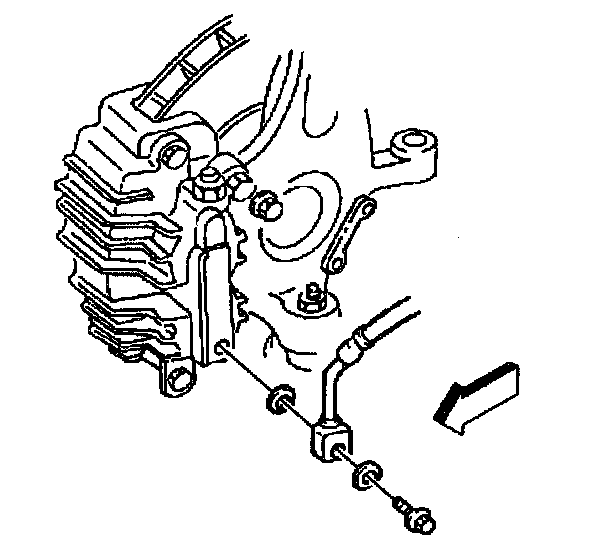
6. Install the inlet fitting, two new gaskets and the inlet fitting bolt, if removed.
^ Tighten the brake caliper inlet fitting bolt to 40 Nm (30 lb ft).
7. Bleed the hydraulic brake system, if the inlet fitting was removed. Refer to Hydraulic Brake System Bleeding (Manual) or Hydraulic Brake System Bleeding (Pressure).
8. Install the tire and wheel assembly. Refer to Tire and Wheel Removal and Installation.
^ Tighten the wheel nuts in sequence to 140 Nm (100 lb ft).
9. Lower the vehicle.
Notice: When filling the master cylinder, use only Delco Supreme 11 (GM P/N 12377967) or equivalent DOT 3 brake fluid. Do not use a container which has been used for petroleum based fluids, or a container which is wet with water. Petroleum based fluids will cause swelling and distortion of rubber parts in the hydraulic brake system, and water will mix with brake fluid, lowering the boiling point. Keep all fluid containers capped to prevent contamination.
10. Refill the master cylinder reservoir. Refer to Master Cylinder Reservoir Filling.
Caution: Do not move the vehicle until a firm brake pedal is obtained. Failure to obtain a firm pedal before moving vehicle may result in personal injury.
11. With the engine running, pump the brake pedal slowly and firmly three times to seat the brake pads.
12. Inspect the hydraulic brake system for brake fluid leaks.