Front Suspension Crossmember Replacement
Removal Procedure
1. Install the engine support fixture. Refer to Engine Support Fixture in Engine.
2. Remove the tire and wheel assemblies. Refer to Tire and Wheel Removal and Installation.
3. Raise the vehicle on a hoist. Refer to Vehicle Lifting.
4. Remove the splash shields. Refer to Splash Shield Replacement - Wheelhouse in Body and Frame.
5. Disconnect the Antilock Brake System (ABS) harness from the wheel speed sensor and frame. Refer to Wheel Speed Sensor Jumper Harness Replacement - Front in Brakes and Traction Control.
6. Remove the lower ball joints from the steering knuckles. Refer to Lower Ball Joint Replacement.
7. Remove the brake modulator assembly from the front suspension crossmember. Refer to Brake Pressure Modulator Valve (BPMV) Bracket Replacement in Brakes and Traction Control.
8. Remove the tie rod ends from the steering knuckles. Refer to Tie Rod End Replacement - Outer.
9. Remove the bolt from the steering gear to intermediate shaft and disconnect the shaft. Refer to Intermediate Steering Shaft Replacement in Steering Wheel and Column - Tilt.
10. Remove the power steering lines from the steering gear. Refer to Power Steering Gear Replacement.
11. Remove the front transmission mount bracket bolts. Refer to Transmission Mount Replacement - Front in Transmission and Drivetrain.
12. Remove the rear transmission mount bracket bolts. Refer to Transmission Mount Replacement - Rear in Transmission and Drivetrain.
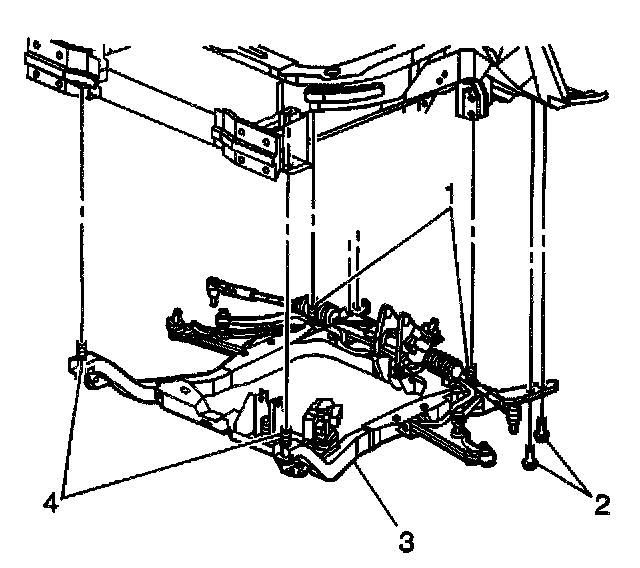
13. Remove the brake lines from the retainers on the front suspension crossmember (3).
14. Lower the vehicle until the front suspension crossmember (3) rests on the jack stands.
15. Remove the front suspension crossmember front support bolts (4).
16. Remove the front suspension crossmember rear support bolts (1).
17. Remove the front suspension crossmember to body bolts (2).
18. Raise the vehicle off of the front suspension crossmember (3).
19. Remove the following components if replacing the front suspension crossmember:
- The lower control arms. Refer to Lower Control Arm Replacement.
- The power steering gear. Refer to Power Steering Gear Replacement.
- The front transmission mount. Refer to Transmission Mount Replacement - Front in Transmission and Drivetrain.
- The rear transmission mount. Refer to Transmission Mount Replacement - Rear in Transmission and Drivetrain.
- The stabilizer shaft. Refer to Stabilizer Shaft Replacement.
- The lower radiator mounting panel. Refer to Radiator Lower Mounting Panel Replacement in Cooling System.
Installation Procedure
1. Install the following components on the front suspension crossmember if removed:
- The lower control arms. Refer to Lower Control Arm Replacement.
- The power steering gear. Refer to Power Steering Gear Replacement.
- The front transmission mount. Refer to Transmission Mount Replacement - Front in Transmission and Drivetrain.
- The rear transmission mount. Refer to Transmission Mount Replacement - Rear in Transmission and Drivetrain.
- The stabilizer shaft. Refer to Stabilizer Shaft Replacement.
- The lower radiator mounting panel. Refer to Radiator Lower Mounting Panel Replacement in Cooling System.
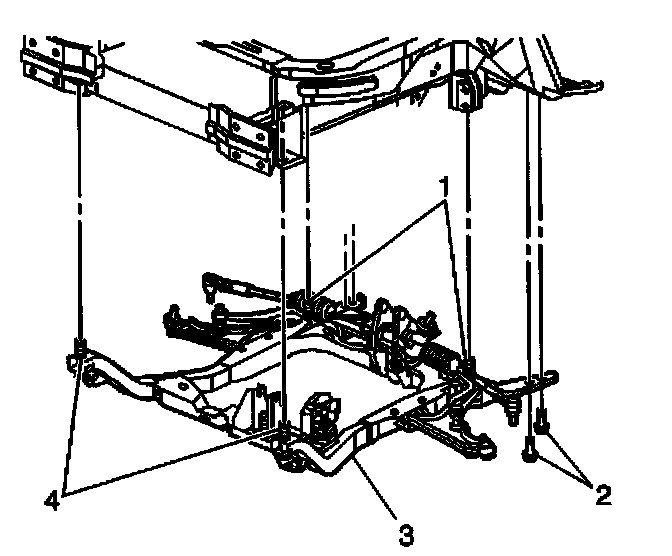
2. Lower the vehicle on to the front suspension crossmember (3).
3. Install the front suspension crossmember to body bolts (2). Hand tighten the bolts.
4. Install the front suspension crossmember rear bolts (1). Hand tighten the bolts.
5. Install the front suspension crossmember front bolts (4). Hand tighten the bolts.
6. Raise the vehicle and support with jack stands. Refer to Vehicle Lifting.
Notice: Refer to Fastener Notice in Service Precautions.
7. Tighten the front suspension crossmember bolts in the following order:
Tighten
7.1. Tighten the front suspension crossmember rear bolts (1) to 245 N NM (180 ft. lbs.) plus 180 degrees rotation.
7.2. Tighten the front suspension crossmember bolts (4) to 110 Nm (81 ft. lbs.).
7.3. Tighten the front suspension crossmember to body bolts (2) to 82 Nm (61 ft. lbs.).
8. Install the brake lines to the retainers on the front suspension crossmember (3).
9. Install the rear transmission mount bracket bolts. Refer to Transmission Mount Replacement - Rear in Transmission and Drivetrain.
10. Install the front transmission mount bracket bolts. Refer to Transmission Mount Replacement - Front in Transmission and Drivetrain.
11. Install the power steering lines to the steering gear. Refer to Power Steering Gear Replacement.
12. Install the bolt from the steering gear to intermediate shaft. Refer to Intermediate Steering Shaft Replacement in Steering Wheel and Column - Tilt.
13. Install the tie rod ends to the steering knuckles. Refer to Tie Rod End Replacement - Outer.
14. Install the brake modulator assembly to the front suspension crossmember. Refer to Brake Pressure Modulator Valve (BPMV) Bracket Replacement in Brakes and Traction Control.
15. Install the lower ball joints to the steering knuckles. Refer to Lower Ball Joint Replacement.
16. Connect the ABS sensor to the wheel speed sensor and front suspension crossmember. Refer to Wheel Speed Sensor Jumper Harness Replacement - Front in Brakes and Traction Control.
17. Install the splash shields. Refer to Splash Shield Replacement - Wheelhouse in Body and Frame.
18. Install the tire and wheel assemblies. Refer to Tire and Wheel Removal and Installation.
19. Remove the engine support fixture. Refer to Engine Support Fixture in Engine.
20. Bleed the power steering system. Refer to Bleeding Power Steering System.
21. Align the front wheels. Refer to Measuring Wheel Alignment (Front) or Measuring Wheel Alignment (Rear).