Instruments - Erratic Rain Sensor Operation
NUMBER: 08-019-04GROUP: Electrical
DATE: May 18, 2004
THIS BULLETIN IS BEING PROVIDED IN ADVANCE. THE SOFTWARE WILL BE AVAILABLE ON ON A StarSCAN(TM) SOFTWARE UPDATE CD RELEASE 4.07 MAY 24, 2004.
SUBJECT:
Light Rain Sensor Module Calibration Update
OVERVIEW:
This bulletin involves flash reprogramming the Light Rain Sensor Module (LRSM) with new software.
MODELS:
2005 (LX) 300C
SYMPTOM/CONDITION:
Some customers may explain the rain sensor switch settings do not differ enough in sensitivity to rain, or that the rain sensor is not sensitive enough.
DIAGNOSIS:
Use a StarSCAN(TM) to determine the p/n of the LSRM, if the p/n is 56050078AG, perform the Repair Procedure.
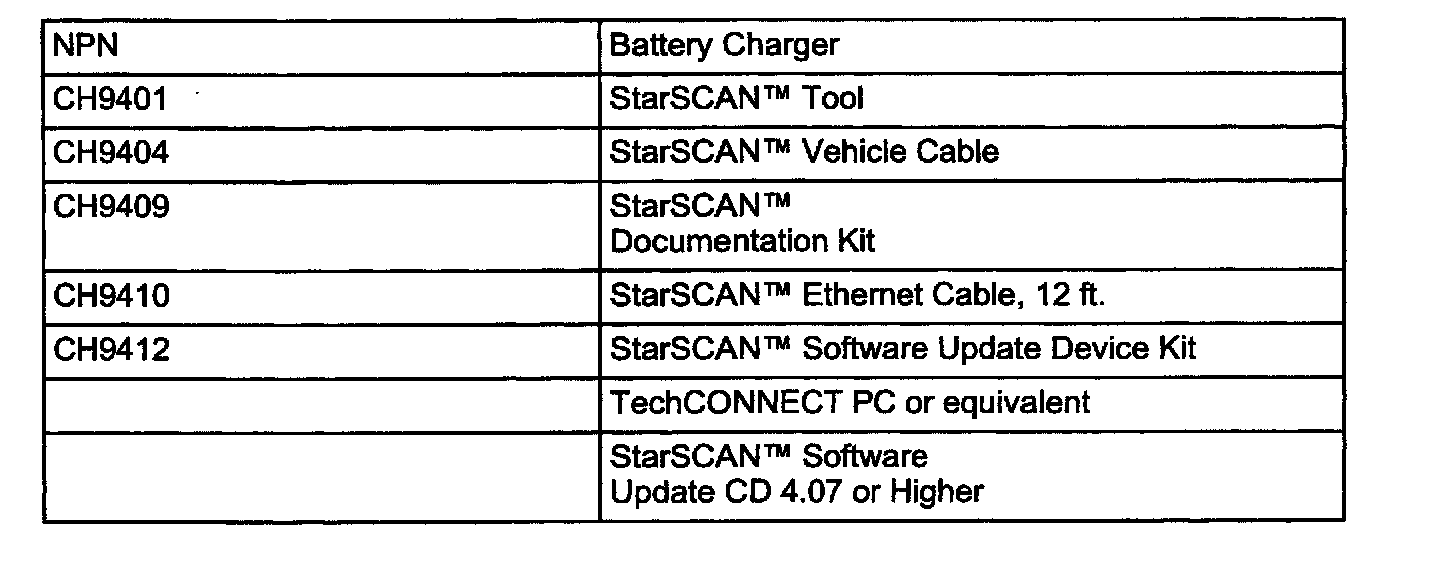
SPECIAL TOOLS/EQUIPMENT REQUIRED:
REPAIR PROCEDURE USING SOFTWARE UPDATE CD TO RETRIEVE FLASH FILE:
NOTE:
Before flashing this module, make sure the StarSCAN(TM) is operating at the latest level and this is the latest flash file available from the StarSCAN(TM) update CD. To determine the latest StarSCAN(TM) software version level available refer to the website under the "Latest News" link.
NOTE:
If this flash process is interrupted/aborted, the flash should be restarted.
NOTE:
For detailed information on the operation of the StarSCAN(TM), refer to the Quick Reference documentation provided in the StarSCAN(TM) documentation kit. In addition, more recent information may also be available at the website. Look under "Training Aids" and also under "Download Center > Frequently Asked Questions" for more help.
1. Retrieve the old LRSM part number. Using the StarSCAN(TM) at the "Home" screen:
a. Select "ECU View"
b. Touch the screen to highlight the LRSM in the list of modules.
c. Record the "Part Number", displayed on the "ECU Overview" screen, for later reference.
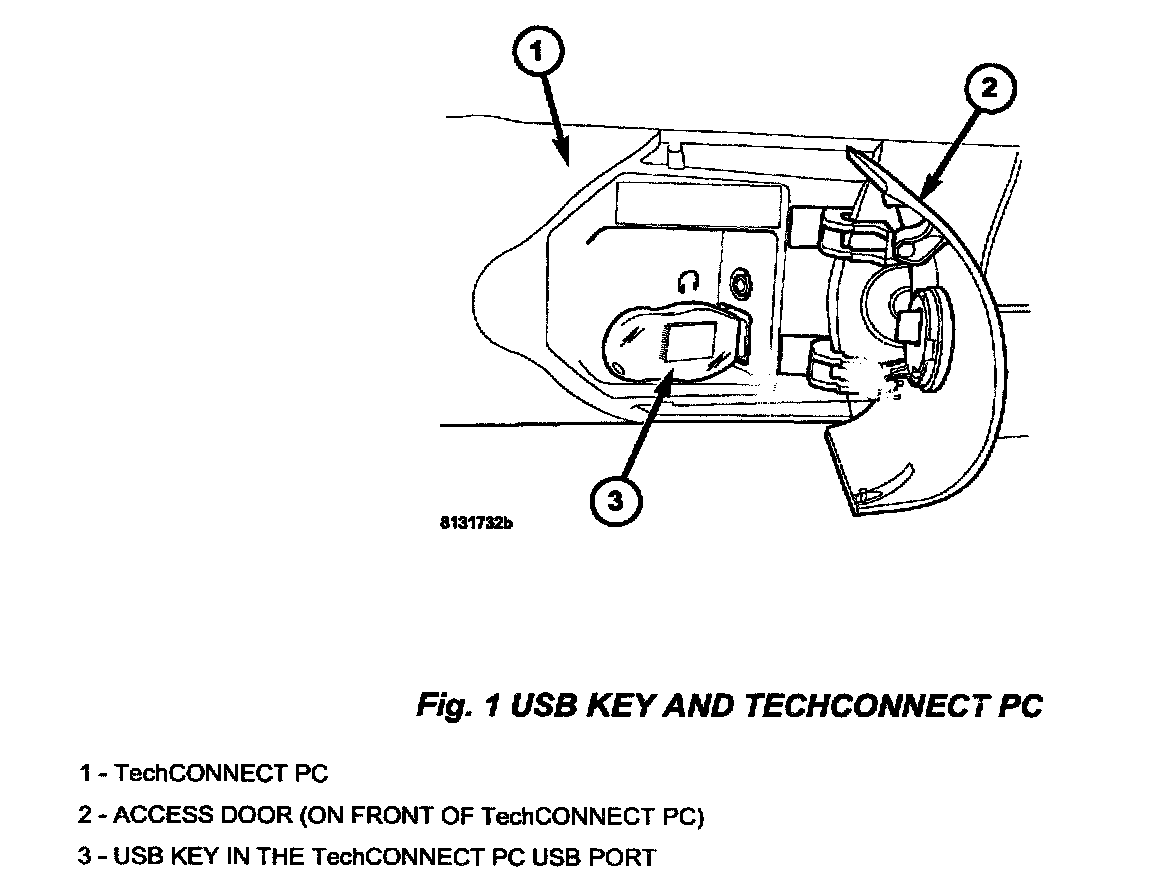
2. Insert the USB Key, into the USB port on the TechCONNECT or equivalent PC (Fig. 1).
3. Insert the StarSCAN(TM) Software Update CD into the TechCONNECT or equivalent PC. The StarSCAN(TM) Software Update CD will start automatically.
a. Select "Controller Flash".
b. Follow the on screen instructions.
4. At the "Select the type of information you wish to enter." screen:
a. If the old "Part Number" was recorded in Step # 1, proceed to Step # 5.
b. If the old "Part Number" is not known, proceed to Step # 6.
5. Select "Enter part number".
a. Follow the on screen instructions. Enter the "Part Number" (use capital letters) recorded in Step # 1 when prompted to do so. Follow the on screen instructions. Select "Next" after each step. Select "Finish" after completing the last step.
b. Proceed to Step # 7.
6. Select "Enter YME Information".
a. Follow the on screen instructions. Select "Next" after each step. Select "Finish" after completing the last step.
b. Proceed to Step # 7.
7. Using the mouse highlight the appropriate "flash file".
a. Select "Save to USB"
b. Follow the on screen instructions. Select "Next" after each step . Select "Finish" after completing the last step.
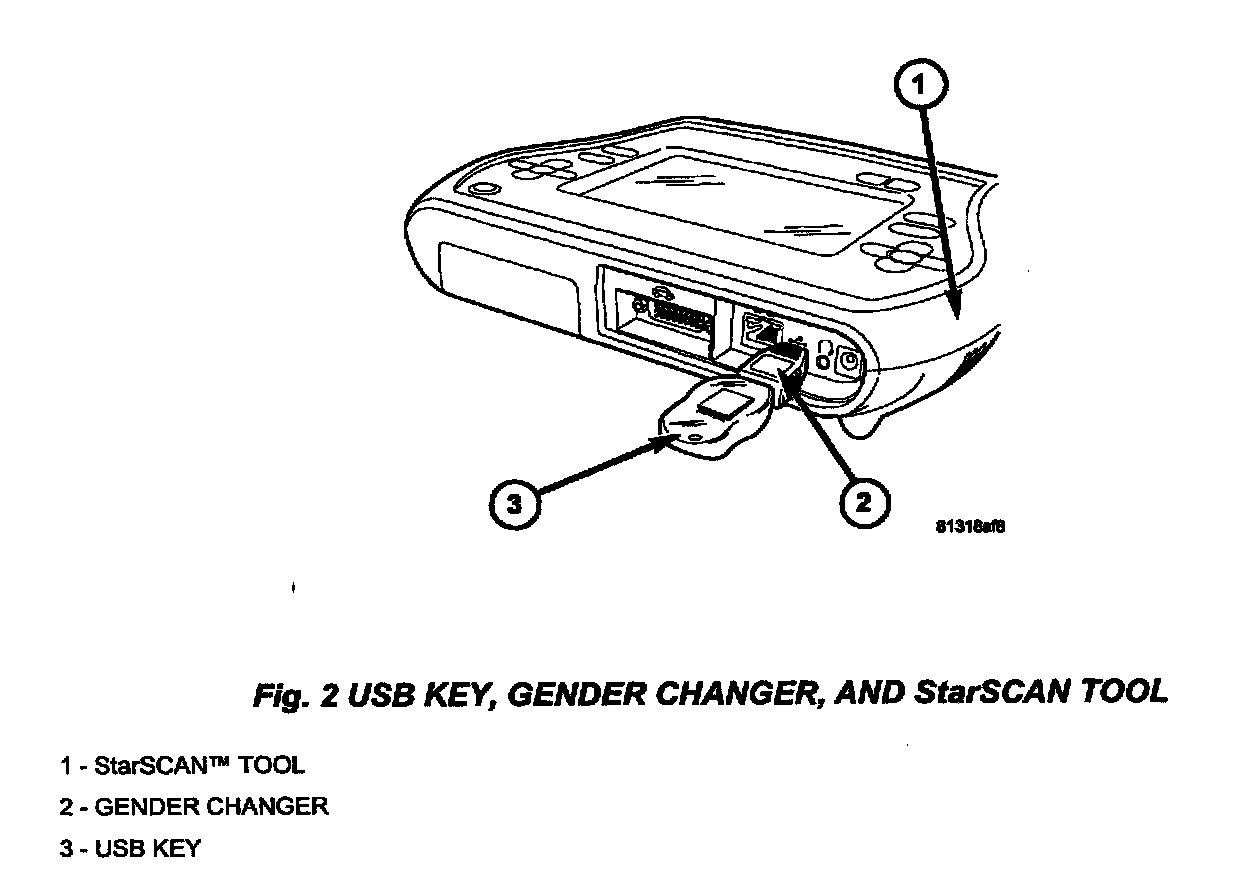
8. With the StarSCAN(TM) powered OFF, connect the USB Key and Gender Changer to the StarSCAN(TM) USB port, (Fig. 2).
9. Open the hood, install a battery charger and verify that charging rate provides approximately 13.5 volts.
10. Connect the StarSCAN(TM) to the vehicle.
11. Power ON the StarSCAN(TM).
12. Download the file from the USB key to the StarSCAN(TM). Using the StarSCAN(TM) at the "Home" screen:
a. Select "Flash Download"
b. Select "Use USB device"
c. Follow the on screen instructions. Select "Next" after each step. Select "Finish" after completing the last step.
d. At the "Flash File List" screen, highlight the appropriate LRSM "flash file"
e. Select "Download to Scantool"
f. When the download is complete, select "Close"
13. Download the file from the StarSCAN(TM) to the vehicle. Using the StarSCAN(TM) at the "Home" screen:
a. Select "ECU View"
b. Browse the list of controllers using the scroll arrows. Highlight the LRSM.
c. Select "More Options"
d. Select "ECU Flash"
e. Highlight the appropriate LRSM "flash file" from the list.
f. Select "Update Controller"
g. When update is completed, select "OK"
NOTE:
Due to the LRSM programming procedure, a DTC may be set in other modules (PCM, TCM, BCM, MIC, SKIM, etc.) within the vehicle, if so equipped. Some DTC's may cause the MEL to illuminate. Check all modules using "ECU View" from the Home screen, record the DTC's, and erase these DTC's prior to returning the vehicle to the customer. Erase any DTC's in the LRSM only after all other modules have had their DTC's erased.
REPAIR PROCEDURE USING THE INTERNET TO RETRIEVE FLASH FILE:
NOTE:
The StarSCAN(TM) must be at version 4.07 or higher before this procedure can be performed.
NOTE:
The StarSCAN(TM) diagnostic scan tool fully supports Internet connectivity. However, in order to take advantage of this feature you must first configure the StarSCAN(TM) for your dealership's network. For instruction on setting up your StarSCAN(TM) for the dealer's network; refer to the StarSCAN(TM) Quick Start Networking Guide available on the website under the "download center".
NOTE:
Make sure the StarSCAN(TM) is configured to the dealership's network before proceeding.
NOTE:
If this flash process is interrupted~aborted, the flash should be restarted.
1. Retrieve the old LRSM part number. Using the StarSCAN(TM) at the "Home" screen:
a. Select "ECU View"
b. Touch the screen to highlight the LRSM in the list of modules.
c. Record the "Part Number", displayed on the "ECU Overview" screen, for later reference.
2. Connect the CH9410 StarSCAN(TM) ethernet cable to the StarSCAN(TM) and the dealer's network drop.
3. Connect the CH9404 StarSCAN(TM) vehicle cable to the StarSCAN(TM) and the vehicle (optional).
4. Power ON the StarSCAN(TM).
5. Download the flash file from the internet to the StarSCAN(TM). Using the StarSCAN(TM) at the "Home" screen:
a. Select "Flash Download"
b. Select "Use connected vehicle" (StarSCAN(TM)) must be connected to the vehicle) or "Enter information manually" (connection to the vehicle is not necessary). Press the "Next" button and follow the on screen instructions.
c. Select the appropriate flash file.
d. Select "Download to Scantool".
e. Select "Close" # after the download is complete.
6. Connect the CH9404 StarSCAN(TM) vehicle cable to the StarSCAN(TM) and the vehicle (if not already connected).
7. Open the hood, install a battery charger and verify that charging rate provides approximately 13.5 volts.
8. Download the file from StarSCAN(TM) to the vehicle. Using StarSCAN~ at the "Home" screen:
a. Select "ECU View"
b. Browse the list of controllers using the scroll arrows. Highlight the LRSM.
c. Select "More Options"
d. Select "ECU Flash"
e. Highlight the appropriate LRSM "flash file" from the list.
f. Select "Update Controller"
g. When update is completed, select "OK"
NOTE:
Due to the LRSM programming procedure, a DTC may be set in other modules (TCM, BCM, MIC, SKIM, etc.) within the vehicle, If so equipped. Some DTC's may cause the MIL to illuminate. Check all modules using "ECU View" from the Home screen, record the DTC's, and erase these DTC's prior to returning the vehicle to the customer. Erase any OTC's in the LRSM only after all other modules have had their DTC's erased.
POLICY:
Reimbursable within the provisions of the warranty.

TIME ALLOWANCE:

FAILURE CODE:
Disclaimer:
This bulletin is supplied as technical information only and is not an authorization for repair.