Condenser HVAC: Service and Repair
REMOVALThe condenser is located between the radiator and the front bumper. The condenser can be serviced without having to drain the cooling system or removal of the radiator.
WARNING: AVOID BREATHING A/C REFRIGERANT AND LUBRICANT VAPOR OR MIST. EXPOSURE MAY IRRITATE EYES, NOSE AND THROAT. USE ONLY APPROVED SERVICE EQUIPMENT MEETING SAE REQUIREMENTS TO RECOVER R-134a SYSTEM. IF ACCIDENTAL SYSTEM DISCHARGE OCCURS, VENTILATE WORK AREA BEFORE RESUMING SERVICE. R-134a SERVICE EQUIPMENT OR VEHICLE A/C SYSTEM SHOULD NOT BE PRESSURE TESTED OR LEAK TESTED WITH COMPRESSED AIR. SOME MIXTURES OF AIR/R-134a HAVE BEEN SHOWN TO BE COMBUSTIBLE AT ELEVATED PRESSURES. THESE MIXTURES ARE POTENTIALLY DANGEROUS AND MAY RESULT IN FIRE OR EXPLOSION CAUSING INJURY OR PROPERTY DAMAGE.
1. Disconnect the negative battery cable from the battery and isolate.
2. Remove hood and hood support.
3. Remove air ducts located in front of the air cleaner assembly.
4. Recover the refrigerant from the A/C system using a refrigerant recovery machine.
Fig. 1 Condenser Inlet:
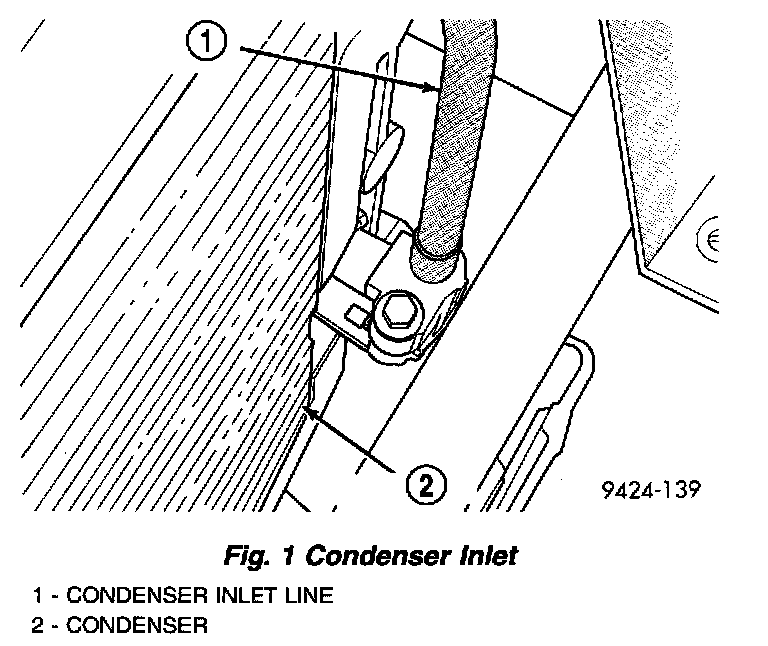
5. Remove bolt retaining condenser inlet line to condenser.
6. Disconnect and cap or tape the A/C line at condenser inlet.
Fig. 2 Condenser Outlet:
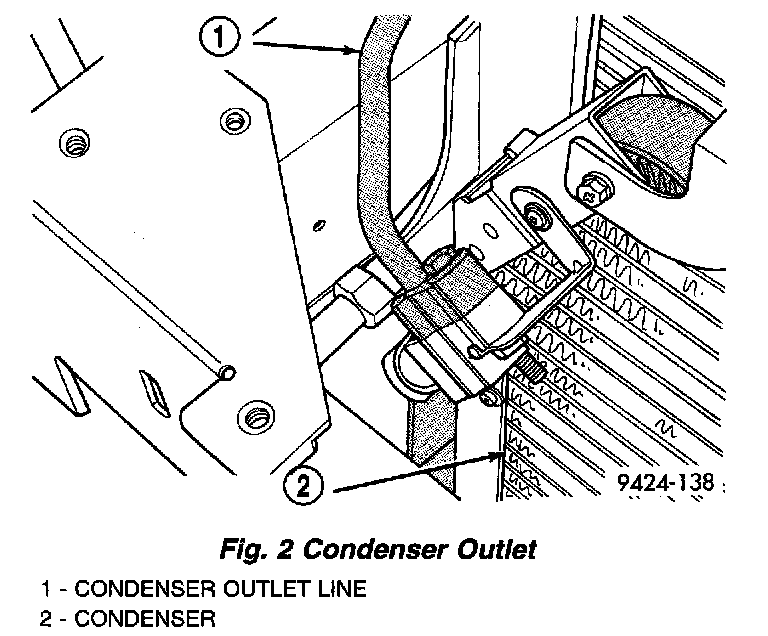
7. Remove bolt retaining condenser outlet line to condenser.
8. Disconnect and cap or tape the A/C line at the condenser outlet.
Fig. 3 Condenser Mounting (Typical):

9. Remove the three rivets retaining condenser mounting bracket to radiator closure panel.
10. Pull up and out on the condenser and remove.
NOTE: Care should be taken not to damage the condenser cooling fins or refrigerant tubes when servicing condenser.
INSTALLATION
NOTE: Care should be taken not to damage the condenser cooling fins or refrigerant tubes when servicing the condenser.
1. Lift the condenser and place it into the vehicle.
2. Install the three rivets that are retaining the condenser mounting bracket to the radiator closure panel.
3. Remove the cap or tape used to cover the A/C line at the condenser outlet.
4. Install the bolt retaining the condenser outlet to the condenser.
5. Remove the cap or tape used to cover the A/C line at the condenser inlet.
6. Install the bolt retaining the condenser inlet line to the condenser.
7. Evacuate the refrigerant system.
8. Recharge the refrigerant system.
9. Install the air ducts to the air cleaner assembly.
10. Install the hood and hood support.
11. Connect the battery negative cable to the battery.