Rocker Cover - Updated Design
84amcjeep01NOVEMBER 1984 000 283
ALL MODELS WITH 1-6 ENGINES
1E
ENGINE Attention: Workshop, Parts Department
NEW ROCKER (CYLINDER HEAD) COVER FOR 4.2L 1-6 ENGINE
A revised rocker (cylinder head) cover entered production of 1984, 4.2L, 1-6 engines as a running change in April 1984, starting with engine serial number 404C16.
The revised cover has five new attaching points. The cover can be adapted to 1981 through 1984 4.2L 1-6 (lightweight) engines built prior to serial number 404C16 using the conversion kit 8983 501 398.
Conversion Procedure
1. Remove the original rocker (cylinder head) cover as outlined in the appropiate vehicle M.R. or Component Service Manual.
2. Block all openings in the cylinder head with shop cloths to prevent the entry of foreign material.
3. Scrape old sealer off the cylinder head cover flange and clean the flange surface thoroughly with AMC cleaner 899 0968 (Canada Part No. 968) or equivalent. Wipe all cleaner residue from flange surface with, clean, dry shop cloth.
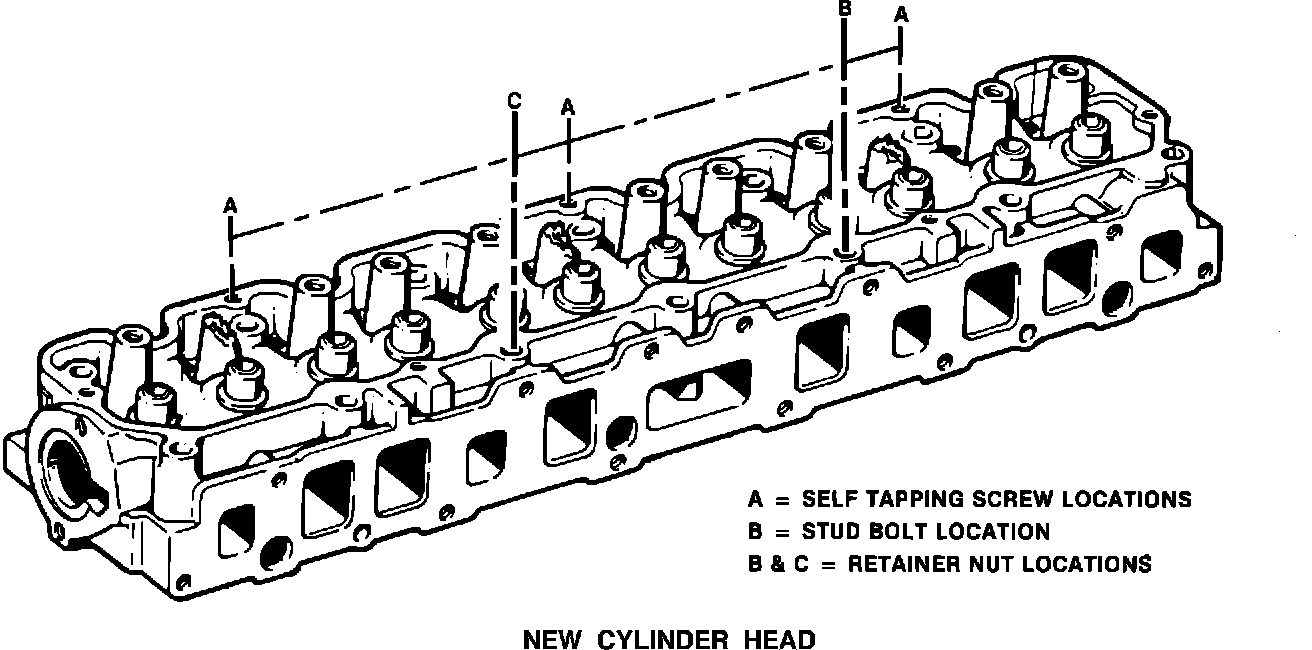
4. Using self tapping screws, G271 444, form threads in the three holes A (see illustration) on the spark plug side of the cylinder head flange. Remove and retain the screws after tapping the holes.
NOTE: Holes A were originally used for the three locating pins on the cover.
5. Remove the cylinder head bolt B (see illustration) and replace it with the new stud bolt assembly 400 7300. Tighten the stud bolt with 115 N-m (85 ft.lbs.) torque.
6. Transfer the PCV grommet and oil filler cap to the new cover, 8933 002 393.
7. Remove the shop cloths used to block cylinder head openings.
8. Apply a coating of AMC/Jeep primer, 8130453, or G.E. SS4004 primer to the cover flange surface of cylinder head. Allow the primer to set-up for at least 10-15 minutes before proceeding.
CAUTION: The following step involves the application of AMC/Jeep Gasket-in-A-Tube silicone sealer. For an effective seal, it is required that the sealer be no more than 12 months old at the time of use. Before using the sealer, check the date code stamped on the crimped seam at the tube bottom or on the sealer carton. The two character letter code can be deciphered using the Sealer Date Code Chart.
Sealer Date Code Chart
First Character Second Character
Is Year of Is Month of
Manufacture Manufacture
K - 1980 A - January
A - 1981 B - February
B - 1982 C - March
C - 1983 D - April
D - 1984 E - May
E - 1985 F - June
F - 1986 G - July
G - 1987 H - August
H - 1988 J - September
J - 1989 K - October
K - 1990 M - November
N - December
9. Apply a 3-mm (1/8-inch) diameter bead of AMC/Jeep Gasket-in-A-Tube 899 3317 (Canada Part No. 3317) or equivalent, to the sealing surfaces on the cylinder head and the rocker (cylinder head) cover. Allow approximately 5 minutes for the sealer to set-up before installing the cover.
CAUTION: The sealer can become tackfree in 10-15 minutes, which will reduce its adhesive qualities. Avoid allowing more than 5 minutes after application before installing the cover.
10. Install replacement seals on the rocker (cylinder head) cover center attaching studs. Be sure the studs are clean before installing the seals.
11. When installing the rocker cover do not allow the sealer to contact the valve actuating components and avoid smearing the sealer.
12. Install and tighten the following rocker (cylinder head) cover attaching fasteners.
^ Three self tapping screws, G271 444, at points A (see illustration). Tighten the screws with 6 N-m (56 in.lbs.) torque.
^ Two retainer nuts, 400 7199, on stud bolts at locations B and C (see illustration). Tighten the nuts with 6 N-m (56 in.lbs.) torque.
^ Two original cover screws at the front and rear lips of the cover. Tighten the screws with 6 N-m (56 in.lbs.) torque.
^ Two original nuts on the rocker arm bridge studs. Tighten the nuts with 3 N-m (28 in.lbs.) torque.
NOTE: If the above two nuts are not a self locking type, replace them with the self locking nuts, 400 6926.
^ All remaining original cover screws. Tighten with 6 N-m (56 in-lbs) torque in a crossing pattern to ensure proper cover seating.
13. Install the vacuum switch and bracket on the cylinder head cover.
14. Connect and/or attach the following:
^ PCV valve
^ PCV valve shut-off hose
^ Fuel line
^ Distributor vacuum advance hose
^ Air cleaner and hoses
^ Any other air and vacuum hoses removed during service operations
^ Battery negative cable
15. Check and adjust engine oil level if necessary.
CAUTION: The silicone sealer on the valve cover must be allowed to cure for a minimum of 1-1/2 hours before starting the engine.
Parts
DESCRIPTION QUANTITY PART NUMBER
COVER CONVERSION KIT, 1 8983 501 398
Kit Contents:
Cover 1 8933 002 393
Self tapping screw (5/16 - 18 x 5/8) 3 G271 444
Stud bolt 1 400 7300
Retainer nut 2 400 7199
S.R.T. Information
OPERATION DESCRIPTION NUMBER TIME TIC
CO. KIT, ROCKER (CYLINDER HEAD)
COVER CONVERSION-INSTALL 1999 1.7 *
*1141 leak from gasket - 1143 other leak.
Filing Instructions
Record this I.S. Note on pages 16 and 52 of the MOT. 4.2L (I-6) manual, page B-134 of the M.R. 251, page B-60 of the M.R. 253, page B-125 of the M.R. 252 and file it in your MOT, 4.2L (I-6) binder.