Intake Manifold: Service and Repair
REMOVAL1. Disconnect battery ground cable and drain engine cooling system.
2. Remove crankcase ventilation tube from valve cover.
3. Remove air cleaner outlet tube.
4. Relieve fuel system pressure.
5. Remove fuel line safety clips and disconnect fuel lines.
6. Mark locations of vacuum lines and remove.
7. Disconnect fuel charging wiring from intake air temperature sensor, camshaft position sensor, throttle position sensor, idle air control valve, ECT sensor, ignition coil, water temperature indicator sender unit and EGR backpressure transducer.
8. Disconnect upper radiator hose from water hose connection. After loosening retaining clamp, carefully use twisting motion to loosen water hose connection.
9. Remove brace spanning from generator mounting bracket to throttle body stud bolt.
10. Remove throttle body.
11. Remove EGR tube at exhaust manifold connector and EGR valve.
12. Disconnect fuel charging wiring retainers from valve cover stud bolts.
13. Carefully disconnect electrical connections to each fuel injector and remove fuel charging wiring from engine.
14. Disconnect heater water hoses.
15. Remove ignition wires from spark plugs.
16. Remove harness to retainer valve cover stud bolts.
17. Remove camshaft position sensor.
18. Remove ignition coil from rear of LH cylinder head.
19. Remove valve covers.
20. Loosen cylinder No. 3 intake valve rocker arm seat retaining bolt. Rotate rocker arm off push rod and away from top of valve stem. Remove push rod.
21. Remove lower intake manifold retaining bolts. Wedge a large pry bar between intake manifold and cylinder head. Pry upward to break seal.
22. Remove lower intake manifold with fuel injection supply manifold and fuel injectors in place as an assembly.
INSTALLATION
1. Clean mating surface of any old gasket material.
2. If installing new intake manifold, transfer ECT sensor, water thermostat, water hose connection, heater hose elbow and water temperature indicator sender unit to new lower intake manifold.
3. Install fuel injectors to manifold.
4. Install fuel injection supply manifold retaining bolts and tighten to 70-106 in lb.
5. Apply silicone sealant to four corners of mating surface, then install new intake manifold gasket.
6. Install front and rear intake manifold end seals. Secure with retainers.
7. Carefully position lower intake manifold bolt holes to those in cylinder head.
Fig. 3 Intake Manifold Bolt Tightening Sequence:
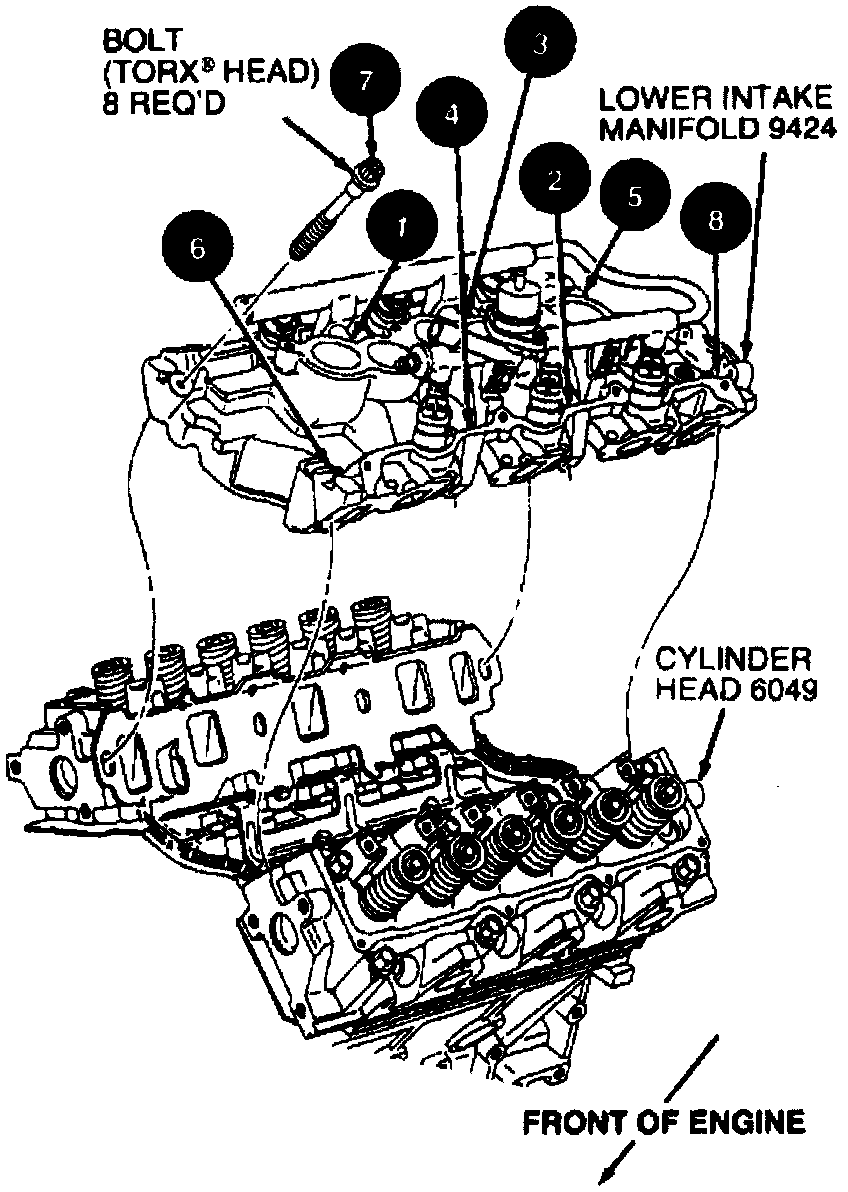
8. Install bolts No. 1, 2, 3 and 4 and hand tighten.
9. Install remaining bolts and tighten in two-step process. Torque in sequence, to 15-22 ft lb, then again in sequence to 20-23 ft lb.
10. Install camshaft position sensor.
11. Install push rod. Move rocker arm into position with push rod and snug rocker arm seat retaining bolt. Rotate crankshaft to position camshaft lobe straight down and away from valve tappet.
12. Torque rocker arm seat retaining bolt to 62-132 in lb, then tighten to 19-28 ft lb.
13. Install valve covers.
14. Install fuel charging wiring to each injector.
15. Install ignition coil to rear LH cylinder head.
16 Connect ignition wires to spark plugs and ignition coil.
17. Install throttle body and new intake manifold upper gasket.
18. Install EGR tube at exhaust manifold connector and EGR valve.
19. Install fuel lines and fuel line safety clips.
20. Install upper radiator hose and heater water hoses.
21. Connect vacuum lines to premarked locations.
22. Connect fuel charging wiring connectors to IAT sensor, camshaft position sensor to IAC valve, throttle position sensor, ECT sensor, EGR backpressure transducer, ignition coil and water temperature indicator sender unit.
23. Fill and bleed engine cooling system, then fill crankcase with suitable engine oil.
24. Install air cleaner outlet tube.
25. Install crankcase ventilation tube to valve cover and air cleaner outlet tube.
26. Connect battery ground cable.
27. Start engine and check for fluid and vacuum leaks.