Bleeding Sequence
WARNING: BRAKE FLUID CONTAINS POLYGLYCOL ETHERS AND POLYGLYCOLS. AVOID CONTACT WITH EYES. WASH HANDS THOROUGHLY AFTER HANDLING. IF BRAKE FLUID CONTACTS EYES, FLUSH EYES WITH RUNNING WATER FOR 15 MINUTES. GET MEDICAL ATTENTION IF IRRITATION PERSISTS. IF TAKEN INTERNALLY, DRINK WATER AND INDUCE VOMITING. GET MEDICAL ATTENTION IMMEDIATELY.CAUTION:
_ Do not allow the brake master cylinder reservoir to run dry during the bleeding operation. Keep the brake master cylinder reservoir filled with the specified brake fluid. Never reuse the brake fluid that has been drained from the hydraulic system.
_ Brake fluid is harmful to painted and plastic surfaces. If brake fluid is spilled onto a painted or plastic surface, immediately wash it with water.
NOTE: When any part of the hydraulic system has been disconnected for repair or replacement, air may enter the system, causing spongy brake pedal action. This requires the bleeding of the hydraulic system after it has been properly connected. The hydraulic system can be bled manually or with Brake Bleeder.
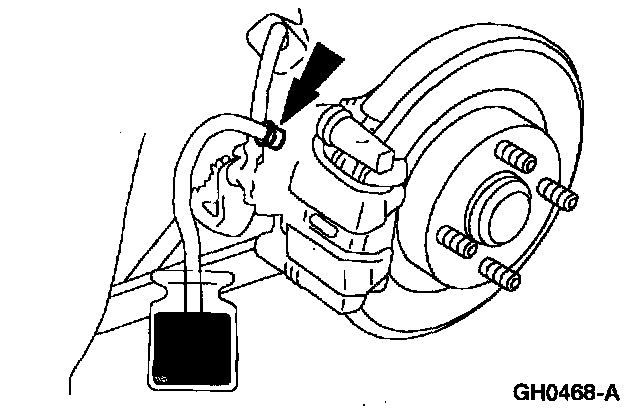
1. Place a box end wrench on the RH rear bleeder screw. Attach a rubber drain tube to the RH bleeder screw and submerge the free end of the tube in a container partially filled with clean brake fluid.
2. Have an assistant pump the brake pedal ten times and then hold firm pressure on the brake pedal.
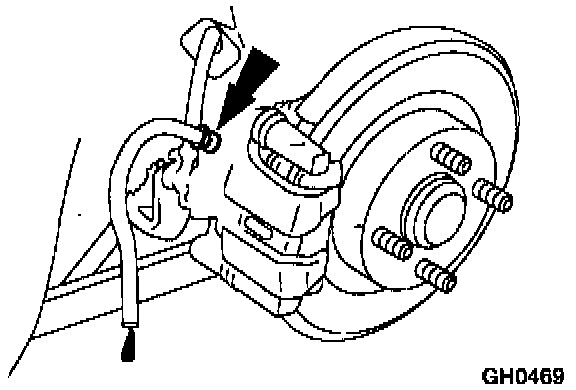
3. Loosen the RH rear bleeder screw until clear, bubble-free brake fluid flows. Have an assistant maintain pressure on the brake pedal while tightening the bleeder screw.
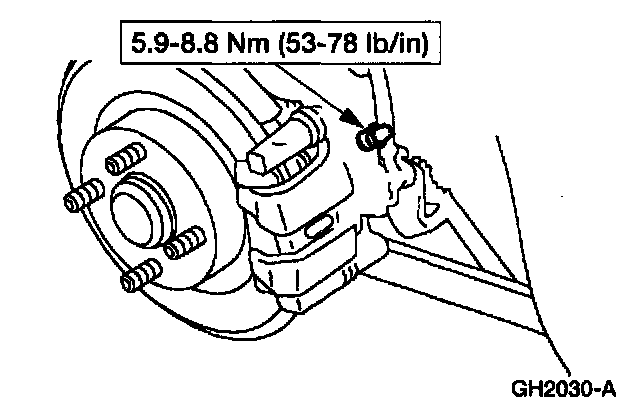
4. Repeat steps 1, 2, and 3 for the LH rear bleeder screw.
5. Place a box end wrench on the RH front disc brake caliper bleeder screw. Attach a rubber drain tube to the RH front disc brake caliper bleeder screw and submerge the free end of the tube in a container partially filled with clean brake fluid.
6. Have an assistant pump the brake pedal ten times and then hold firm pressure on the brake pedal.
7. Loosen the RH front disc brake caliper bleeder screw until clean, bubble-free brake fluid flows. Have an assistant maintain pressure on the brake pedal while tightening the bleeder screw.
8. Repeat steps 5, 6, and 7 for the LH front disc brake caliper bleeder screw.
If equipped with anti-lock control, perform steps 9 through 13; otherwise, go to step 14.
NOTE: Performing the NGS SERVICE BLEED FUNCTION drives trapped air from the hydraulic anti-lock actuator. Subsequent bleeding removes the air from the system to the bleeder screws.
9. Connect the NGS.
NOTE: The engine must be running to provide adequate voltage to the anti-lock brake control module during the anti-lock control portion of the service bleed.
10. Start the engine and depress the brake pedal to half of the full extension position.
11. Access FUNCTION TEST mode and press the trigger to run the SERVICE BLEED FUNCTION.
12. Repeat steps 1through 7.
13. Repeat steps 11and 12 one time (after performing a total of two NGS cycles and two additional conventional bleeds), then go to step 14.
14. If necessary, bleed the brake master cylinder.