Campaign - CVT Shift Solenoid Replacement: Overview
01-036April 3, 2001
Applies T0:
2001 Civic HX 2-door - From VIN 1HGEM22..1L000001 thru 1HGEM22..1L031963
2001 Civic GX 4-door - From VIN 1HGEN26..1L000001 thru 1HGEN26..1L000318
Product Update: CVT Shift Solenoid
BACKGROUND
The transmission loses reverse gear, and the "D" light flashes on the instrument panel display. This usually happens after a cold start. The spring has collapsed around the check ball inside the reverse inhibitor solenoid, causing a loss of fluid pressure.
CUSTOMER NOTIFICATION
All owners of affected vehicles will be mailed a notification of this campaign. An example of the customer notification is shown in this service bulletin.
Not every vehicle in the listed VIN ranges is affected by this campaign. Before starting work, verify that the vehicle is eligible:
^ The customer has a notification letter for this campaign.
^ It is shown on your campaign responsibility report.
^ If neither, do a VIN status inquiry on DCS.
CORRECTIVE ACTION
Replace the reverse inhibitor solenoid.
PARTS INFORMATION
Inhibitor Solenoid Kit:
P/N 28400-PLY-305, H/C 6755524
This kit contains a reverse inhibitor solenoid, oil pan gasket, two 0-rings, and a drain bolt washer.
REQUIRED MATERIALS
Honda ATF-Z1 Fluid: P/N 08200-9001, H/C 6512628
WARRANTY CLAIM INFORMATION
Operation Number: 218156
Flat Rate Time: 0.9 hour
Failed Part: P/N 28400-PLY-305
H/C 6755524
Defect Code: 789
Contention Code: L21
Template ID: 01-036A
Skill Level: Repair Technician
REPAIR PROCEDURE
1. Disconnect the 8P connector from the transmission solenoid harness connector (see step 11, page 14-88 of the '01 Civic Coupe S/M Supplement).
2. Raise the vehicle on a hoist.
3. Drain the transmission fluid. Clean the transmission oil pan and the area around it.
4. When the fluid stops draining, install the drain bolt with a new washer. Torque the drain bolt to 49 N.m (36 lb-ft).
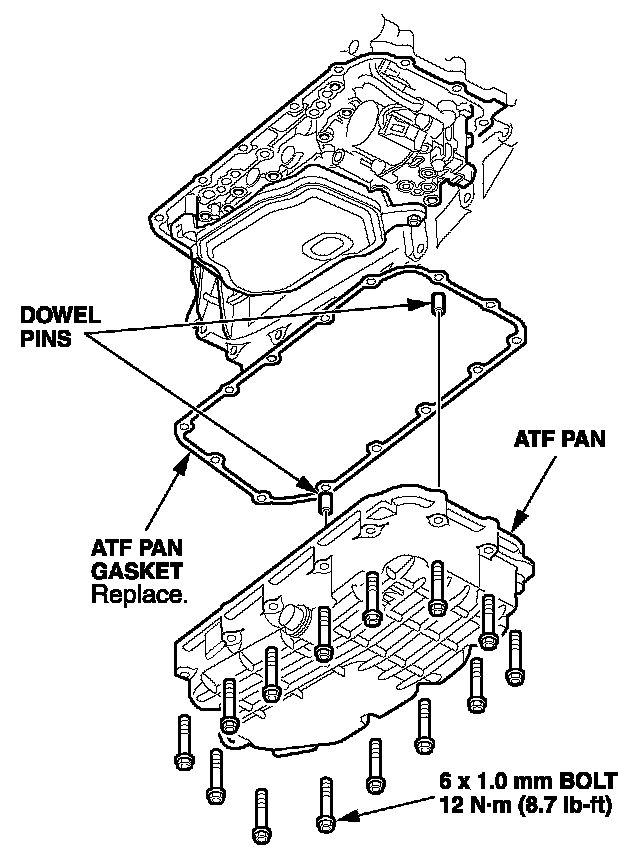
5. Remove the 14 transmission oil pan mounting bolts. Remove the oil pan, and remove the two dowel pins so they do not fall out later
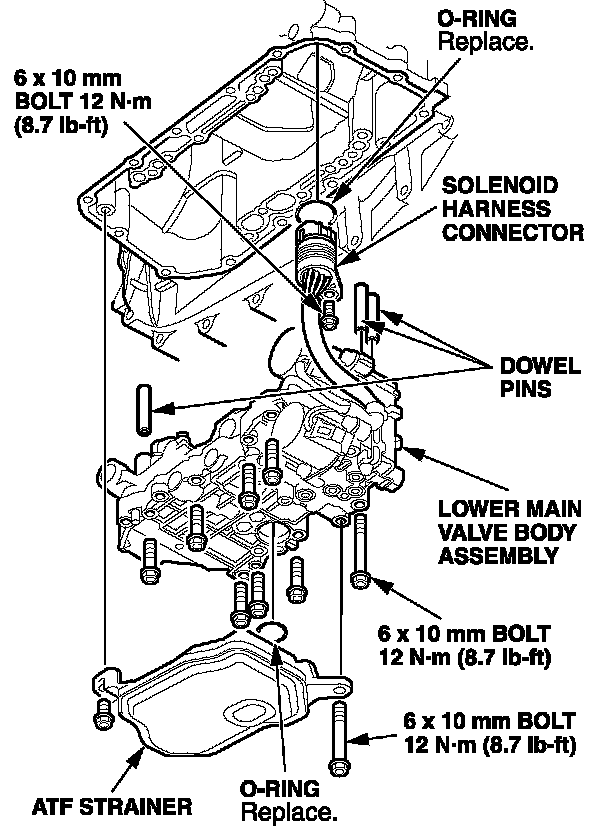
6. Remove the ATF strainer (two bolts).
7. Remove the eight lower main valve body mounting bolts. Lower the valve body and move it to one side. Support the valve body with your hand while you remove the solenoid harness connector mounting bolt. Remove the valve body from the vehicle.
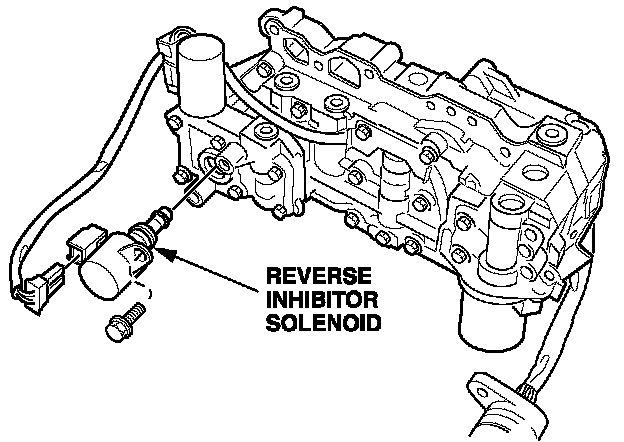
8. Disconnect the electrical connector from the reverse inhibitor solenoid. Remove the solenoid (one bolt).
9. Install the new inhibitor solenoid. Torque the mounting bolt to 12 N.m (8.7 lb-ft). Reconnect the electrical connector.
10. Make sure the three dowel pins are in the valve body. Hold the valve body in position under the transmission, then install the solenoid harness connector mounting bolt. Torque the mounting bolt to 12 N.m (8.7 lb-ft).
11. Install the valve body in the transmission. Torque the eight bolts to 12 N.m (8.7 lb-ft).
12. Install the ATF strainer. Torque the two bolts to 12 N.m (8.7 lb-ft).
13. Put the two dowel pins in place, then install the oil pan with a new gasket. Torque the 14 bolts to 12 N.m (8.7 lb-ft).
14. Lower the vehicle. Reconnect the 8P solenoid harness connector.
15. Refill the transmission with Honda ATF-Z1 fluid (4.1 quarts).

16. Center-punch a completion mark above the sixth character (2) of the engine compartment VIN.

DISCLAIMER