Transmission Fluid Warmer - A/T: Service and Repair
ATF Warmer Removal and Installation
Removal
1. Vehicle Lift
1. Raise the vehicle on a lift, and make sure it is securely supported.
2. Engine Undercover
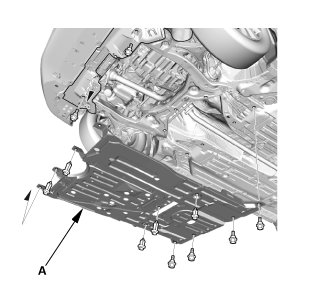
1. Remove the engine undercover (A).
3. Radiator Cap
1. Wait until the engine is cool, then carefully remove the radiator cap.
4. Radiator Coolant - Replacement
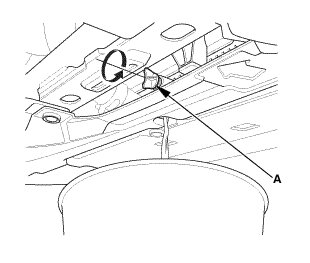
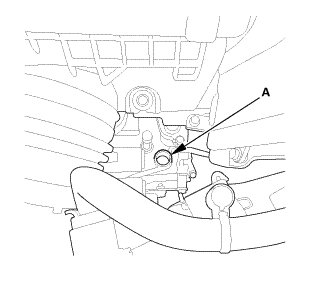
1. Loosen the drain plug (A), and drain the coolant.
5. ATF Warmer
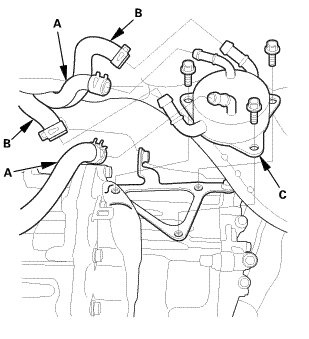
1. Disconnect the ATF hoses (A).
2. Turn the end of the ATF hoses up to prevent ATF from flowing out, then plug the hoses and lines.
3. Disconnect the water bypass hoses (B).
4. Remove the ATF warmer (C).
Installation
1. ATF Warmer
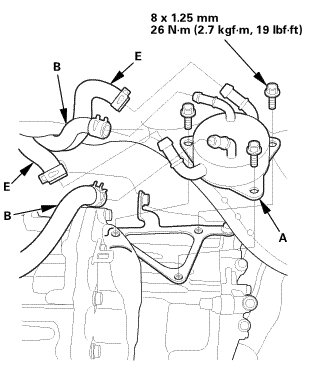
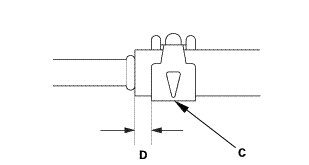
1. Install the ATF warmer (A).
2. Connect the ATF hoses (B) until the hose end contacts the bulge.
3. Secure the hoses with the clips (C) at 2-4 mm (0.08-0.16 in) (D) from the hose ends.
4. Connect the water bypass hoses (E).
2. Engine Undercover
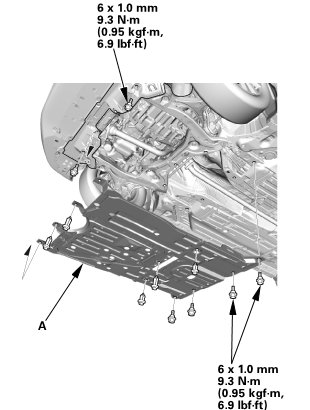
1. Install the engine undercover (A).
3. ATF Level Check
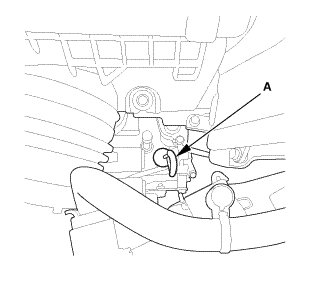
1. Park the vehicle on the level ground.
2. Remove the ATF dipstick (yellow loop) (A), and wipe it with a clean cloth.
3. Insert the dipstick into the dipstick hole.
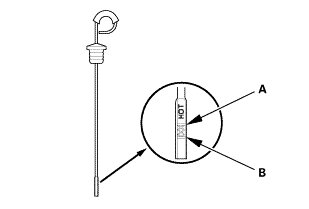
4. Remove the dipstick, and check the ATF level. It should be between the upper mark (A) and the lower mark (B).
5. If the ATF level is below the lower mark, check for fluid leaks at the transmission, the hoses, and the line joints. If a problem is found, fix it before filling the transmission with ATF.
NOTE: If the vehicle is driven when the ATF level is below the lower mark, one or more of these symptoms may occur:
* Transmission damage.
* Vehicle does not move in any gear.
* Vehicle accelerates poorly, and flares when starting off in forward and reverse positions.
* Engine vibrates at idle.
6. If the ATF level is above the upper mark, drain the ATF to proper level.
NOTE: If the vehicle is driven when the ATF level is above the upper mark, the vehicle may creep forward while in N, or have shifting problems.
7. If necessary, fill the transmission with ATF through the dipstick hole (A) to bring the fluid level between the upper mark and the lower mark of the dipstick. Do not fill the fluid above the upper mark. Always use Honda automatic transmission fluid (ATF) ATF DW-1. Using a non-Honda ATF can affect shift quality.
8. Insert the dipstick back into the dipstick hole.
4. Radiator Coolant - Replacement
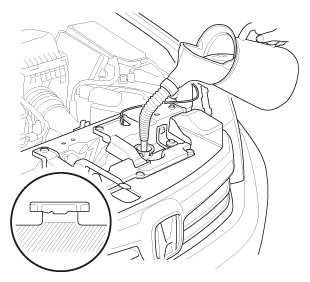
1. Pour Honda Long Life Antifreeze/Coolant Type 2 into the radiator up to the base of the filler neck.
NOTE (Except K24Z7 engine):
* Always use Honda Long Life Antifreeze/Coolant Type 2. Using a non-Honda coolant can result in corrosion, causing the cooling system to malfunction or fail.
* Honda Long Life Antifreeze/Coolant Type 2 is a mixture of 50 % antifreeze and 50 % water. Do not add water.

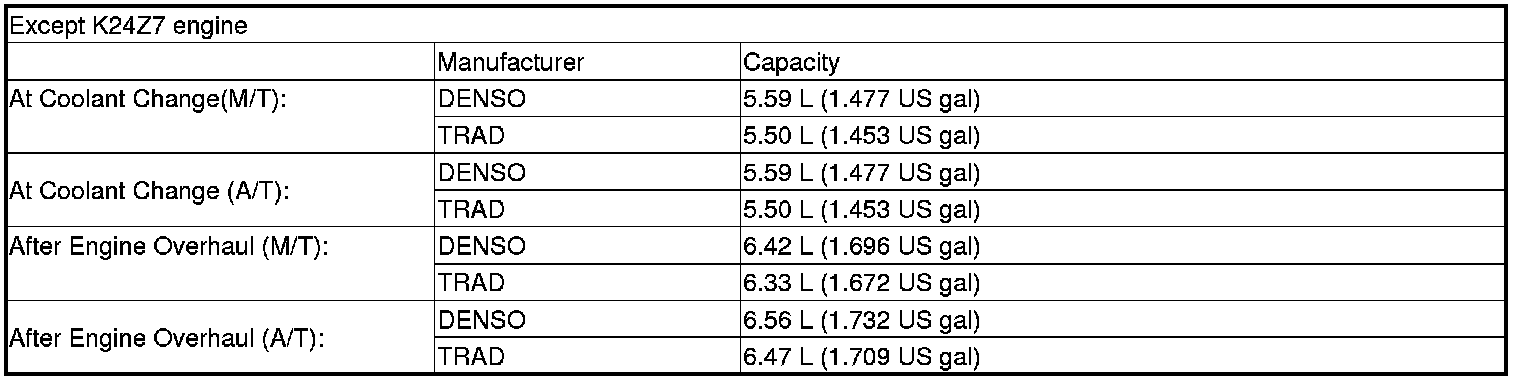
NOTE (K24Z7 engine):
* Always use Honda Long Life Antifreeze/Coolant Type 2. Using a non-Honda coolant can result in corrosion, causing the cooling system to malfunction or fail.
* Honda Long Life Antifreeze/Coolant Type 2 is a mixture of 50 % antifreeze and 50 % water. Do not add water.
* If the vehicle is regularly driven in very low temperatures (under -31 °F,-35 °C) a 60 % concentration of coolant should be used. To accomplish this, pour 1.6 L (0.4 US gal) of Honda Extreme Cold Weather Antifreeze/Coolant Type 2 into the radiator first, then add Honda Long Life Antifreeze/Coolant Type 2 until the radiator is full.


5. Warm Up The Engine
Start the engine. Hold the engine speed at 3,000 rpm without load (A/T in P or N, M/T in neutral) until the radiator fan comes on, then let it idle.
6. ATF Level Check
1. Park the vehicle on the level ground.
2. Remove the ATF dipstick (yellow loop) (A), and wipe it with a clean cloth.
3. Insert the dipstick into the dipstick hole.
4. Remove the dipstick, and check the ATF level. It should be between the upper mark (A) and the lower mark (B).
5. If the ATF level is below the lower mark, check for fluid leaks at the transmission, the hoses, and the line joints. If a problem is found, fix it before filling the transmission with ATF.
NOTE: If the vehicle is driven when the ATF level is below the lower mark, one or more of these symptoms may occur:
* Transmission damage.
* Vehicle does not move in any gear.
* Vehicle accelerates poorly, and flares when starting off in forward and reverse positions.
* Engine vibrates at idle.
6. If the ATF level is above the upper mark, drain the ATF to proper level.
NOTE: If the vehicle is driven when the ATF level is above the upper mark, the vehicle may creep forward while in N, or have shifting problems.
7. If necessary, fill the transmission with ATF through the dipstick hole (A) to bring the fluid level between the upper mark and the lower mark of the dipstick. Do not fill the fluid above the upper mark. Always use Honda automatic transmission fluid (ATF) ATF DW-1. Using a non-Honda ATF can affect shift quality.
8. Insert the dipstick back into the dipstick hole.
7. Maintenance Minder Reset
1. After doing all procedures, select the individual maintenance item you wish to reset with the HDS (See the Maintenance Minder General Information).