P2068
This article has been updated by technical service bulletin 06-90-019 dated July 2006.
The dual fuel level sender diagnostic trouble codes P2065, P2066, P2067, and P2068 were inadvertently omitted from the 2006 Azera Shop manual. Each code's related set criteria and diagnostic procedure is provided in this bulletin.
P2068 - FUEL LEVEL SENSOR OBD CIRCUIT HIGH INPUT
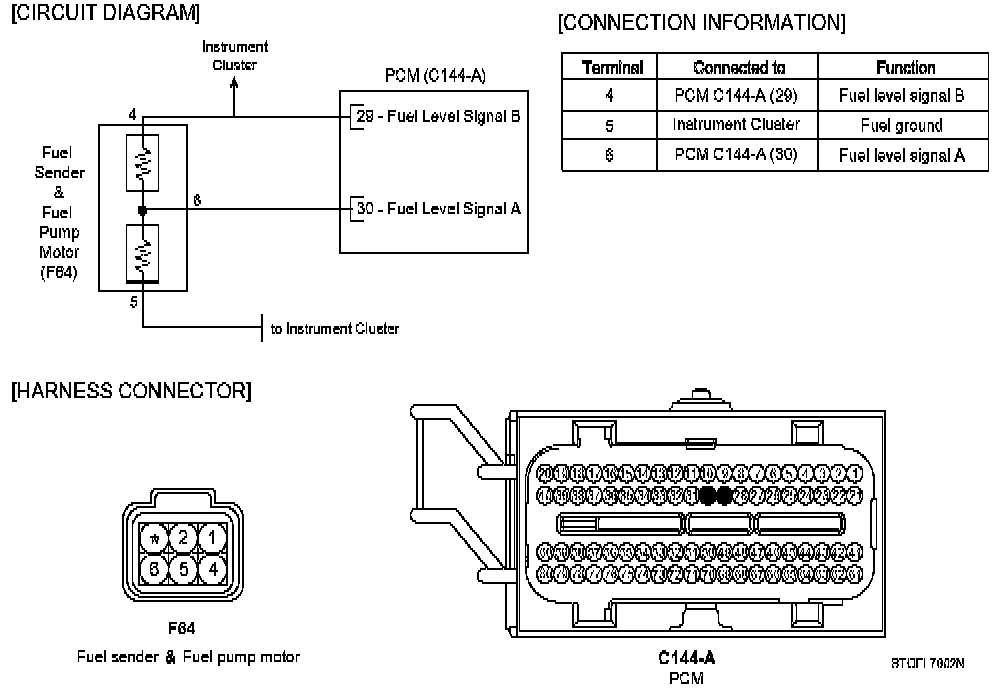
Additional wiring schematic information for the dual fuel level sender system can be obtained from TSB 06-90-018.
DTC P2068 Fuel Level Sensor "B" Circuit High Input
Component Location:
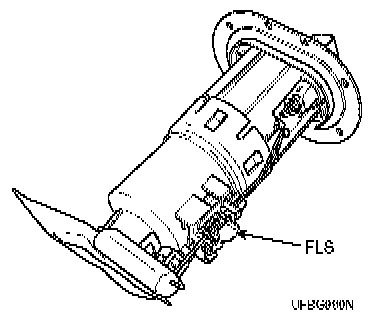
General Description
The Fuel Level Sensor (FLS) measures fuel level in the fuel tank and its information is used by the PCM to monitor the condition of the EVAP canister purge system (i.e. leak detection). If the fuel level sensor reads too high of a signal, too low (stuck), or if the difference between the voltage of the fuel level sensor and the voltage deviation of the fuel level sensors exceeds a preset value while driving, the PCM will interpret this as a fault.
DTC Description
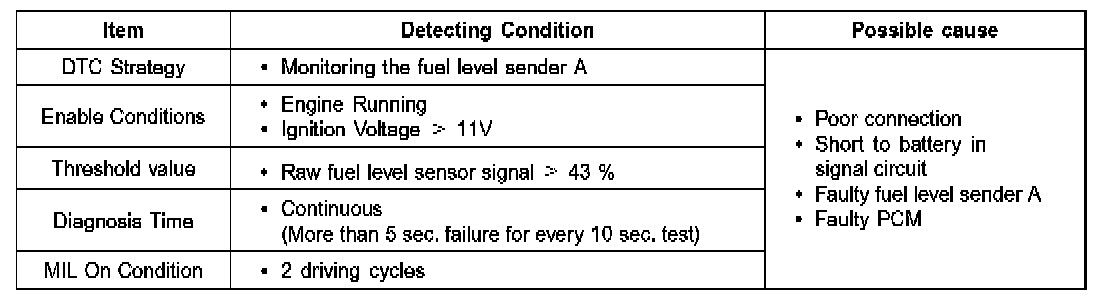
Checking output signals of the fuel level sender under detecting conditions, if the fuel level is too high, the PCM will set DTC P2068. The MIL (Malfunction Indication Lamp) will illuminate if the condition lasts two consecutive drive cycles.
DTC Detecting Conditions:
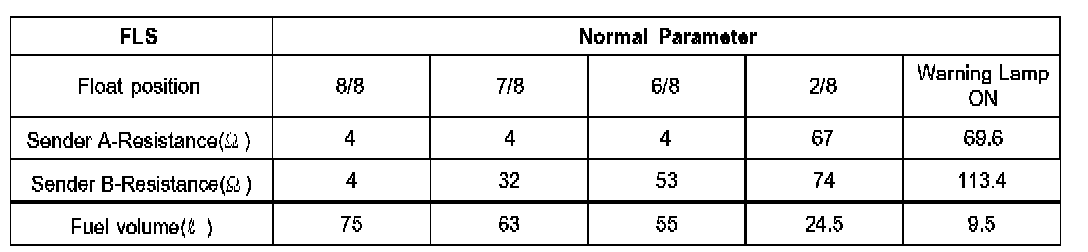
Specifications:
Schematic Diagram:
Monitor Scantool Data
1. Check DTC Status
1) Connect scantool to Data Link Connector (DLC).
2) IG "ON".
F4 DTAL:
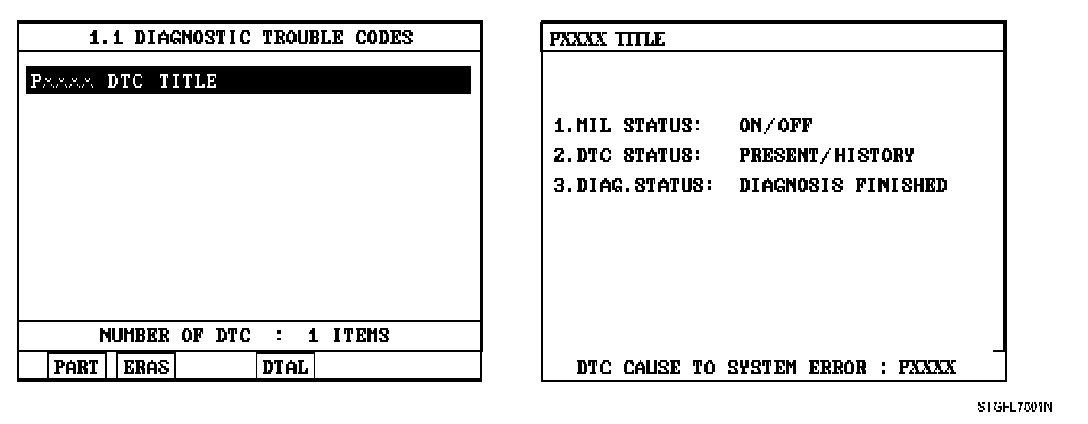
3) Select "Diagnostic Trouble Codes (DTCs)" mode, and then Press F4 (DTAL) to check DTC's information from the DTC's menu.
4) Read "DTC Status" parameter.
5) Is parameter displayed "Present fault"?
YES
Go to "Terminal and Connector Inspection" procedure.
NO
Fault is intermittent caused by poor contact in the sensor's and/or PCM's connector or was repaired and PCM memory was not cleared. Thoroughly check connectors for looseness, poor connection, bending, corrosion, contamination, deterioration, or damage. Repair or replace as necessary and go to "Verification of Vehicle Repair" procedure.
Terminal And Connector Inspection
1. Many malfunctions in the electrical system are caused by harness and terminal issues. Faults can also be caused by interference from other electrical systems, and mechanical or chemical damage.
2. Thoroughly check connectors for looseness, poor connection, bending, corrosion, contamination, deterioration, or damage.
3. Has a problem been found?
YES
Repair as necessary and go to "Verification of Vehicle Repair" procedure
NO
Go to " Signal Circuit Inspection " procedure
Signal Circuit Inspection
1. Check short to battery in harness
1) IG "OFF" and disconnect Fuel Sender & Fuel Pump Motor connector and PCM connector.
2) IG "ON" & ENG "OFF"
Voltage Check:
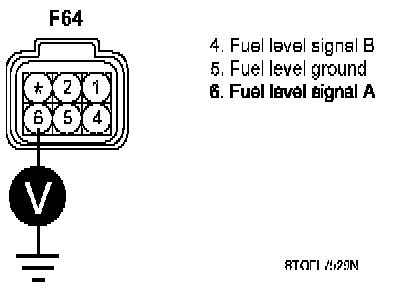
3) Measure voltage between terminal 6 of Fuel Sender & Fuel Pump Motor harness connector and chassis ground.
4) Is the measured voltage within specification ?
YES
Go to "Ground Circuit Inspection" procedure.
NO
Repair short to battery in harness and go to "Verification of Vehicle Repair" procedure.
Ground Circuit Inspection
1. Check open in harness
1) IG "OFF" and disconnect Instrument cluster connector and Fuel Sender & Fuel Pump Motor connector.
Resistance Check:
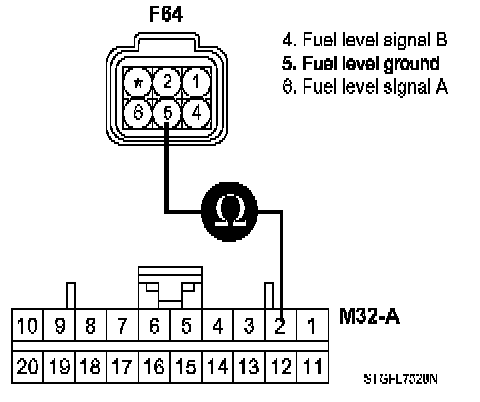
2) Measure resistance between terminal 5 of Fuel Sender & Fuel Pump Motor harness connector and terminal 2 of Instrument cluster.
Specification: Below 1 Ohm
3) Is the measured resistance within specification ?
YES
Go to "Component Inspection" procedure.
NO
Repair open in harness and go to "Verification of Vehicle Repair" procedure.
Component Inspection
1. Ignition "OFF"
2. Remove Fuel Sender & Fuel pump motor from fuel tank.
Resistance Check:
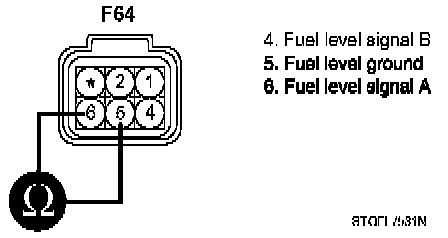
3. Measure resistance between terminal 5 and 6 of Fuel Sender & Fuel pump motor (Component Side).
4. Does the resistance of FLS change as lifting up and down the fuel level float ?
YES
Substitute with a known - good PCM and check for proper operation. If the problem is corrected, replace PCM and go to "Verification of Vehicle Repair" procedure.
Note: There is a memory reset function on the scan tool that will erase optional data gathered and recorded by a PCM. Use this reset function before and after using a test PCM from another car to avoid detecting false problems.
NO
Substitute with a known-good Fuel Level Sender and check for proper operation. If the problem is corrected, replace Fuel Level Sender and go to "Verification of Vehicle Repair" procedure.
Verification Of Vehicle Repair
After a repair, it is essential to verify that the fault has been corrected.
1. Connect scan tool and select "Diagnostic Trouble Codes (DTCs)" mode
2. Press F4 (DTAL) and confirm that "DTC Readiness Flag" indicates "Complete".
If not, drive the vehicle within conditions noted in the freeze frame data or enable conditions.
3. Read "DTC Status" parameter
4. Is parameter displayed "History (Not Present) fault"?
YES
System performing to specification at this time.
Clear the DTC
NO
Go to the applicable troubleshooting procedure.