Radiator
RadiatorService Repair No - 26.40.01
Removal
1. Disconnect the battery ground cable.
2. Recover the A/C refrigerant.
3. Remove the air cleaner assembly.
4. Remove the cooling fan drive pulley.
5. WARNING: Since injury such as scalding could be caused by escaping steam or coolant, do not remove the filler cap from the coolant expansion tank while the system is hot.
Drain the cooling system.
6. Remove the radiator grille.
7. Remove the auxiliary coolant pump.
8. WARNING: Eye protection must be worn.
CAUTION: Before disconnecting or removing the components, ensure the area around the joint faces and connections are clean. Plug open connections to prevent contamination.
NOTE: The receiver drier need only be changed under the following circumstances: There is dirt in the refrigerant circuit (eg. compressor seizure). The system is leaking and refrigerant has been lost to atmosphere. Refrigerant circuit has been open more than 24 hours due to repair.
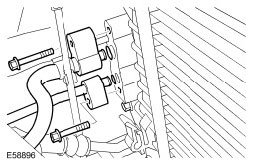
Disconnect the A/C pipes.
^ Remove the 2 bolts.
^ Discard the O-ring seals.
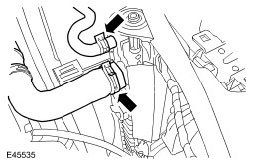
9. Disconnect the 2 upper radiator hoses.
^ Carefully release the clips.
10. Release the power steering fluid reservoir and position aside.
^ Tie the reservoir aside.
11. Release the windshield washer reservoir filler neck.
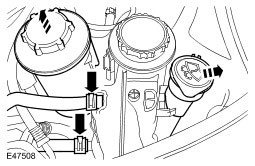
12. Remove the coolant expansion tank.
^ Remove the 2 bolts.
^ Release the spigot and lug.
^ Disconnect the coolant low level sensor electrical connector.
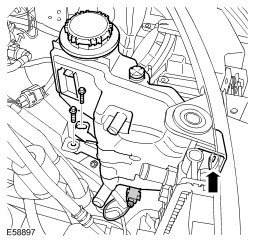
13. Remove the auxiliary coolant pump mounting bracket.
^ Remove the peg.
^ Release the clip.
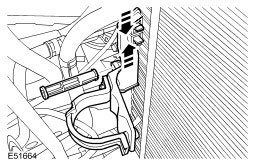
14. Release and remove the cooling fan lower shroud from the cooling pack.
^ Release the 2 clips.
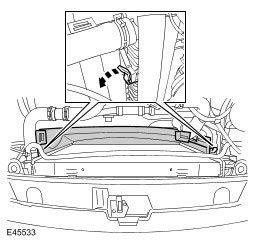
15. CAUTION: Always plug any open connections to prevent contamination.
Disconnect the transmission cooler hoses.
^ Position a container to collect the fluid.
^ Release the 2 clips.
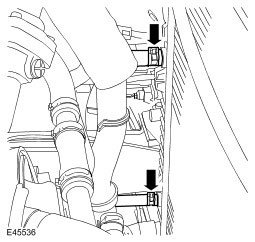
16. Remove the radiator securing pegs.
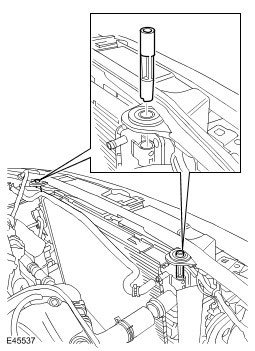
17. Release the breather hose and tie aside.
18. Release the power steering fluid cooler.
^ Release the 3 clips.
^ Tie the line aside.
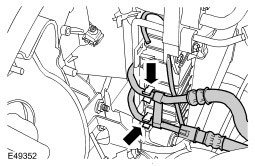
19. Release the bumper air ducting.
^ Remove the 2 screws.
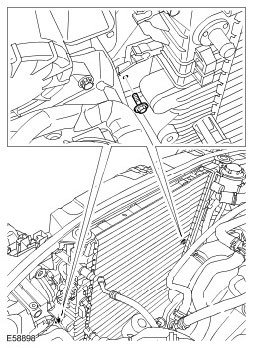
20. With assistance, remove the radiator assembly.
^ Protect the elements from damage.
^ Remove the 2 radiator retaining bolts.
^ With assistance, remove the radiator.
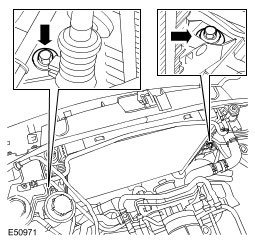
Installation
1. With assistance, install the radiator assembly.
^ With assistance, install the radiator assembly.
^ Align the radiator.
^ Remove the element protection.
^ Tighten the bolts to 25 Nm (18 ft. lbs.).
2. Secure the bumper air ducting.
^ Tighten the screws.
3. Install the power steering fluid cooler.
^ Secure in the 3 clips.
4. Install the radiator securing pegs.
5. Connect the upper radiator hoses.
^ Position and secure in the clips.
6. Install the transmission cooler hoses.
7. Install the radiator upper hoses.
^ Install the clip.
8. Secure the coolant expansion tank.
^ Connect the coolant low level indicator electrical connector.
^ Locate the lug and spigot.
^ Tighten the 2 bolts to 10 Nm (7 ft. lbs.).
9. Install the power steering fluid reservoir.
10. Install the windshield washer reservoir filler neck.
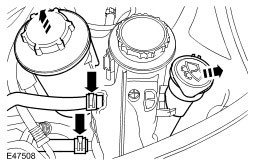
11. NOTE: Lubricate the O-ring seals with clean refrigerant oil.
Connect the A/C pipes.
^ Install new O-ring seals. Tighten the bolts to 10 Nm (7 ft. lbs.).
12. Connect the coolant hoses to the expansion tank.
^ Secure the clips.
13. Install the auxiliary coolant pump mounting bracket.
^ Secure the clip.
^ Install the securing peg.
14. Install the auxiliary coolant pump.
15. Install the radiator grille.
16. Install the cooling fan drive pulley.
17. Install the air cleaner assembly.
18. Fill the A/C system.
19. Connect the battery ground cable.
20. Refill the cooling system.
21. Check automatic transmission fluid level.