Injector Volume Test
WARNING: Fuel line spills and leakage are dangerous. Fuel can ignite and cause serious injuries or death and damage. Always carry out the following procedure with the engine stopped.NOTE:
- Perform this inspection only when directed.
- If you have an after-market fuel injector tester or SST (49 L018 901), perform this inspection.
- If there is no after-market fuel injector tester available, perform the "Simulation Test", "Resistance Inspection", and "Fuel Leakage Inspection" to verify whether the fuel injector is okay or not.
1. Complete the "BEFORE REPAIR PROCEDURE".
2. Disconnect the negative battery cable.
Using the SST
1. Remove the fuel injectors together with the fuel distributor with fuel hose connected. (See FUEL INJECTOR REMOVAL/INSTALLATION.)
2. Fasten the fuel injectors firmly to the fuel distributor with wire.
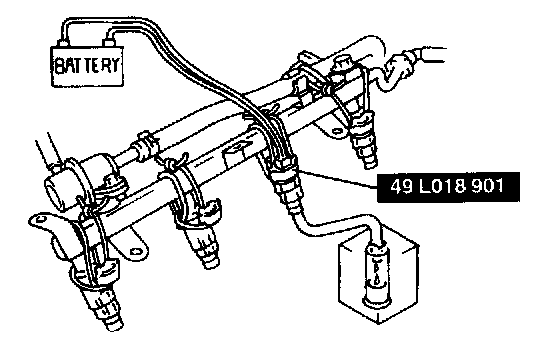
3. Connect the fuel injector to the SST or the fuel injector tester as shown in the figure.
4. Connect the negative battery cable.
CAUTION: Connecting the wrong DLC terminal may possibly cause a malfunction. Carefully connect the specified terminal only.
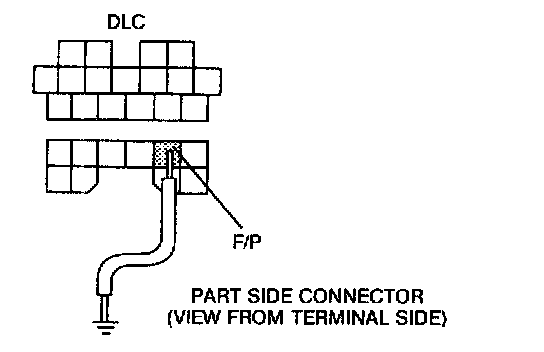
5. Short the DLC terminal F/P to the body GND using a jumper wire.
6. Turn the ignition switch to ON position.
7. Measure the injection volume of each fuel injector using a graduated container.
- If not as specified, replace the fuel injector.
Injection volume:
51 - 66 ml {51 - 66 cc, 1.8 - 2.5 fl oz}/15 sec.
8. Turn the ignition switch to LOCK position.
9. Disconnect the negative battery cable.
10. Disconnect the SST or the fuel injector tester from the fuel injector.
11. Disconnect the jumper wire.
12. Complete the "AFTER REPAIR PROCEDURE".
Using a Fuel Injector Tester
1. Remove the fuel injectors.
2. Connect the fuel injector to a fuel injector tester.
3. Measure the injection volume of each fuel injector.
- If not as specified, replace the fuel injector.
Injection volume:
51 - 66 ml {51 - 66 cc, 1.8 - 2.5 fl oz}/15 sec.
4. Complete the "AFTER REPAIR PROCEDURE".