Service Procedure
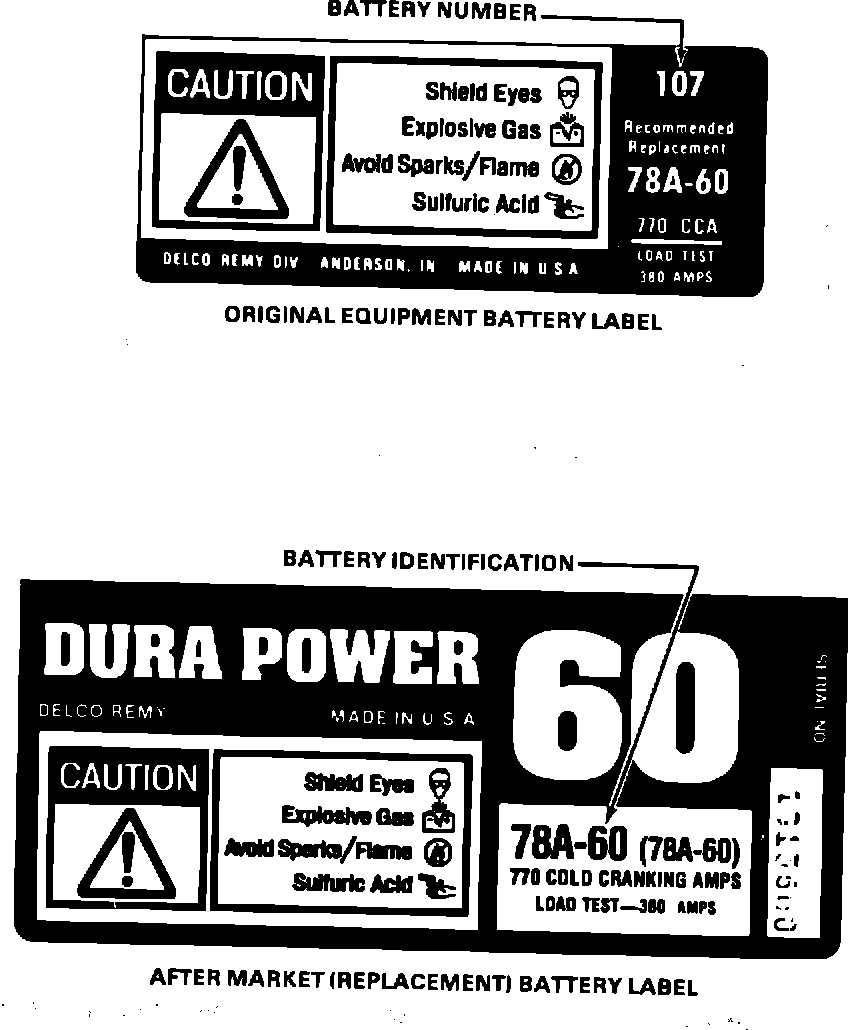
FIGURE 1 - CAUTION LABELS USED ON BATTERIES TO BE REPLACED:
PART A - INSPECTION OF BATTERY
1. Open vehicle hood, cover fenders, and inspect "Caution" label on top surface of battery. Refer to Figure 1.
a. Replace batteries identified as original equipment number "107" or aftermarket (replacement) number "78A-60" on "Caution" label following the complete procedure in PART B of this procedure.
b. DO NOT replace batteries that ARE NOT identified as described in Step "a" above, as no further action is required, except to install a campaign identification label, Step 10 of PART B of this procedure.
PART B - COMPONENT INSPECTION. CLEANING, REPAIR AND REPLACEMENT
CAUTION: Follow recommended precautions in handling batteries and potential battery acid contamination components. Battery acid is corrosive. Proper protective clothing and safety glasses should be worn during the following work:
1. Disconnect battery negative cable, positive cable, remove retainer screw and retainer. Carefully remove battery, tag with vehicle information, and store in a safe area for disposition.
2. Inspect the following areas for evidence of battery acid. Make note of areas where acid or acid residue can usually be identified as a whitish discoloration or deposit. Acid can result in corrosion of paint peeling on metals and softening and blistering of rubber and certain plastic compounds.
a. Battery tray, hold-down bolt, and plastic clamp, b. Left inner fender area, (right inner fender area if diesel engine),
c. Left shock tower, d. Left horns, e Radiator, (air conditioning line, muffler hose, etc. diesel engine only),
f. Lower radiator support, g. Transmission oil cooler lines, hoses, and clamps, (gasoline only),
h. Power steering oil cooler lines, hold-down bracket and bolt, i. Hood release cable, j. Windshield washer hose, k. Upper radiator hose and clamp at radiator, l. Air cleaner housing and inlet area (3.8L engine only),
m. Hood insulation above battery, n. Engine cradle under battery, o. Side rail under battery, p. Any other suspected contaminated part in battery area.
q. Engine oil cooler pipes (diesel engine only).
3. If there were no evidence of battery acid found in Step 2, proceed to Step 5 of this procedure to replace transmission cooler hoses (on gasoline engine vehicles only) and install new battery. If evidence of acid presence was noted in Step 3, clean affected parts and areas using the following procedure:
a. Purchase sodium bicarbonate (baking soda) locally.
b. Sprinkle affected area with baking soda.
c. Mix a solution of one (1) part baking soda by volume to one (1) part water.
d. Brush affected parts and areas liberally with solution, making sure to cover all surfaces.
e. Let stand until affected area stops gassing (foaming).
f. Rinse with clean water.
g. Repeat application five (5) times and rinse.
4. After neutralizing acid in Step 3, proceed to correct possible degradation, as listed below. Perform only the appropriate steps listed where acid presence was noted:
STANDARD PAINT REFINISH PROCEDURES SHOULD BE USED WHEN REPAIRING PAINT THAT WAS DAMAGED BY BATTERY ACID.
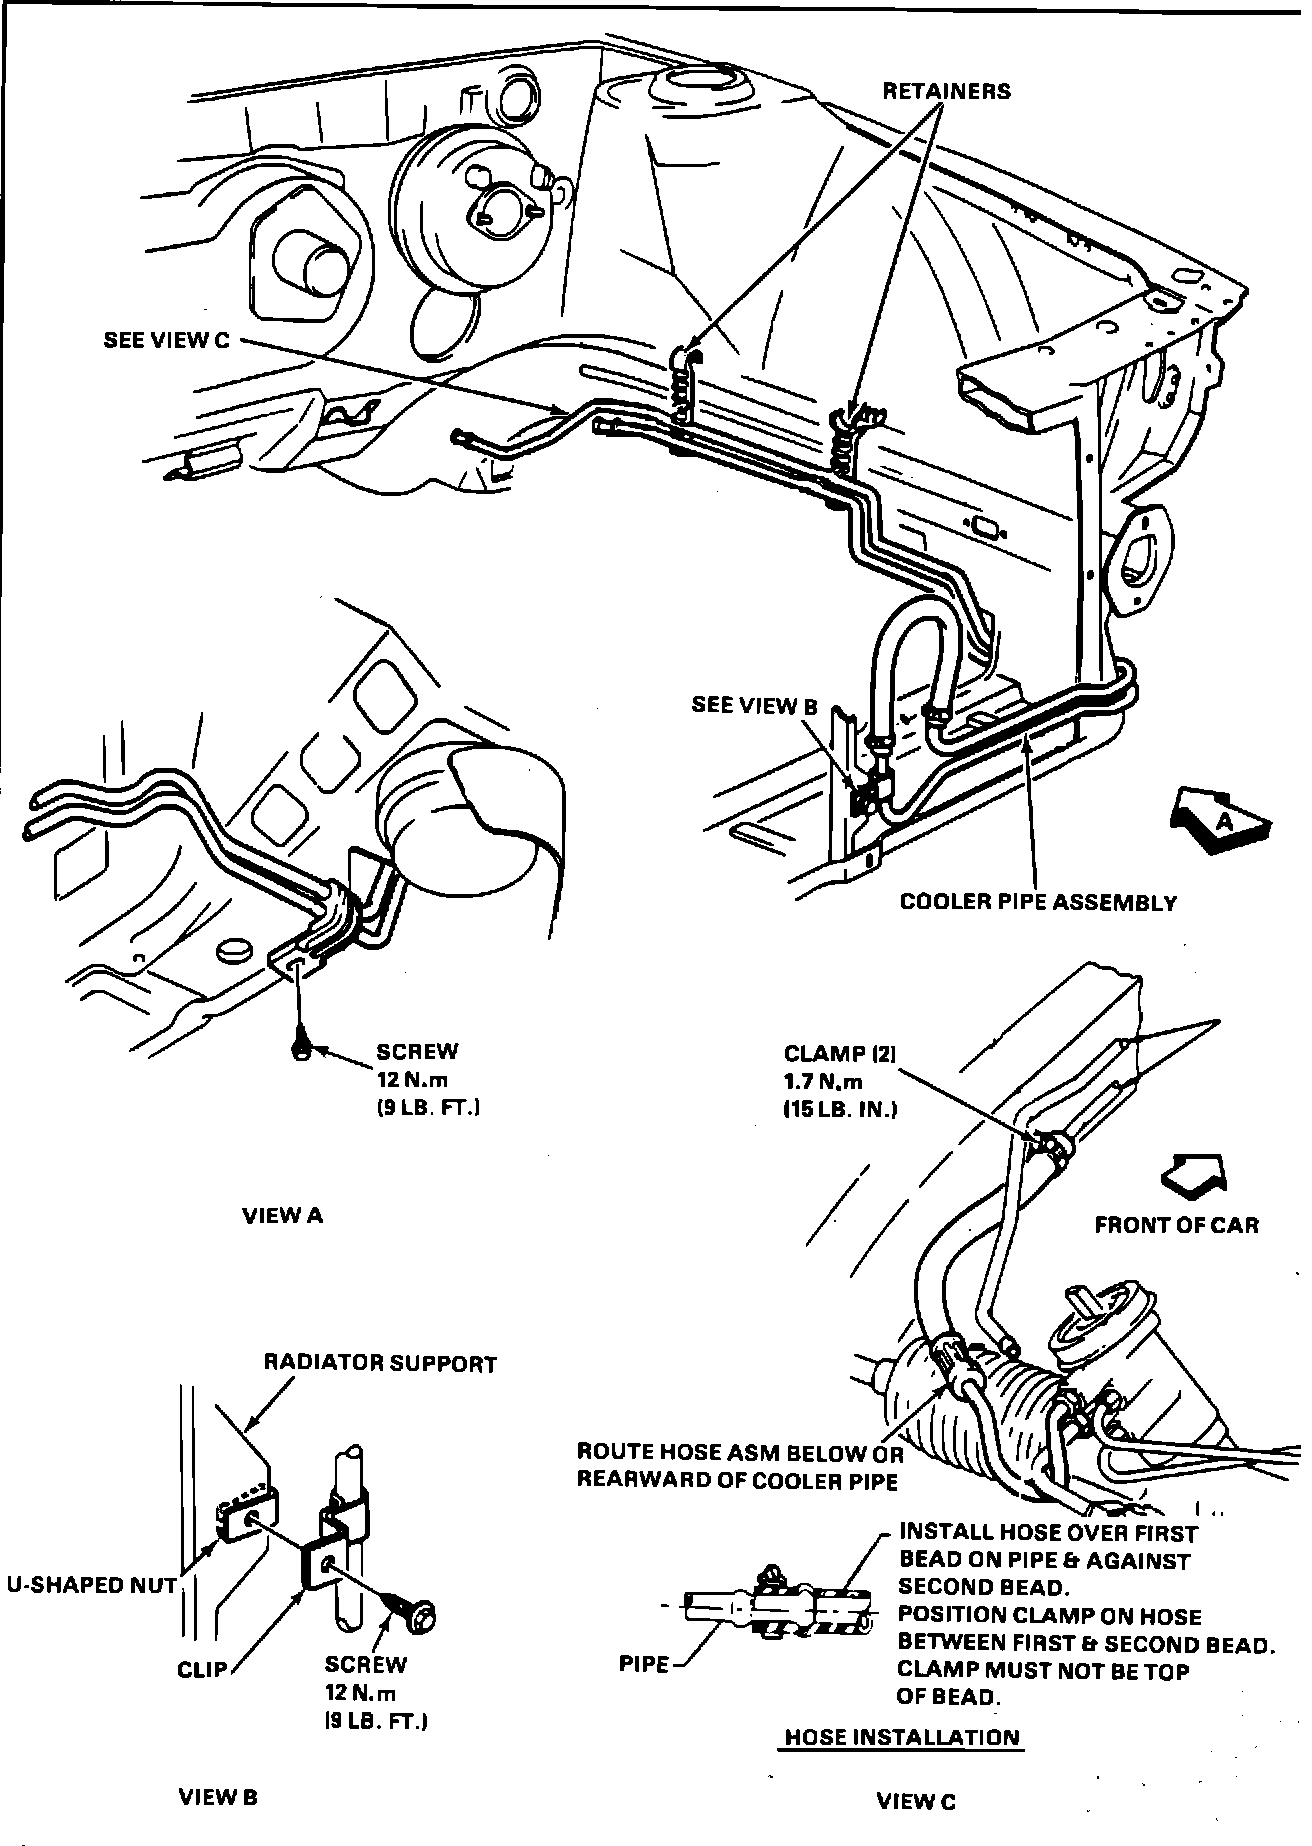
FIGURE 2 - POWER STEERING COOLER PIPE INSTALLATION:
a. Power Steering Oil Cooler Lines (Gasoline Engine Only)
Place container under line connections. Remove old lines. Clean hold-down bracket, attaching screw, lower radiator support behind hold-down bracket and along side rail where lines were, with baking soda and water solution. Replace power steering oil cooler line with package number 22527846. Refer to Figure 2. Fill power steering system to replace lost fluid.
b. Battery Tray, Hold-down Bolt and Plastic Clamp
Make sure acid residue has been thoroughly cleaned. Repaint tray as required.
c. Lower Radiator Support and Radiator
Make sure acid residue has been thoroughly cleaned. Repaint affected areas as required.
d. Upper Radiator Hose and Clamp at Radiator (Lower Hose on Diesel)
Remove hose and replace clamp at radiator. Install new hose and clamp at radiator. Fill radiator with recommended coolant. Tighten clamps to 2 N-m (18 in.lbs.).
e. Windshield Washer Container Hose and Hood Release Cable (Gasoline Engine Only)
Replace washer container hose with service part number 1359744 cut to proper length. Replace hood release cable.
f. Other Parts and Areas
Work performed and time allowance in the following areas must have zone approval.
1) Left or right fender area.
2) Left or right shock tower.
3) Horns.
4) Air cleaner housing and inlet area.
5) Hood insulation above battery. If battery acid is evidenced on hood insulator, it should be replaced and inner hood panel should be cleaned and paint repaired, if required.
6) Engine cradle under battery.
7) Other suspected contaminated parts in battery area.
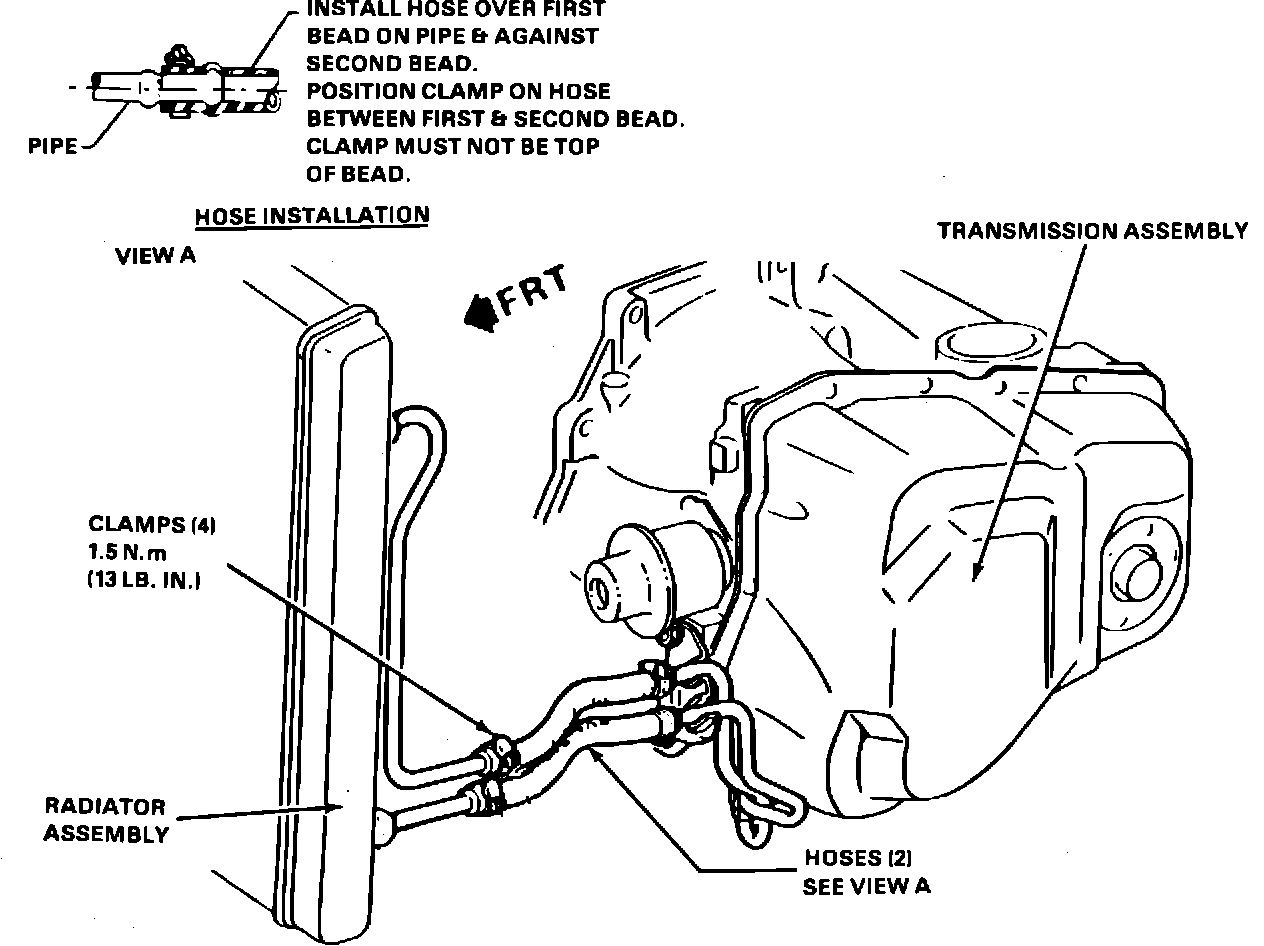
FIGURE 3 - TRANSMISSION COOLER LINE HOSE INSTALLATION:
5. Place drain container under transmission cooler hoses (gasoline engine only).
6. Remove transmission cooler hoses (gasoline engine only). If required, clean end of lines with a clean rag soaked in the baking soda and water solution; cover ends of lines with tape and repaint affected areas. Remove tape. Install new hoses and clamps using parts in package 25526686. Refer to Figure 3. Tighten clamps to 1.5 N-m (13 in.lbs.).
7. Measure transmission oil lost during hose replacement and install same amount of new oil in transmission.
8. Install new service battery 78A-72, part number 1981590. Tighten battery retainer screw to 17 N-m (13 ft.lbs.). Connect positive cable, negative cable, and tighten cable bolts to 12 N-m (9 ft.lbs.).
9. Start engine and check for leaks at cooler hose connections, and at connections of other replaced fluid lines and hoses. Repair, if required.
10. Install a Campaign Identification label. Each vehicle modified in accordance with the instructions outlined in this procedure will require a Campaign Identification label. Each label provides a space to include the campaign number, the five (5) digit dealer code of the dealer performing the campaign service, and the date the campaign was performed. This information may be inserted with a typewriter or ballpoint pen. When installing label, clean the surface of the radiator upper mounting support and apply the campaign label where it is readily visible.