Knee Bolster Replacement
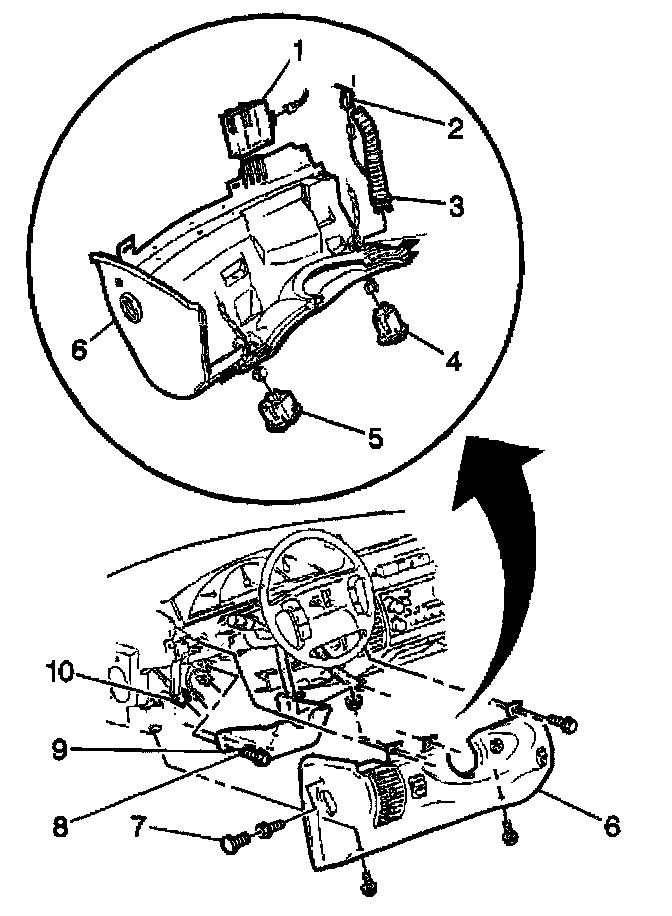
REMOVAL PROCEDURE
IMPORTANT: After a non-deployment accident, visually inspect the knee bolster for damage or deformation. Any visible damage may indicate
structural damage to the IP assembly.
1. Remove the IP trim plate.
2. Remove the left insulator panel.
3. Remove the plastic cap (7) in the knee bolster panel near the door in order to access the fastener.
4. Remove the knee bolster fasteners from the IP.
5. Pull the knee bolster (6) rearward.
6. Disconnect the air temperature sensor (3).
7. Remove the interior lighting control module (1).
8. Disconnect the traction control switch (4) connector.
9. Disconnect the rear compartment release switch or rear compartment release/fog lamp switch (5) connector.
10. Remove the knee bolster.
11. Remove the switches from the knee bolster, as needed.
INSTALLATION PROCEDURE
1. Install the switches to the knee bolster, as needed.
2. Partially install the knee bolster.
3. Connect the switch connectors to the switches on the knee bolster.
4. Install the interior lighting control module (1).
5. Install the air temperature sensor (3).
6. Install the knee bolster (6).
NOTE: Refer to Fastener Notice in Cautions and Notices.
7. Install the top knee bolster fasteners.
Tighten
Tighten the top fasteners to 1.9 N.m (17 lb in).
8. Install the bottom fasteners to the knee bolster.
Tighten
Tighten the bottom fasteners to 10 N.m (88 lb in).
9. Install the fastener to the side of the knee bolster.
Tighten
Tighten the side fastener to 1.9 N.m (17 lb in).
10. Install the plastic cap (7).
11. Install the insulator panel.
12. Install the IP trim plate.