Front Wiper Linkage Replacement
Front Wiper Linkage Retaining Nuts:
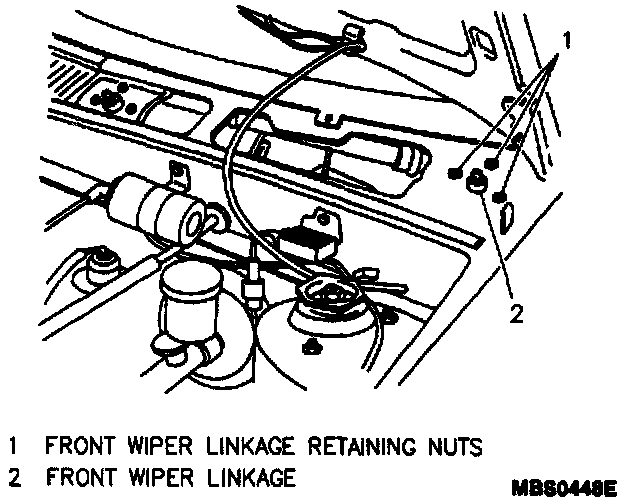
Remove or Disconnect
1. Negative (-) battery cable.
IMPORTANT:
Before removing the wiper arms, note their location for proper installation.
2. One nut cover and retaining nut from each wiper arm.
3. Wiper arms from vehicle.
4. Eleven plastic retaining clips and cowl vent grille from vehicle.
5. Six nuts retaining wiper linkage assembly to cowl.
6. Front wiper motor electrical connector.
7. Three wiper motor mounting bolts, pull motor away from bulkhead.
8. Gently pry wiper linkage from wiper motor crank arm.
IMPORTANT:
The wiper motor crank arm is not serviced separately and should not be disconnected from the wiper motor. The crank arm is positioned on the wiper motor to allow the wiper arms to return to their normal park position.
9. Wiper motor from vehicle.
10. Slide wiper linkage assembly through the cowl opening.
Install or Connect
1. Slide the wiper linkage assembly through the cowl opening.
2. Wiper motor to vehicle.
3. Wiper linkage to wiper motor crank arm.
4. Wiper motor to bulkhead; secure with three mounting bolts (including MAP sensor bracket).
Tighten
^ Wiper motor mounting bolts to 20 N.m (15 lb.ft.).
5. Wiper motor electrical connector.
6. Wiper linkage assembly to cowl; secure with six retaining nuts.
Tighten
^ Wiper linkage retaining nuts to 15 N.m (11 lb.ft.).
7. Cowl vent grille; secure with eleven plastic retaining clips.
8. Wiper arms; secure each with one retaining nut and nut cover.
Tighten
^ Wiper arm retaining nuts to 20 N.m (15 lb.ft.).
9. Negative (-) battery cable.