Repair Procedure
WORK PROCEDURERecall N03
Porsche 928 S4, model year 1991 - Replacement of fill piece in the automatic transmission.
1. Place shift selector lever into position "D", and raise vehicle on a hoist, drain ATF fluid.
2. Remove shield on the ATF reservoir, (remove two Allen bolts M6X12).
3. Remove plastic nut on the ATF reservoir pipe connection with adjustable pliers. Remove the ATF reservoir and push to the side.
4. Cut off and remove both plastic cable binders for the transmission temperature sensor harness (left side of oil pan).
5. Remove ATF oil pan, (remove six bolts M8X30).
Note:
Small amounts of ATF fluid will always drip from the automatic transmission after the oil pan is removed.
6. Remove ATF filter, (three Phillips screws M5X12). Disconnect the spring on the control pressure piston.
7. Remove valve body, (remove 15 M6 bolts).
Note:
Do not invert (turn upside down) the valve body. Place it on a clean surface in the installation position.
8. Remove holder for leaf spring, (remove bolt M6X15).
9. Remove lower cover with backing plate, oil pipe and gasket. (Remove nine bolts M6X30.) Place cover on a clean surface.
10. Remove fill piece from transmission housing. Pull out to the bottom with a scribing tool, pulling in the area.
Note:
Do not push the fill piece up since it can bind in the housing. Insert the scribing tool in the area and pull out fill piece.
In case the fill piece is tight in the housing, drill a 4.2 mm dia. hole in the area marked with the "X", approximately 15-20 mm deep. Turn in a M5 lap and pull the fill piece out.
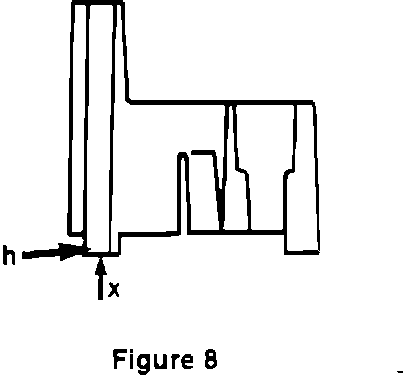
If the surface of the fill piece (Figure 8 marked with the "X") is not even and looks the same as the new fill piece (a raised tab on the fill piece marked with an "h"), the new fill piece is already installed and can remain in the transmission. The drawing shows the new fill piece with raised tab (h).
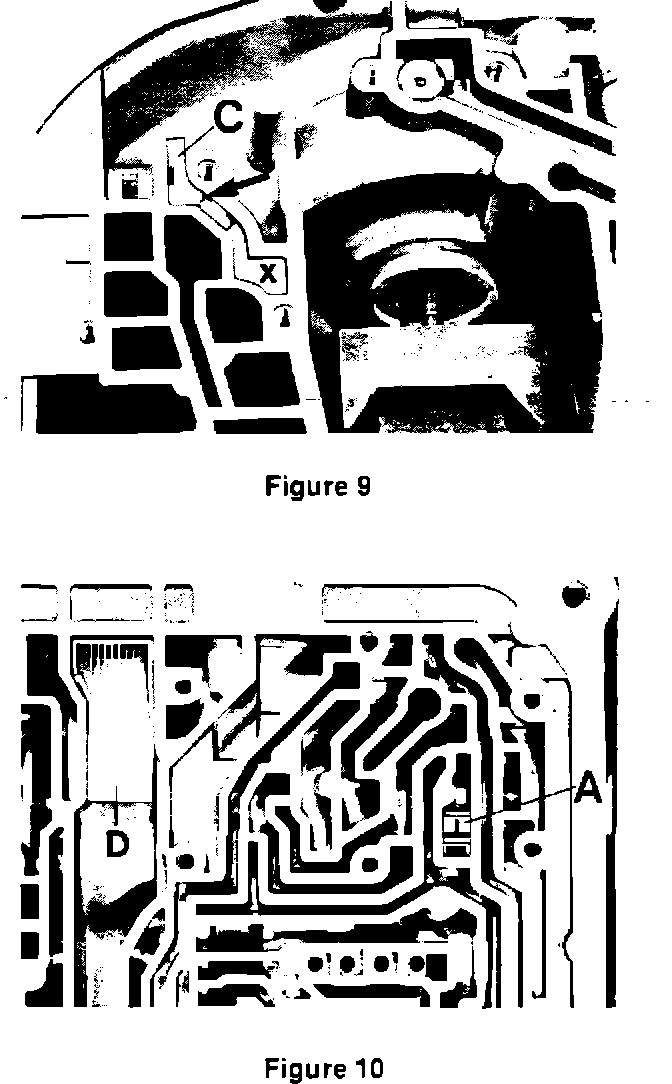
11. If necessary, install new fill piece. Push in fill piece all the way until the fill piece tabs (h) are even with the transmission housing (Figure 9).
12. Assure correct seating of temperature throttle (A), fill piece (C) and oil deflector (D). Figures 9 and 10.
13. Reinstall lower cover with backing plate and gasket. Assure that the oil pipe is correctly installed in the respective drilling without binding. The pin for the leaf spring is the guide point for the cover. Use one bolt to hold the lower cover in place.
14. Reinstall valve body. Assure that the control pressure piston is not deformed. Also, the selector piston must engage into the linkage.
Start bolt in the center of the valve body. The bolt is black in color - M6X55,
To center the valve body, start the two bolts and tighten lightly.
Bolt M6X55 and is black
Bolt M6X50 and is yellow.
15. Install hand tight the remaining 12 bolts for the valve body.
16. Reinstall the nine bolts in the lower cover M6X30 and torque to 8 N-m (5.9 ft.lbs.).
17. Torque the 15 bolts for the valve body with 8 N-m (5.9 ft.lbs.)
18. Reinstall leaf spring. Leaf spring and bracket must be centered on the guide pin. Install bolt M6X15, assure that the roller on the leave spring contacts the selector plate in the center. Torque bolt to 8 N-m (5.9 ft.lbs.).
19. Reinstall spring on the control pressure piston.
20. Reinstall ATF oil filter. Torque the three Phillips screws to 3 N-m (3 ft.lbs.).
21. Reinstall ATF oil pan with a new gasket. Clean the sealing surface with a "lint-free" rag. Install the six bolts M8X30 and torque to 8 N-m (5.9 ft.lbs.).
22. Reinstall ATF reservoir onto the pipe of the oil pan and tighten the plastic nut.
23. Install drain plug with a new gasket and torque to 11.5 N-m (8.3 ft.lbs.)
24. Secure cable for temperature sensor with two cable ties on the oil pan.
25. Fill transmission with ATF fluid until the fluid is steady at the minimum mark. Do not remove the reservoir screen, danger of contamination!
26. Lower car, place one person into the car and raise the hoist. Start the engine and let it run in idle.
27. With the engine running at idle, fill the transmission further with ATF fluid until the fluid level is steady at the 20~ mark.
Shift into "R".
Caution, the wheels are turning!
Run the transmission for a short period in "R"
Shift into "N".
Stop the rear wheels with the brakes.
Shift into "D".
Caution, the wheels are turning!
Shift transmission several times from D to 3 to 2. Check ATF fluid level, if necessary fill to the 20~ mark.
Shift into "N".
Stop the rear wheels with the brakes.
Shift into "P".
Check ATF fluid level, if necessary fill to the 20~ mark.
Switch off engine.
28. Close the ATF reservoir. Reinstall shield with two Allen head bolts. M6X12
29. Lower the car.
30. Road test vehicle. After road test, lift the car on a hoist again and check the ATF fluid level at 80~C (175~F). If necessary, replenish to maximum mark
31. Check visually for oil leaks on the transmission.
32. To identity the campaign completion, mark the transmission with an "X" on the area using red paint.
Required Tools:
- Ratchet
- Ratchet extension
- Socket, 13 mm
- Socket, 10 mm
- 5 mm Allen wrench socket
- Adjustable pliers
- Torque wrench (3 N-m-30 N-m or 3 ft.lbs.-25 ft.lbs.)
- Scribing tool
- Oil drain container
- Electric drill
- Drill bit 4.2 mm dia.
- M5 thread tap
Required Parts:
Qty. Part Number Description
1 000 043 202 05 Kit
Repair References:
928 Workshop Manual, Group 38, pages 28-123, 38-124, 38-131, 38-132, 38-138, 38-139 and 38-140.
Time Allowance:
240 TU