Intake Manifold Replacement
Intake Manifold ReplacementRemoval Procedure
1. Remove engine sight shield.
2. Remove the evaporative emission canister purge solenoid valve.
3. Release the power brake booster vacuum pipe.
4. Remove the manifold absolute pressure sensor.
5. Remove the turbocharger control solenoid valve.
6. Remove the oil level indicator and tube.
7. Release the charge air cooler outlet air hose.
8. Remove the intake manifold brace.
9. Remove the fuel feed pipe.
10. Warning
Relieve the fuel system pressure before servicing fuel system components in order to reduce the risk of fire and personal injury.
After relieving the system pressure, a small amount of fuel may be released when servicing the fuel lines or connections. In order to reduce the chance of personal injury, cover the regulator and the fuel line fittings with a shop towel before disconnecting. This will catch any fuel that may leak out. Place the towel in an approved container when the disconnection is complete.
Remove the fuel feed pipe metal.
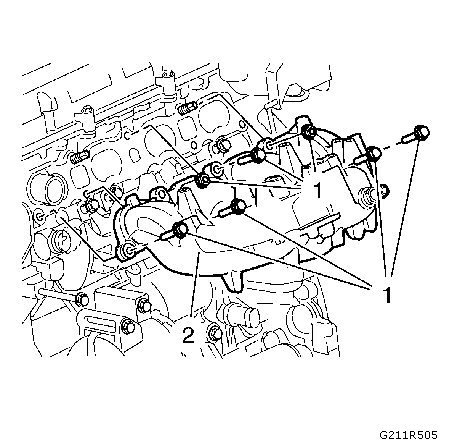
11. Remove the 7 fasteners (1) from the intake manifold (2).
Installation Procedure
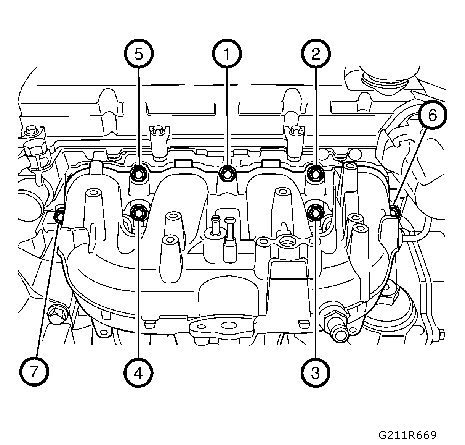
1. Refer to Fastener Caution.
Install the intake manifold and tighten to 25 Nm (18 lb ft).
2. Install the fuel feed pipe metal.
3. Install the fuel feed pipe.
4. Install the intake manifold brace.
5. Install the charge air cooler outlet air hose.
6. Install the oil level indicator and tube.
7. Install the turbocharger control solenoid valve.
8. Install the manifold absolute pressure sensor.
9. Install the power brake booster vacuum pipe.
10. Install the evaporative emission canister purge solenoid valve.
11. Install the engine sight shield.