Removal and Installation
REMOVAL1. RUN ENGINE AT IDLE SPEED WITH A/C ON FOR APPROX. 10 MINUTES
2. STOP ENGINE
3. DISCONNECT NEGATIVE (-) TERMINAL CABLE FROM BATTERY
4. DISCHARGE REFRIGERANT FROM REFRIGERATION SYSTEM
5. REMOVE DRIVE BELT
6. DISCONNECT CRUISE CONTROL ACTUATOR CONNECTOR
7. REMOVE 3 CRUISE CONTROL ACTUATOR SET BOLTS
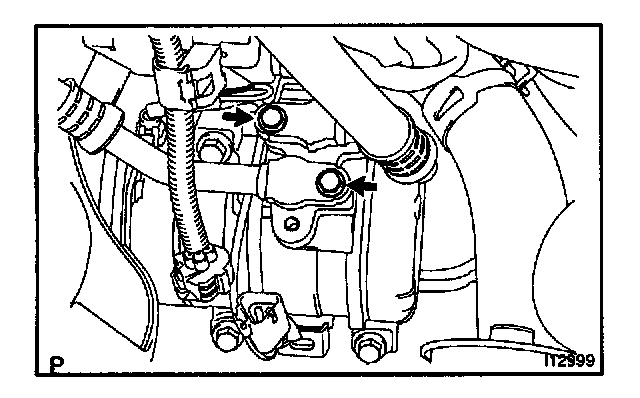
8. DISCONNECT DISCHARGE AND SUCTION HOSES
Remove the 2 bolts and disconnect the both hoses.
NOTE: Cap the open fittings Immediately to keep moisture or dirt out of the system.
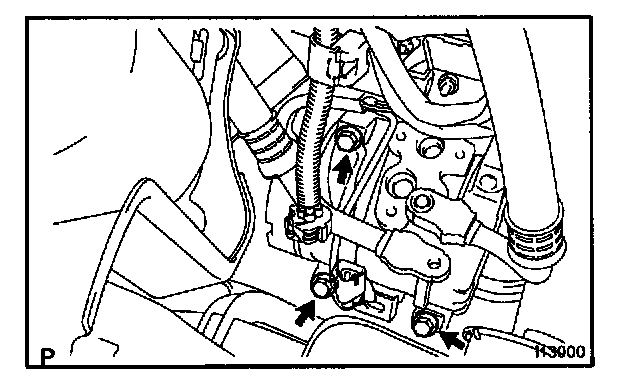
9. REMOVE COMPRESSOR
a. Disconnect the connector.
b. Disconnect the wire harness clamp.
c. Remove the 3 bolts and compressor.
INSTALLATION
1. INSTALL COMPRESSOR
a. Install the compressor with 3 bolts.
Torque: 25 Nm (250 kg.cm, 18 ft.lb)
b. Connect the connector.
2. CONNECT DISCHARGE AND SUCTION HOSES
a. Lubricate 2 new O-rings with compressor oil and install them to the hoses.
b. Connect the both hoses with 2 bolts.
Torque: 10 Nm (100 kg.cm, 7 ft.lb)
NOTE: Hose should be connected immediately after the caps have been removed.
3. INSTALL 3 CRUISE CONTROL ACTUATOR SET BOLTS
4. CONNECT CRUISE CONTROL ACTUATOR CONNECTOR
5. INSTALL AND CHECK DRIVE BELT
6. CONNECT NEGATIVE (-) TERMINAL CABLE TO BATTERY
7. EVACUATE AIR FROM REFRIGERATION SYSTEM CHARGE SYSTEM WITH REFRIGERANT
Specified amount: 430 ± 30 g (15.17 ± 1.06 oz.)
8. INSPECT FOR LEAKAGE OF REFRIGERANT
Using a gas leak detector, check for leakage of refrigerant.
If there is leakage, check the tightening torque at the joints.
9. INSPECT A/C OPERATION