Accessory Control Display: Service and Repair
REMOVAL1. EJECT MAP DISC
a. Turn the ignition switch on (ACC).
b. Push the "CLOSE" button.
c. Touch "MAP EJECT" on the navigation screen to eject the map disc.
2. REMOVE SHIFT LEVER KNOB SUB-ASSEMBLY (for Automatic Transaxle)
3. REMOVE SHIFT LEVER KNOB SUB-ASSEMBLY (for Manual Transaxle)
4. REMOVE NO. 1 INSTRUMENT CLUSTER FINISH PANEL GARNISH
5. REMOVE NO. 2 INSTRUMENT CLUSTER FINISH PANEL GARNISH
6. REMOVE FLOOR SHIFT POSITION INDICATOR HOUSING SUB-ASSEMBLY (for Automatic Transaxle)
7. REMOVE UPPER CONSOLE PANEL (for Manual Transaxle)
8. REMOVE UPPER CONSOLE REAR PANEL SUBASSEMBLY (for Automatic Transaxle)
9. REMOVE UPPER CONSOLE REAR PANEL SUBASSEMBLY (for Manual Transaxle)
10. REMOVE UPPER CONSOLE PANEL SUB-ASSEMBLY
11. REMOVE INSTRUMENT PANEL NO. 2 REGISTER ASSEMBLY
12. REMOVE NAVIGATION RECEIVER WITH HEATER CONTROL PANEL ASSEMBLY
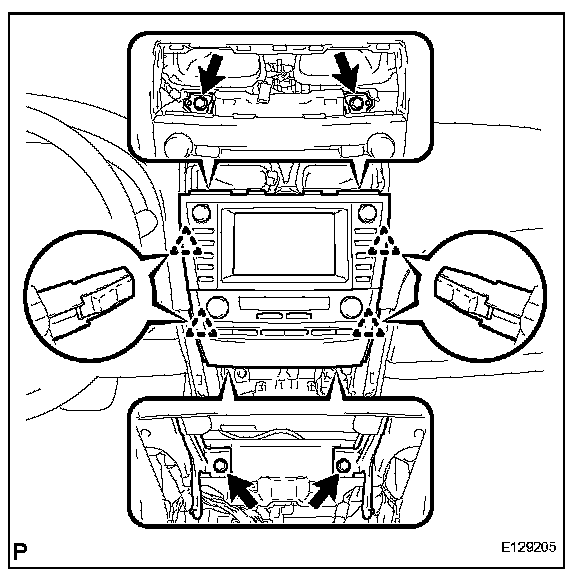
a. Remove the 4 bolts.
b. Pull the navigation receiver with heater control panel assembly toward the rear of the vehicle and disengage the 4 clips.
c. Disconnect each connector and remove the navigation receiver with heater control panel assembly.
13. REMOVE RADIO NO. 1 BRACKET
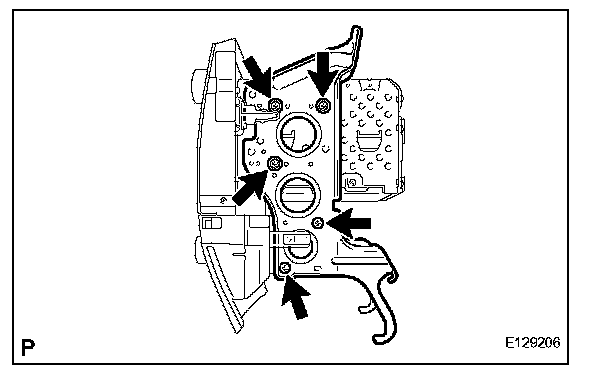
a. Remove the 5 bolts and radio No. 1 bracket.
14. REMOVE RADIO NO. 2 BRACKET
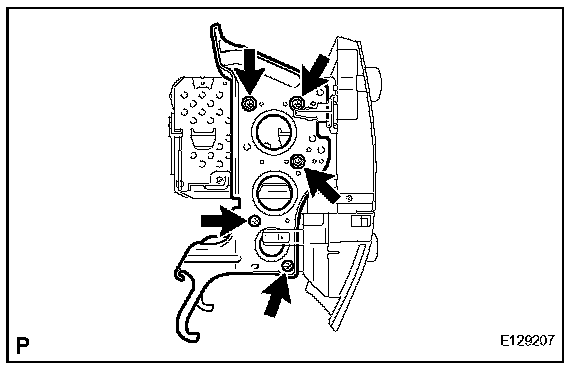
a. Remove the 5 bolts and radio No. 2 bracket.
15. REMOVE NAVIGATION RECEIVER ASSEMBLY
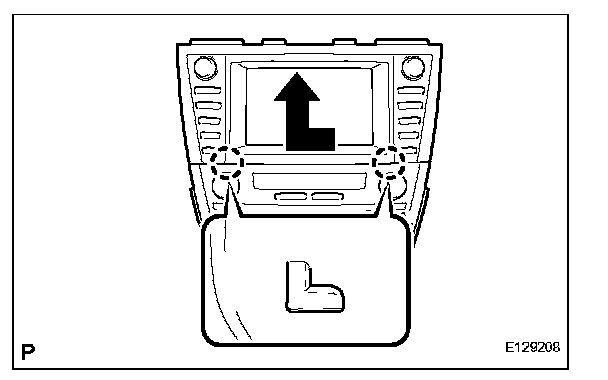
a. Remove the navigation receiver assembly as shown in the illustration.
INSTALLATION
1. INSTALL NAVIGATION RECEIVER ASSEMBLY
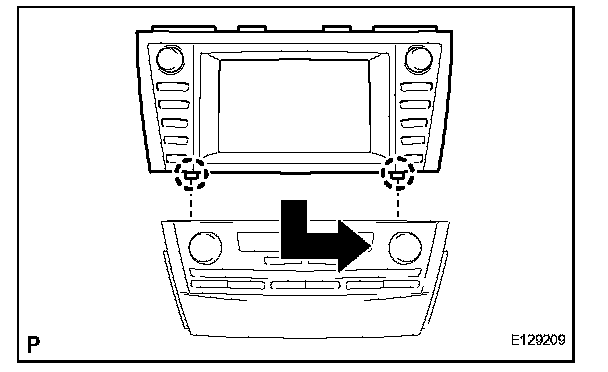
a. Install the navigation receiver assembly as shown in the illustration.
2. INSTALL RADIO NO. 2 BRACKET
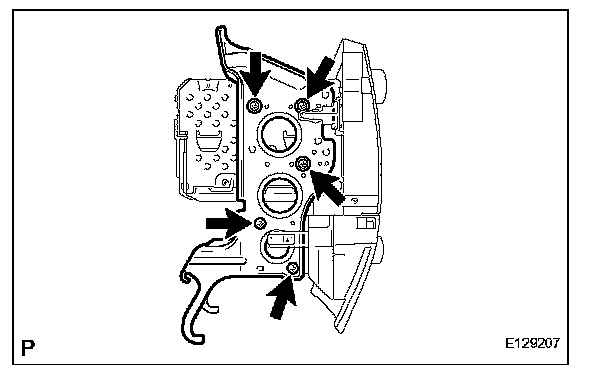
a. Install the radio No. 2 bracket with the 5 bolts.
3. INSTALL RADIO NO. 1 BRACKET
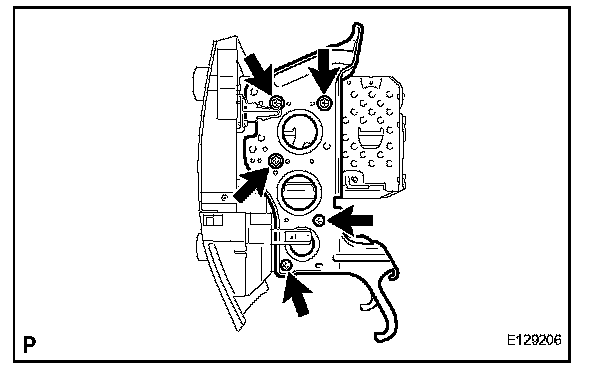
a. Install the radio No. 1 bracket with the 5 bolts.
4. INSTALL NAVIGATION RECEIVER WITH HEATER CONTROL PANEL ASSEMBLY
a. Connect each connector.
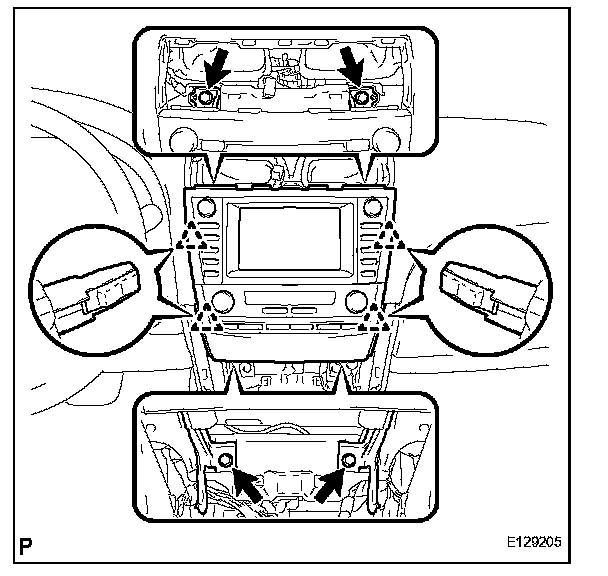
b. Engage the 4 clips.
c. Install the navigation receiver with heater control panel assembly with the 4 bolts.
5. INSTALL INSTRUMENT PANEL NO. 2 REGISTER ASSEMBLY
6. INSTALL UPPER CONSOLE PANEL SUB-ASSEMBLY
7. INSTALL UPPER CONSOLE REAR PANEL SUBASSEMBLY (for Automatic Transaxle)
8. INSTALL UPPER CONSOLE REAR PANEL SUBASSEMBLY (for Manual Transaxle)
9. INSTALL FLOOR SHIFT POSITION INDICATOR HOUSING SUB-ASSEMBLY (for Automatic Transaxle)
10. INSTALL UPPER CONSOLE PANEL (for Manual Transaxle)
11. INSTALL NO. 2 INSTRUMENT CLUSTER FINISH PANEL GARNISH
12. INSTALL NO. 1 INSTRUMENT CLUSTER FINISH PANEL GARNISH
13. INSTALL SHIFT LEVER KNOB SUB-ASSEMBLY (for Automatic Transaxle)
14. INSTALL SHIFT LEVER KNOB SUB-ASSEMBLY (for Manual Transaxle)
15. INSERT MAP DISC