Windshield Assembly Overview
Windshield Assembly Overview
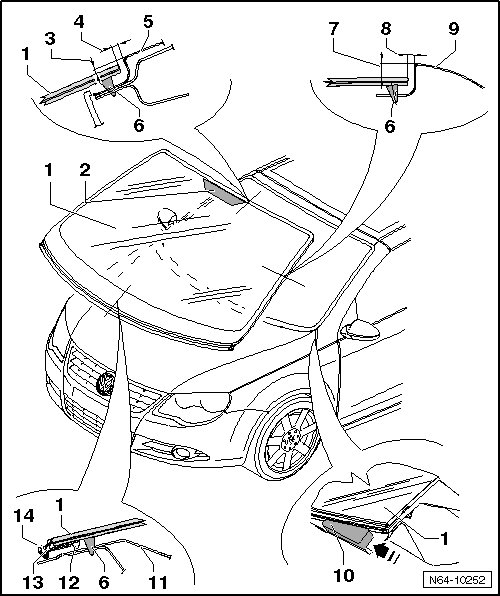
1 Windshield
• Remove the windshield, Refer to => [ Windshield, Removing ] Windshield, Removing
• Windshield, Installing, Refer to => [ Windshield, Installing ] Windshield, Installing
2 Communication window
• Only with tinted glass
• There is no infrared reflecting coating in this area, it serves to fulfill function of electronic components installed as retail accessories.
3 Height dimension
• From window surface to upper edge of the windshield frame
• Set a constant dimension of 2.5 mm using the adjustment gauge (3371)
4 Gap dimension
• From window edge to the windshield frame
• Set a constant dimension of 2.5 mm using the adjustment gauge (3371)
5 Windshield frame body flange
6 PUR adhesive sealant
• Bead diameter: width = 7 mm, height = 11 mm (including pre-coating, residual material on window glass and window flange)
• Minimum curing time, Refer to => [ Minimum Curing Time ] Minimum Curing Time
7 Height dimension
• From window surface to upper edge of A-pillar
• Set a constant dimension of 8 mm using the adjustment gauge (3371)
8 Gap dimension
• From the window edge to A-pillar
• Set a constant dimension of 2.5 mm using the adjustment gauge (3371)
9 A-pillar body flange
10 Adjustment aid
• 443 845 631 A
• Only for installation, is removed after adhesive cures.
11 Windshield frame body flange
12 Spacer
• Is a part of the windshield
13 Retainer
• Is a part of the windshield
14 Plenum chamber cover
• Must only be pulled out of binding profile by hand.