A/C Compressor Sub-Assembly
A/C Compressor Sub-Assembly
Special tools, testers and auxiliary items required
• Torque wrench (V.A.G 1331/) (or 5-50 Nm equivalent)
• The auxiliary component bracket for A/C compressor and ancillary parts can be removed and installed without opening the refrigerant circuit.
• To remove ribbed belt:
• Position of ribbed V-belt => [ Ribbed Belt Routing ]
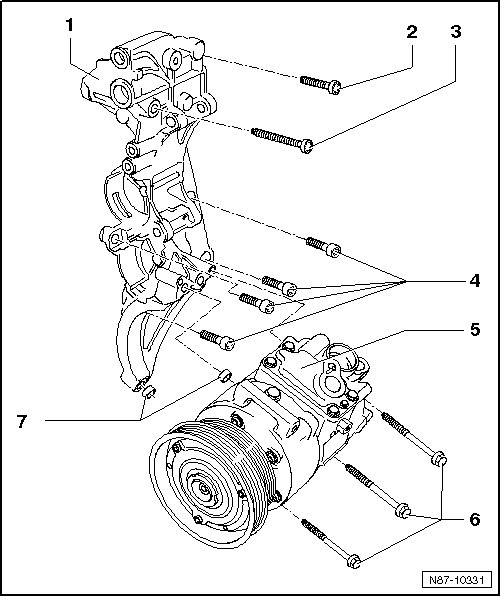
1 Auxiliary component bracket for generator and A/C compressor
• No. on auxiliary component bracket (07K 903 143 B )
Removing
- Loosen A/C compressor, unscrew hex-bolts - 6 -. Remove A/C compressor from auxiliary component bracket and secure to body with appropriate material (e.g. welding wire) => [ Securing A/C compressor to body ]
- Remove bolts from auxiliary component bracket.
2 Multi-point socket head M8X60
• 25 Nm
3 Multi-point socket head M8X110
• 25 Nm
4 Hex socket head M8X30
• 25 Nm
• Qty. 4
5 A/C Compressor
• Removing and installing => [ A/C Compressor ] A/C Compressor
6 Hex bolts M8x85
• Qty. 3
• 25 Nm
7 Dowel sleeves
• Qty. 2
• Ensure proper seating between auxiliary component bracket and A/C compressor
Securing A/C compressor to body
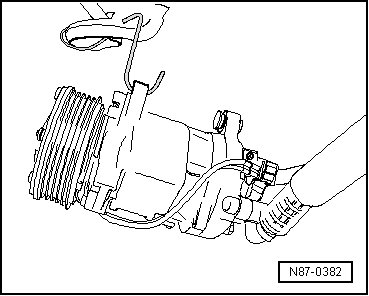
If A/C compressor is removed and refrigerant circuit not opened, A/C compressor must be secure to body using appropriate material, a welding wire for example.
Make sure the refrigerant lines on the A/C compressor remain free of tension.
Ribbed Belt Routing
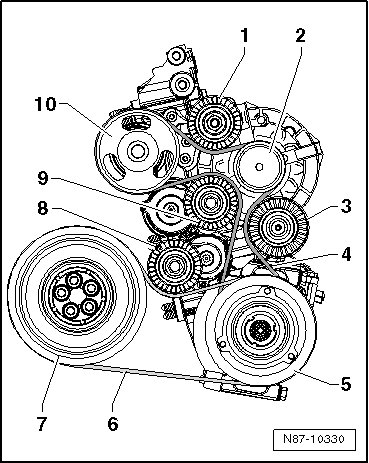
1. Idler roller, top
2. Ribbed belt pulley - generator
3. Idler roller, bottom
4. Ribbed belt for generator and coolant pump
5. Ribbed belt pulley - A/C compressor
6. Ribbed belt for A/C compressor
7. Ribbed belt pulley - crankshaft
8. Tensioning roller for ribbed belt - A/C compressor
9. Tensioning roller for ribbed belt - generator and coolant pump
10. Ribbed belt pulley - refrigerant pump