EVAP Purge Regulator Valve, Checking
Diagnostic Procedures
EVAP Purge Regulator Valve, Checking
Special tools, testers and auxiliary items required
• multimeter.
• Wiring diagram.
Test requirements
• The Evaporative Emission (EVAP) Canister Purge Regulator Valve (N80) fuse OK.
• The ignition switched off.
• Voltage for the Evaporative Emission (EVAP) Canister Purge Regulator Valve (N80) is supplied via the Engine Component Power Supply Relay (J757).
Test procedure
- Perform a preliminary check to verify the customers complaint. Refer to => [ Preliminary Check ] Preliminary Check
Start diagnosis
etc.)
- Remove the engine cover with air filter. Refer to the repair information.
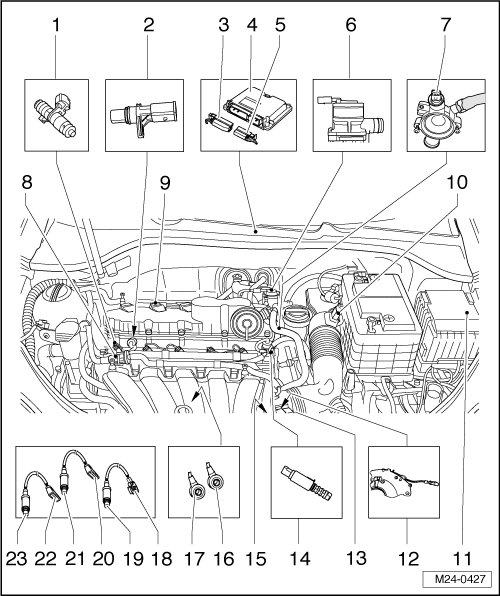
- Disconnect the Evaporative Emission (EVAP) Canister Purge Regulator Valve (N80) electrical harness connector - 8 -.
Checking internal resistance
- Using a multimeter, check the Evaporative Emission (EVAP) Canister Purge Regulator Valve (N80) terminals 1 and 2 for resistance.
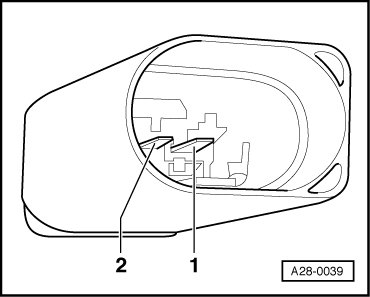
Specified value: 15.0 to 25.0 ohms.
If the specified value was Not obtained:
- Replace the Evaporative Emission (EVAP) Canister Purge Regulator Valve (N80).
If the specification is obtained:
Checking voltage supply
- Using a multimeter, check the purge valve electrical harness connector terminal 1 to 2 for voltage.
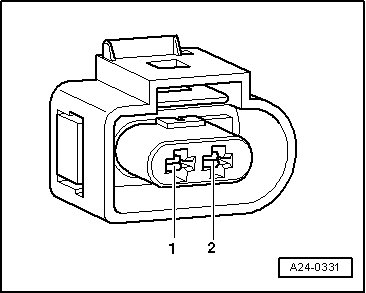
- Turn ignition switch ON.
Specified value: 10.6 volts +/- 2 volts.
If the specified value was Not obtained:
- Leave the multimeter positive lead on terminal 1 and connect the multimeter negative lead to engine ground.
- Ignition switch ON.
Specified value: Near battery voltage.
If the specified value was Not obtained:
- Remove fuse 24 in Fuse panel B. Check the wire from the electrical harness connector terminal 1 to fuse 24 in Fuse panel B for open or high resistance.
- Check the electrical harness connector for damage, corrosion, loose or broken terminals.
- If necessary, repair the wiring connection.
If the specified value was obtained:
Check Ground (GND) activation
If the manufacturers test box is being used, perform the following step.
- Install the test box.
If the manufacturers test box is not being used, perform the following step.
- Remove the Motronic Engine Control Module (ECM) ( J623). Refer to the repair information.
- Using a multimeter, check the Evaporative Emission (EVAP) Canister Purge Regulator Valve (N80) electrical connector terminal 2 to Motronic Engine Control Module (ECM) (J623 ) electrical connector T60 terminal 32 for an open circuit.
Specified value: 1.5 ohms max.
If the specified value was Not obtained:
- Check the wiring for a short to voltage, high resistance or an open circuit.
- Check the electrical harness connector for damage, corrosion, loose or broken terminals.
- If necessary, repair the wiring connection.
If the specified value was obtained:
- Replace the Motronic Engine Control Module (ECM) (J623). Refer to the repair information.
- Install the engine cover with air filter. Refer to the repair information.
Final procedures
After the repair work, the following work steps must be performed in the following sequence:
1. Check the DTC memory. Refer to => [ Diagnostic Mode 03 - Read DTC Memory ] Scan Tool Testing and Procedures.
2. If necessary, erase the DTC memory. Refer to => [ Diagnostic Mode 04 - Erase DTC Memory ] Scan Tool Testing and Procedures.
3. If the DTC memory was erased, generate readiness code. Refer to => [ Readiness Code ] Monitors, Trips, Drive Cycles and Readiness Codes.