Front Interior Lamp
Front Interior Lamp
Special tools, testers and auxiliary items required
• Removal Wedge (3409)
The following components are integrated in the front interior light, depending on equipment:
• Front Interior Lamp Button (E326)
• Driver Reading Lamp Button (E457)
• Front Passenger Reading Lamp Button (E458)
• Front Interior Lamp (W1)
• Left Center Reading Light (W39)
• Right Center Reading Light (W40)
• Tilt Sunroof Button 1 (E582)
• Sunroof Switch Illumination (L65)
• Telephone Microphone (R38)
• When removing and installing components in a visible area (switches, covers, trim, etc.), mask off the areas at which a prying tool ( (3409) , screwdriver) will be positioned, using commercially available adhesive tape.
• The following illustrations show how to removed and install the front interior lamp in a vehicle with a panorama glass roof. The same procedure is used to remove and install the front interior lamp on vehicles without the panorama glass roof.
Removing
- Switch off the ignition and all electrical consumers and move the ignition key or start button into the 0 position (preliminary engaged position).
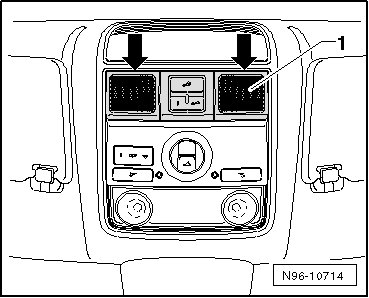
- Carefully pry the trim - 1 - out at the retainers - arrows -.
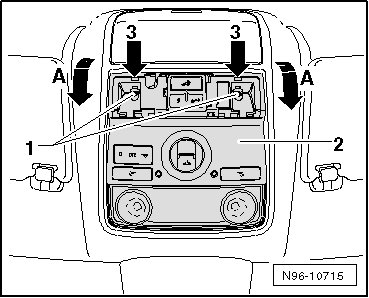
- Remove the bolts - 1 -, release the retaining tabs - 3 arrows - and remove the interior lamp - 2 - from the headliner in the - direction of arrow A -. Be careful of the connected wires.
- Release and disconnect the connectors - 1 -, - 2 - and - 3 -.
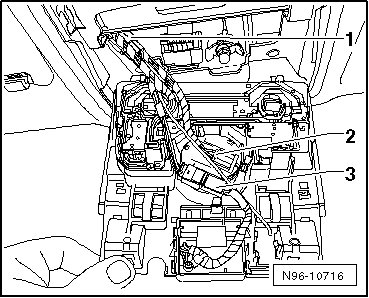
- Remove front interior light.
Installing
Install in reverse order of removal.