Power and Ground Distribution: Testing and Inspection
No Response from Totally Integrated Power Module
For a complete wiring diagram, refer to.
Test Step 1 - Test for Intermittent Condition
• Turn the ignition on.
• Ensure the IOD fuse is installed and battery voltage is between 10.0 and 16.0 volts.
• Ensure the scan tool is updated to the latest software.
• If the scan tool displays any error messages involving the Diagnostic CAN C circuits, diagnose and repair the error message before proceeding.
• A loss of communication with the TIPM can cause the ECU View button on the scan tool to be inoperative.
• With the scan tool, attempt to select ECU View.
Can the scan tool communicate with the TIPM?
Yes
• The no response condition is not present at this time. Using the wiring diagram/schematic as a guide, inspect the wiring for chafed, pierced, pinched, and partially broken wires and the wiring harness connectors for broken, bent, pushed out, and corroded terminals.
No
• Go to Test Step 2
Test Step 2 - Fused B (+) Circuits Open at TIPM
• Disconnect the scan tool from the DLC.
• Using a test lamp connected to ground, and using the wiring diagram as a guide, check all fused B (+) circuits at the TIPM.
Does the test lamp illuminate brightly for each circuit?
Yes
• Go to Test Step 3
No
• Repair the fused B(+) circuit for an open or short.
• Perform the Body Verification Test. Refer to => [ Body Verification Test ] Body Interior.
Test Step 3 - Fused Ignition Switch Output Circuits Open at TIPM
• Turn the ignition on.
• Using a test lamp connected to ground, and using the wiring diagram as a guide, check each fused ignition switch output circuit at the TIPM.
Does the test lamp illuminate brightly for each circuit?
Yes
• Go to Test Step 4
No
• Repair the fused ignition switch output circuit for an open.
• Perform the Body Verification Test. Refer to => [ Body Verification Test ] Body Interior.
Test Step 4 - Ground Circuits Open at TIPM
• Turn the ignition off.
• Using a test lamp connected to 12 volts, and using the wiring diagram as a guide, check all ground circuits at the TIPM.
Does the test lamp illuminate brightly on each circuit?
Yes
• Go to Test Step 5
No
• Repair the ground circuit that did not light the test lamp for an open.
• Perform the Body Verification Test. Refer to => [ Body Verification Test ] Body Interior.
Test Step 5 - Check for Diagnostic CAN C (+) Circuit Open at DLC
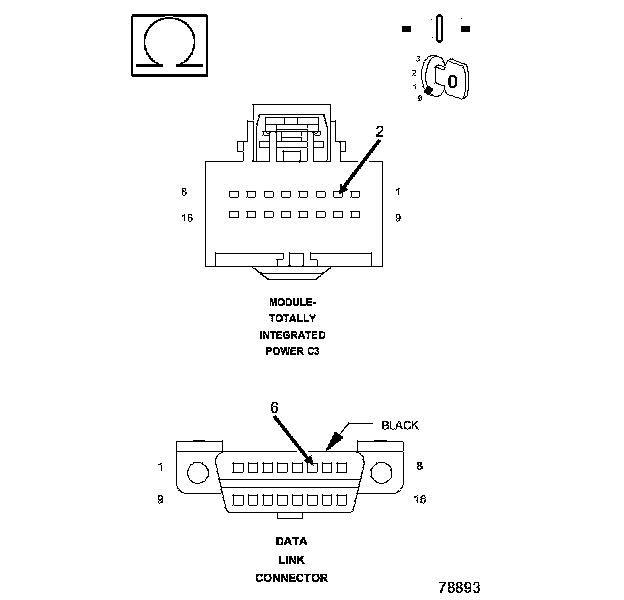
• Disconnect the TIPM C3 harness connector.
• Measure the resistance on the diagnostic CAN C (+) circuit between the TIPM C3 harness connector and the DLC.
Is the resistance more than 10.0 ohms?
Yes
• Repair the diagnostic CAN C (+) circuit for an open.
• Perform the Body Verification Test. Refer to => [ Body Verification Test ] Body Interior.
No
• Go to Test Step 6
Test Step 6 - Check for Diagnostic CAN C (-) Circuit Open at DLC
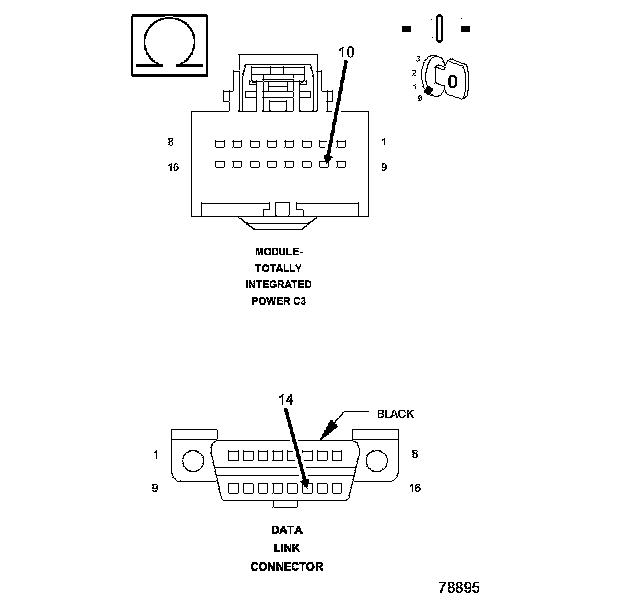
• Measure the resistance on the diagnostic CAN C (-) circuit between the TIPM C3 harness connector and the DLC.
Is the resistance more than 10.0 ohms?
Yes
• Repair the diagnostic CAN C (-) circuit for an open.
• Perform the Body Verification Test. Refer to => [ Body Verification Test ] Body Interior.
No
• Go to Test Step 7
Test Step 7 - Check for Diagnostic CAN C Circuits Shorted Together
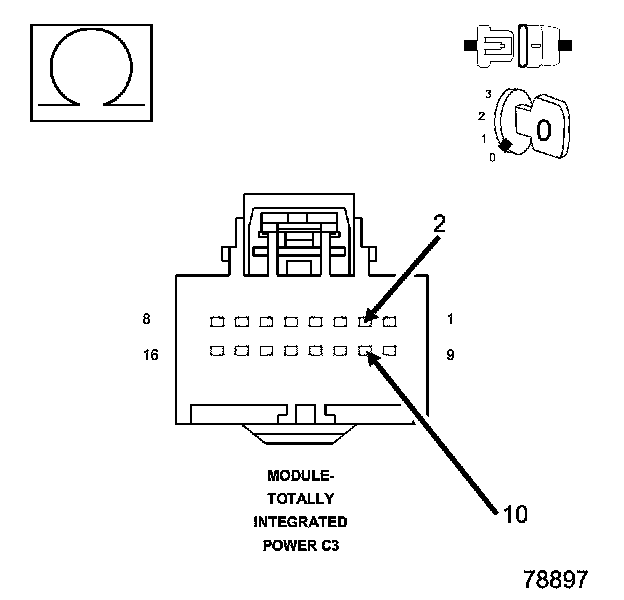
• Measure the resistance between the diagnostic CAN C (+) circuit and the diagnostic CAN C (-) circuit at the TIPM C3 harness connector.
Is the resistance less than 100.0 ohms?
Yes
• Repair the diagnostic CAN C (+) circuit for a short to the diagnostic CAN C (-) circuit.
• Perform the Body Verification Test. Refer to => [ Body Verification Test ] Body Interior.
No
• Replace the TIPM.
• Perform the Body Verification Test. Refer to => [ Body Verification Test ] Body Interior.