Fuel Filter: Service and Repair
Suction Jet Pump, Fuel Filter and Pressure Relief Valve
Special tools, testers and auxiliary items required
• Wrench (T10202)
• Torque Wrench (40-200 Nm) (V.A.G 1332)
• On All Wheel Drive (AWD) vehicles, the fuel must be pumped out of the fuel level sensor 2 area and to the fuel delivery unit due to the shape of the fuel tank. A suction jet pump, pumps the fuel from the left chamber to the right chamber in the fuel tank.
• The fuel delivery unit must be removed first, in order to remove the suction jet pump.
• The left flange consists of the suction jet pump, fuel filter, pressure relief valve and fuel level sensor 2. Only the fuel level sensor 2 can be replaced separately.
• Only check the fuel level sensor 2 if the engine shuts off due to low fuel but the fuel gauge indicates the tank is still 1/4 full.
Removing
- Remove the rear seat bench.
- Remove the fuel delivery unit. Refer to => [ Fuel Delivery Unit ] Fuel Delivery Unit.
- Remove left cover (when viewed from the direction of travel) from the fuel level sensor 2.
- First, pull on the connector without pressing the retainer to make sure it is connected securely. If the connector was not connected correctly, it could cause a fault.
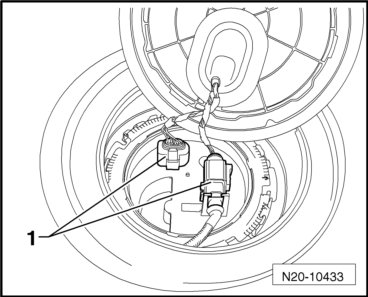
- Disconnect the connector - 1 - from the left flange.
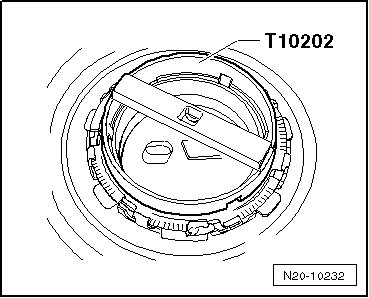
- Remove the lock ring using the wrench (T10202).
- Lift the flange slightly and remove the seal from the fuel tank opening.
- Remove the flange from the fuel tank together with the fuel level sensor 2.
- Check the fuel lines for kinks and damage.
- Check the suction jet pump and the fuel tank for any contamination.
Installing
Do not bend the fuel level sensor 2 float arm when installing.
- Insert the flange in the fuel tank together with the fuel level sensor 2. The tab on the flange faces in the direction of travel.
- Route the fuel lines in the right chamber of the fuel tank so they are not kinked.
- Insert a new, dry seal into the fuel tank opening. Only coat the inner side that comes into contact with the flange with fuel.
- Note the fuel level sensor 2 installed position. Refer to => [ Installed Position of the Fuel Delivery Unit Flange and Fuel Level Sensor 2 ] Fuel Tank and Attachments Overview.
- Make sure the seal is in the correct location.
- Install the lock ring using the wrench (T10202). Tightening specification: 110 Nm.
- Connect the connector - 1 - and pull on it to make sure it is connected securely.
- Install the fuel delivery unit. Refer to => [ Fuel Delivery Unit ] Fuel Delivery Unit.
The rest of the installation follows the reverse of the removal procedure.